VirtualMV/Flash12 (CS6)/Journal/Toggle sound using buttons
| Flash12 (CS6) | ||
|---|---|---|
| Overview | What is Flash? | Resources | History | Quick reference | Upgrading | Design Examples | Journal | Troubleshooting | |
| Basics | Media Basics | Text | Graphics | Animation ( Timeline | Classic tween | Shape tween | Object tween | Motion guide | Movie clip ) | Audio | Video | |
| Text | Scrollbox | Stop Movie | Importing HTML | TLF Features | |
| Graphics | Spraybrush and Art Deco Tool | Fast Loading Photo Album | |
| Audio and Video | Audio ( Adding Sound to a button | Toggle Background Music | Toggle sound using buttons ) | Video ( Advanced Techniques | Alpha Channels | Video Resources ) | |
| Animation | Complex Animation | Mouth Animation | |
| Navigation | Introduction | Joke Book ( Adding Buttons ) | Journal Navigation | |
By the end of this page you will be able to:
- Toggle Sound on and off by using a button and ActionScript 2
}}
Dynamic Sound
In this exercise we will utilize the inbuilt Sound Class in Flash to dynamically load the sound file and the on/off buttons to play and stop it. You can wrap the entire exercise into a movieClip for inclusion in any project.
Setting the Stage
Create a new ActionScript 2 Movie. Click Insert > New Symbol > Give it a name of soundMovie, make it a movieClip > Click OK.
Within this newly created movieClip, we are going to create the buttons, write all the actionScript and load the sound.
With soundMovie open, create 4 layers. Name each one as follows:
- Background
- Buttons
- ActionScript
- Labels
With the background layer selected, draw a shape, just to give it some dimension, a rectangle of a similar size to the buttons you will eventually use is ideal. Lock this layer. Delete from the stage. We will open this and use again shortly.
Import the Sound file
Import a sound file to the library. Open your Library panel (Ctrl+L), locate and right click on your sound file. Click properties. In the advanced section of the properties panel, in the identifier text box enter coolsound and tick the "Export for ActionScript" and "Export in first frame" options under Linkage.
This gives the sound file in the library an identifier without it actually being used in the movie timeline. This enables it to be called and used by ActionScript code.
Create the Buttons
Create two similar buttons, one for use with turning the sound on, and one for turning the sound off. You can use ones from the components library, or create them yourself. They too can be deleted from the stage. We will use them later also.
The ActionScript
Return to the library and open the movieClip you created before.(soundMovie).
Create 3 keyframes on each of the Buttons, ActionScript and Labels layers.
With the labels layer selected, click on frame two, and give it a label "play". On frame three, label it "stop". Lock the layer.
With the ActionScript layer selected, click on Frame One and insert the following ActionScript:
my_sound = new Sound();
my_sound.attachSound("coolsound");
play();
This is to create an instance of the Sound Class whose source is coolsound (the identifier you gave it). On Keyframes two and three give them the stop(); action. Lock the Layer.
With the Buttons layer selected, select frame two, and insert from the library, the button you wish to use to turn on the sound. Then do the same on frame three and insert the button you wish to use to turn off the sound. Line the buttons up so they are in exactly the same position.
With the button on frame two selected, open the actions panel and insert the following ActionScript:
on (release) {
my_sound.start(0,1000);
gotoAndStop("stop");
}
On clicking the play button, the sound instance starts to play and the timeline goes to and displays the stop button in the "stop" frame. The optional parameters (0,1000) specifies that the sound file starts playing at 0 milliseconds and is looped 1000 times (any number can be inserted here).
Select the off button on Frame three, open the actions panel and paste in the following ActionScript:
on (release) {
my_sound.stop();
gotoAndStop("play");
}
On clicking the stop button, the sound instance stop playing and the timeline goes and displays the start button in the "play" frame. Lock the Buttons layer.
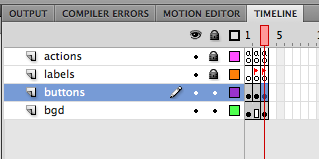
Your timeline, inside the soundMovie movieclip, should look like this:
Return to the main movie. Drag your newly created soundMovie onto the stage, from the library. There you have it, a self-contained movieclip with sound toggling buttons with the appearance of only using one button to turn the sound on and off.
Test your movie.
 References
|
virtualMV | Superquick wiki guide | Please give me some feedback |
VirtualMV/Flash12 (CS6)/Journal/Toggle sound using buttons. (2025). In WikiEducator/VirtualMV wiki. Retrieved February 28, 2025, from http:https://wikieducator.org/VirtualMV/Flash12_(CS6)/Journal/Toggle_sound_using_buttons (zotero)
|
