VirtualMV/Flash12 (CS6)/Journal/Joke Book/Adding Buttons
| Flash12 (CS6) | ||
|---|---|---|
| Overview | What is Flash? | Resources | History | Quick reference | Upgrading | Design Examples | Journal | Troubleshooting | |
| Basics | Media Basics | Text | Graphics | Animation ( Timeline | Classic tween | Shape tween | Object tween | Motion guide | Movie clip ) | Audio | Video | |
| Text | Scrollbox | Stop Movie | Importing HTML | TLF Features | |
| Graphics | Spraybrush and Art Deco Tool | Fast Loading Photo Album | |
| Audio and Video | Audio ( Adding Sound to a button | Toggle Background Music | Toggle sound using buttons ) | Video ( Advanced Techniques | Alpha Channels | Video Resources ) | |
| Animation | Complex Animation | Mouth Animation | |
| Navigation | Introduction | Joke Book ( Adding Buttons ) | Journal Navigation | |
By the end of this exercises you should be able to:
|
Adding Buttons and adding some ActionScript
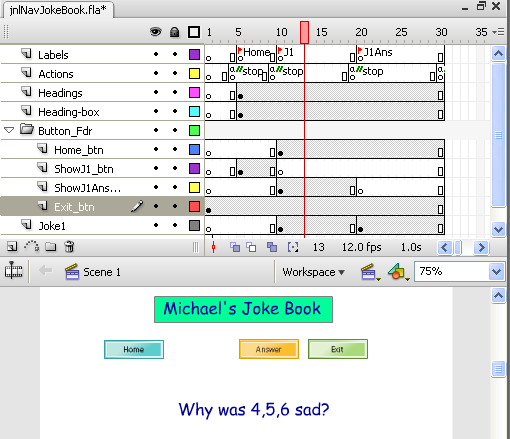
1. Create a Layer for the home button, name it Home_btn.
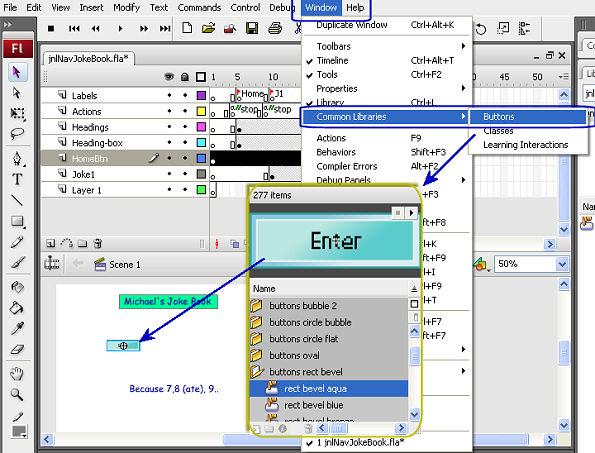
2. Now select Window > Common Libraries > Buttons .. select a button style you like (there are folders to expand), then drag it onto the stage.
3. Click on the actual button on the stage to select it (this is important!). Now double click, or Right click and “Edit in New Window”. This will open up the button symbol and allow you to edit pieces (You created your own symbols in earlier parts of this book).
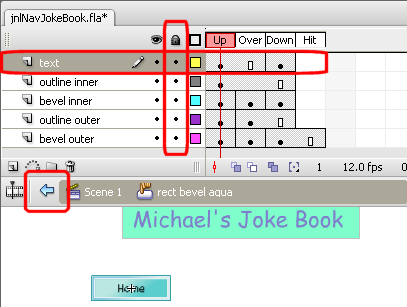
4. If there is a lock showing in the text Layer, click on it to allow this Layer to be edited.
5. Now double click on the text (which is probably the word Enter), And change the text to Home. You may also want to change the text properties to make the text easier to read. {You can also Click on Text tool, then click on the text}
6. When you have finished playing with the button, either
- use the big blue back arrow (next to the word timeline if you double clicked - shown in the diagram below), or
- Close the tab (x on right of tab pane)
the button should read Home now
And you should be back to the Joke Book.
7. Clear the frames 1-9 (of the Home_Btn Layer) - Why???
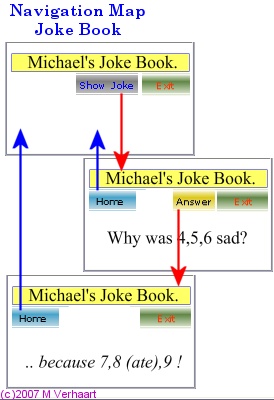
8. Slide the Playback head so that the [Home] button is on the stage
9. With the Selection Tool chosen, Click on the [Home] button ON THE STAGE. We are going to add some ActionScript onto the button.
10. Press [F9] to open the Action Panel
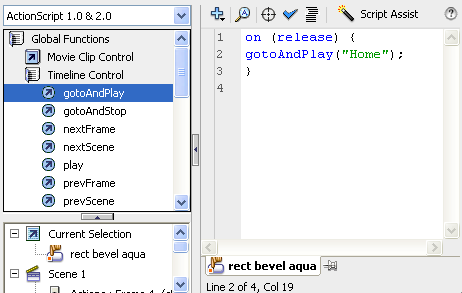
11. Choose “Global Functions | Movie Clip Control”, and double click “on”, use the popup to choose release (double-click). What you are instructing the button to do is when someone clicks and releases the button to….do something. So, Move your cursor to before the } and we will now enter some instructions..
12. We want the movie to go to the label start and play from there. So, select Global Functions | Timeline control and choose gotoAndPlay and in the () type in “Home” (include the quotes). The code should look like that shown
13. Press [F9] to return to the stage.
You have now added the instructions for the home button to your movie.
14. Following the same steps, and add the code for the other buttons. Add the [Show Joke] button to the Layer Joke1Btn containing joke1_btn Add the [Answer] button to the Layer Answer1Btn, containing answer1_btn
15. Add the [Exit] button,
For the ActionScript of the Exit button (exit_btn in layer ExitBtn) use
on (press) {
 fscommand("quit");
}
Note: this will only work when Flash is an exe file (It doesn't make sense in an html browser).
Tidy up the buttons and place in a folder
16. Right Click on the layer above the first button, and Insert Folder (call it Button_fdr)
17. Now drag each of the button layers into this folder.
This means that as your movie grows you can collapse the folder of buttons to make the timeline easier to read.
Save, Test and Publish your document
1. Save jnlNavJokeBk.fla
2. Test ([Ctrl]+[Enter]) and Publish the flash document.
Task: Create a joke book!
1. Add two more jokes to your joke book. (you may like to visit http://www.azkidsnet.com )
a. Add J2 and J2Ans, and J3 and J3Ans
b. Add stop commands
c. Change [Show Joke] Button to [Joke 1], add two further buttons [Joke 2] and [Joke 3]
d. Etc…
 References
|
virtualMV | Superquick wiki guide | Please give me some feedback |
VirtualMV/Flash12 (CS6)/Journal/Joke Book/Adding Buttons. (2025). In WikiEducator/VirtualMV wiki. Retrieved February 18, 2025, from http:https://wikieducator.org/VirtualMV/Flash12_(CS6)/Journal/Joke_Book/Adding_Buttons (zotero)
|
