VirtualMV/Flash12 (CS6)/Basic/Text
| Flash12 (CS6) | ||
|---|---|---|
| Overview | What is Flash? | Resources | History | Quick reference | Upgrading | Design Examples | Journal | Troubleshooting | |
| Basics | Media Basics | Text | Graphics | Animation ( Timeline | Classic tween | Shape tween | Object tween | Motion guide | Movie clip ) | Audio | Video | |
| Text | Scrollbox | Stop Movie | Importing HTML | TLF Features | |
| Graphics | Spraybrush and Art Deco Tool | Fast Loading Photo Album | |
| Audio and Video | Audio ( Adding Sound to a button | Toggle Background Music | Toggle sound using buttons ) | Video ( Advanced Techniques | Alpha Channels | Video Resources ) | |
| Animation | Complex Animation | Mouth Animation | |
| Navigation | Introduction | Joke Book ( Adding Buttons ) | Journal Navigation | |
Overview
By the end of this exercises you should be able to:
|
To illustrate the basic steps of creating any Flash document, this page guides you through the process in a simple tutorial. This short tutorial is just a sample of the Flash workflow. The first step is to create a new document in Flash.
To create a new Flash document:
If you have just opened flash
1a. In the center panel select Flash File (ActionScript 2.0)
Otherwise
1b. Select File > New. In the New Document dialog box, select Flash File (ActionScript 2.0). Click OK.
2. Just in case someone has played around in Flash before, let’s reset the layout to the Classic one.
Select Window > Workspace > Classic (or use the drop button at the top of right of the screen).
You can use Essentials but the layout will be a little different.
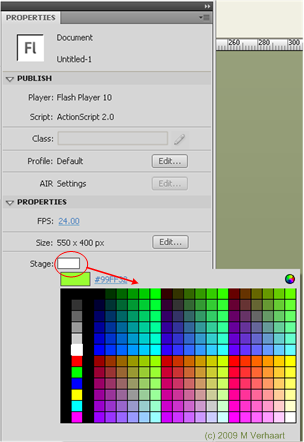
In the Property inspector, the Size button displays the current Stage size setting as 550 x 400 pixels.
(If the Property inspector does not show you may need to Select Window > Properties )
3. The Background color swatch is set to white. You can change the color of the Stage by clicking the Background button, and selecting a different color.
Adding text to the stage
This short tutorial illustrates how to add text to the stage.
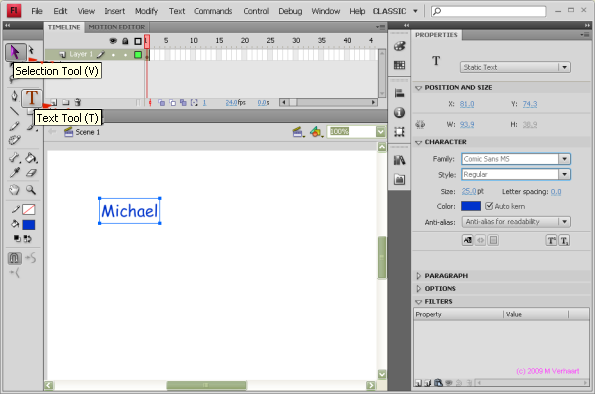
4. Select the Text tool from the Tools panel.
5. Click on the stage and type in your name.
6. Once your name is entered click on the selection tool.
7. Change the font, style or color using the Property Inspector.
8. You can move the text on the stage by clicking and dragging
9. Always allow extra space round text in case the font you have chosen is not available on the computer playing your movie.
10. A useful tip. Use 'Ctrl =' to zoom in and 'Ctrl -' to zoom out (Note use the number keys above the normal keys)
Add another text element
Flash works by placing media on different Layers. The Top Layer in the timeline is the one in front and as you move down the layers they are successively placed behind the ones above.
10. First let us rename the Default Layer (Layer 1). To do this either Double Click on the name (Layer 1) or Right-Click > Properties. Then Change the name to NameTxt.
11. Now we’ll add a new layer. Right Click on NameTxt and select Insert Layer. A New Layer will be inserted before NameTxt.
12. Change the order of the layers so that NameTxt is the first one, by dragging one of them into the correct position.
13. Rename the New Layer to InfoTxt
14. Add a new text element to the InfoTxt Layer (e.g. Hello World!).
Play your movie
15. Save your movie in a folder FlashJournal as jnlText.fla
Test your movie
17. Control > Test Movie
Publishing the Movie
When you finish your Flash document, you are ready to publish it so it can be viewed in a browser. When you publish a FLA file, Flash compresses it into the SWF file format. This is the format that you place in a web page. The Publish command can automatically generate an HTML file with the correct tags in it for you.
To publish the Flash file and view it in a browser or as a standalone application:
1. Select File > Publish Settings.
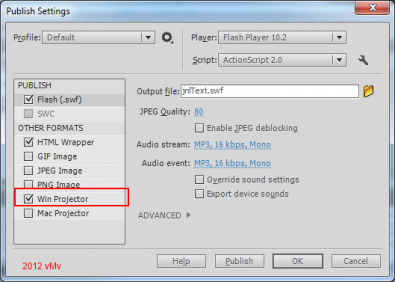
2. In the Publish Settings dialog box, select the Formats tab. The Flash and HTML options should be selected. This action causes Flash to publish only the Flash SWF file and an HTML file. The HTML file is used to display the SWF file in a web browser.
Important: The instructions following show you how to create a Windows Projector (exe) file. This allows the application to run without an external flash player
3. In the Publish Settings dialog box, select the HTML tab and verify that Flash Only is selected in the Template pop-up menu.
This template creates a simple HTML file that contains only your SWF file when displayed in a browser window.
Check the output file names are all jnlText.... (for Flash, HTML Wrapper and Win Projector)
4. Click OK.
5. Select File > Publish and open your web browser.
6. Select File > Open in the web browser.
7. Navigate to the folder where you saved your FLA file.
The jnlText.swf and jnlText.html files should be there. Flash creates these files when you click Publish.
8. Select the file named jnlText.html.
9. Click Open.
Your Flash document is displayed in the browser window.
To view the executable without Flash:
Since you have also clicked on create and exe file, if you navigate to the folder containing the flash files using Windows Explorer, the file jnlText.exe should also exist. By double clicking on this file it should run happily as a stand-a-lone application.
Task : Explore text properties
At this stage leave the text as Static. We will explore Dynamic later.
1. Add a more text (and Layers) to demonstrate different text properties.
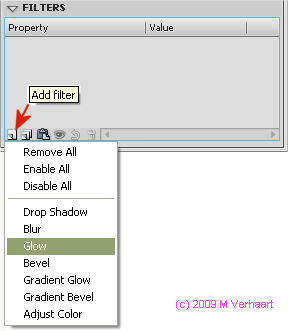
2. You may want to explore the filters (Click on the Filter tab (bottom right), then use the Add Filter icon (bottom of screen. to choose a filter). It is recommended that you use filters carefully as they can affect the performance of your movie. (Gunter, 2007, p.206).
Skills
By the end of this section you should be able to
• Reset the environment to the default
• Change the stage size
• Use the text and selection tool
• Place text on the stage
• Change text properties (font, size)
• Create a new layer
• Move and rename layers
• Understand the z-order (the way each layer is stacked)
• Publish a movie for HTML
• Publish a standalone movie (exe)
• Add a filter to text
 References
|
virtualMV | Superquick wiki guide | Please give me some feedback |
VirtualMV/Flash12 (CS6)/Basic/Text. (2025). In WikiEducator/VirtualMV wiki. Retrieved February 28, 2025, from http:https://wikieducator.org/VirtualMV/Flash12_(CS6)/Basic/Text (zotero)
|


