Nail Art/Hand and Nail Care
| Topic Navigation | |
|---|---|
| Avant Garde | Avant Garde | Activity 1 | Activity 2 | Practical Activity |
| Hair Classic | Classic Look | How to Achieve | Practical Activity | Group Discussion |
| Hair Contemporary | Contemporary Look | How to Achieve | Practical Activity | Group Discussion |
| Beauty Think Tank | Beauty Think Tank | Activity 1 | Activity 2 | Activity 3 |
| Nail Art | Nail Art | Hand and Nail Care | Practical Activity | Group Discussion |
| Cultural and Tribal | Cultural and Tribal Styles | Activity 1 |
| Catwalk | Catwalk Style |
| Glamour | Glamour Look | Activity 1 |
| Competition and Research | Competition and Research | Challenge 1 | Challenge 2 |
NAIL CARE
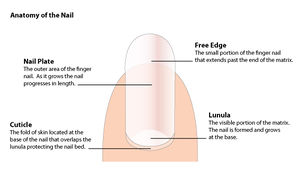
- Nail Anatomy Image
Nails:
Nails are made of keratinized protein that grows in a small region at the tips of the fingers and toes.
If you look carefully at the nails of your fingers you will see the basic parts of the nail's anatomy.
- The white area of the nail that (if left untrimmed and unbroken) grows to extend past the tips of the finger is called the free edge.
- The area of the nail that is still attached to the finger and seems to extend back under the fold of skin is called the nail plate.
- At the base of the nail plate, where the skin folds over the edge of the nail, you will often see a whitish semi-circular shape under the nail.
- This is called the lunula, because of its resemblance to the crescent moon.
- The lunula is the portion of the matrix bed (from which the nail is formed) that is visible.
- The fold of skin that overlaps the nail at its base is the cuticle (also called the eponychium).
- The purpose of the cuticle is to protect the matrix bed from contaminants and infection.
- At the base of the nail, beneath the cuticle and as part of the matrix bed are tendons to anchor the nail in place and blood vessels that carry nutrients and moisture to the nails allowing healthy growth.
Keep your nails clean, trimmed and filed to a length and in a shape that you find comfortable and pleasing.
For some women this means long, claw-like talons, while for others it means short and serviceable.
Men, on the other hand generally prefer short, and some prefer their nails to be trimmed very short - to the point where there is very little, if any, free edge visible.
Professional Steps to Nail Care
Step One:
Keep your hands clean. Wash your hands as often as necessary.
Remember that various items you come in contact with can leave a residue on your hands whether or not it is visible.
A good product to keep on hand is a hand sanitizing gel.
This isn't for fear of some risk of infections or germs, rather because these products offer a handy solution to hand cleaning and offer a pleasant fragrance that will remove residual odours.
Step Two:
Use a lotion or hand cream to keep your hands soft and your skin smooth.
Step Three:
Trim your nails to the desired length. This is always a personal decision, some people like their nails longer, while others find that shorter nails better suit their lifestyle.
Some people's nails are thinner and more flimsy than others and cannot support more than a minimal amount of length before they break.
Always try to keep your nails an even length when compared to the other fingers.
Begin with the little finger on each hand and work your way inward. The goal is uniformity.
Step Four:
File the nails to remove sharp or rough edges.
Use your nail file to pare down the nail and shape it as you desire.
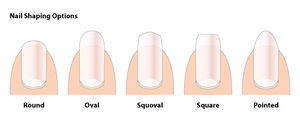
There are five basic nail shapes people use:
Round, Oval, Pointed, Square and Squoval.
The Round shape
Follows the curve of the fingertip and is usually shorter in length extending only slightly past the tip of the finger. Many men prefer this shape when manicuring their nails.
The Oval shape
Is longer with a rounded end and is considered the strongest of the shapes based on the experiences of nail technicians.
The Pointed nail
Is tapered to the center of the nail, although it is rarely shaped into an actual 'point'.
This shape looks best on women with long slender fingers.
The Square shape
Is one where the nail is trimmed to a specific length and the ends are filed to a straight edge.
The corners are filed only enough to remove any truly sharp corners to prevent accidental scratching.
Many men like to have their nails filed into a short, square shape.
The Squoval shape
Is relatively new, and came about because of the number of people who liked the look of the squared nail, but needed the added structural strength of the oval.
It is simply a square nail with the corners rounded.
Step Five:
Once your nails are the desired shape, examine your cuticles. If they are growing down onto the nail plate or appear to be sticking to the nail plate, you need to push them back.
Apply a dab of lotion to each fingertip on the cuticle, and massage it in.
Give the lotion a few moments to soften the cuticle and then take your cuticle pusher or orangewood stick and wrap the tip in cotton.
Gently rub the padded tip along the nail plate at the base of the nail and push the cuticle back away from the nail.
Be sure to rub away any remaining dead skin residue. Gentle is the key here; the cuticle is usually very sensitive and can be painful when damaged.
A light touch is usually sufficient to push back any cuticle.
Step six:
Examine the nail plate. If there are any ridges in the nail plate, you can use the sanding block.
Gentle pressure and small circular motions work best. Once the surface of the nail plate looks and feels smooth, you're done.
Notes for the students:
....................................................................................................................................................................................................................................................................
....................................................................................................................................................................................................................................................................
....................................................................................................................................................................................................................................................................
....................................................................................................................................................................................................................................................................
http://www.greatestlook.com/info/applyingpolish.html
Picture Reference
Applying Nail Polish:
Applying nail polish seems like a simple way to finish the nails after manicuring, but the following procedure is recommended to get the best results and longest wear from your polish.
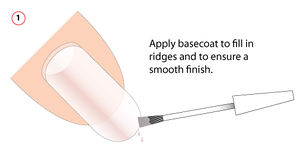
Basecoat:
Starting with the little finger and working your way in to the thumbs, apply a coat of clear polish.
There are polishes designed specifically for use as base coats.
The purpose of the base coat is to fill in any uneven spots in the surface of the nail and to prevent the nail from being stained by any colour that is later applied.
(If all you want is to have clear polish on your nails, simple apply two coats of clear polish, and you're done.)
Step Two:
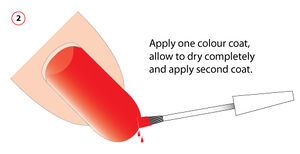
Coloured Polish:
Carefully apply your coloured polish to the nails working from little finger inward.
Allow the first coat to dry completely and then apply a second coat to ensure even coverage.
Use an orangewood stick dipped in nail polish remover to scrape away any mistakes.
Step Three:
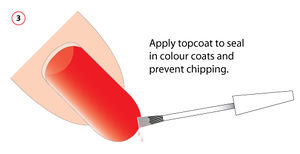
Topcoat:
Once your coloured polish has been applied and allowed to dry fully, add another coat of clear polish to the nails.
(Again, there are polishes designed specifically for use as a top coat.)
The purpose of the top coat is to seal the colour and protect it against chipping and scuffs.
The finished nails will look glossy and have depth of colour.
The great thing about nail colour is that it is a fashion accessory in and of itself.
You can change your colour to match an outfit, or your mood. It's easy and comparably quick.
