Open Education Resource Portal for New Zealand Schools
A national project for reusable and portable content
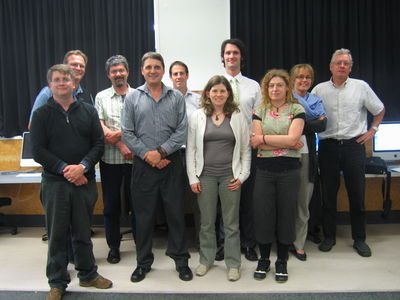
The first cadre of Kiwi educators who attended the OERNZ "
Train-the-trainers" workshop held at Christ's College, Dec 2009. This team will lay the foundations for scaling capacity development for OER by sharing their knowledge and facilitating Wiki-taster sessions across New Zealand.
Front row, left two right: Andrew Dunningham,
Paul Rodley,
Jacqui Land,
Vicki Smith,
Back row, left to right: Rob McCrae,
Wayne Mackintosh,
Mike Hart,
Hamish Chalmers,
Anouk Janssens-Bevernage,
Richard JonesYou will join the WikiEducator family, one of the world's fastest growing wiki projects in the formal education sector. To paraphrase Mahatma Gandhi: "You can be the change you want to see in the OER world". New Zealand teachers are joining the global education community using digital technologies as an enabler to return to the core values of teaching -- that is, to share knowledge freely.
The Open Education Resource for New Zealand (OERNZ) initiative is a national project designed by Kiwi teachers for Kiwi teachers. OERNZ is co-sponsored by the Ministry of Education in partnership with the OER Foundation under the reusable and portable content priority of the Managed Learning Environment initiative. OERNZ aims to nurture and support the development of a national OER commons for our schools. These wiki-taster sessions form part of the capability and community development stream of the OERNZ project.
What is a wiki-taster?
A wiki-taster is:
- A short 90 - 120 minute face-to-face professional development opportunity to help teachers get started with contributing to the OERNZ project
- Arranged by one of our Kiwi educators who volunteered to share their knowledge of this amazing technology as an OERNZ facilitator.
- Where possible, presented at your school.
Feel free to register your interest to host a free wiki-taster at your school. We will do our best to arrange a facilitator to visit your school and run a wiki-taster session. As all resources are distributed under a free content license which you are free to reuse, adapt, modify and redistribute -- we encourage you to run your own Wiki-taster sessions to build Kiwi capability for the OERNZ project.
Outcomes
The purpose of this wiki-taster is to:
- Introduce the OERNZ project to teachers around New Zealand.
- Find out about open education resources (OER) as a national and international initiative.
- Introduce participants to wiki technology and help teachers get started with editing on WikiEducator. During the session we will:
- Create an account on WikiEducator
- Learn the about the difference between the published view and editing view of a wiki
- Cover the basics of editing using WYSIWYG (Rich Text) editing and publish content to the world wide web
- Develop a personal user page on WikiEdcuator
- Create a free portal page for your school to co-ordinate open education activities and the development and sharing of reusable and portable content for New Zealand Schools
- Share ideas for developing OERs and promoting collaboration among New Zealand teachers.
|
Agenda
| Description
|
Time
|
Resource
|
| Welcome and introductions
|
10 mins
|
Indivual introductions while attendance list is distributed. (Attendance register is used to record the number of New Zealand teachers who have attended wiki-taster sessions.)
|
Context questions and WikiEducator trivia
|
5 mins
|
- How many participants in this workshop have published to the world wide web without the assistance of a webmaster or technical support person before? -- By the end of this wiki - taster every participant will have published to the world wide web.
- How many participants have an active wiki account? (For example Wikipedia, Wikispaces etc.)
- How many participants already have a registered account on WikiEducator?
- What percentage of WikiEducator users would you estimate are first-time wiki account holders? (i.e. they have not created an account on any another wiki site before).
- How many participants have heard of the concept "OER" and/or used OER in their teaching?
- Which country founded the WikiEducator project, which now has 80,796 registered account holders?
- What would you guess the average age of a WikiEducator account holder to be using this social software site for creating and sharing teaching materials?
|
| Why is freedom important in education?
|
5 mins
|
View short video of Archbishop Emeritus Desmond Tutu, Chancellor of the University of the Western Cape in South Africa.
|
| Introducing Wikis
|
5 mins
|
View video: Wiki's in plain English
|
| Overview of WikiEducator and OERNZ
|
10 mins
|
Facilitated slide show
|
| Two views of a wiki
|
5 mins
|
Practical demonstration:
|
Creating an account and first edit
|
10 mins
|
- Facilitator demonstrates how to create an account by showing the tutorial and screen cast.
- Note, if the host school is part of the New Zealand Ministry's Single Sign-on (SSO) pilot, participants can use their SSO login details on WikiEducator.
- Activity 1: Creating an account
- Activity 2: First edit on your userpage.
|
| Basic text formating
|
10 mins
|
Facilitor demonstrates basic text formatting features including:
- Bold and italics text
- Numbers and bullet lists
- Headings and subheadings
- Activity 3: Participants spend time practising their skills starting to complete their user page information.
|
| Creating a personal sandbox
|
5 mins
|
Facilitator introduces the feature of having a personal practice area for trying out new wiki skills.
- Facilitator demonstrates the automatic feature to create a personal sandbox.
- Activity 4: Users are invited to use the automated feature for creating a sandbox.
|
| External links, internal links and new wiki pages
|
10mins
|
Facilitator:
- Explains the difference between external and internal links
- Demonstrates how to create an external link and asks particpants to create an external link in their sandbox linked from the user page (see Activity 5, Step 1)
- Demonstrates how to create an internal link and asks participants to create an internal link in their sandbox (see Activity 5, Step 2)
- Demonstrates how to create a new page in the wiki (see Activity 5, Step 3)
|
The way forward for OERNZ
|
10mins
|
Facilitator leads and records participant suggestions for the way forward:
- Show example of the school portal page created in advance of the workshop or alternatively guide participants through how to create a free OER portal for your school. Encourage partipants to work on their school portal page.
- Facilitator record ideas and suggestions for OER projects on the workshop page for this WIkitaster session.
- Show the OERNZ mailing list and show the rss feed from the mailing list on the OERNZ portal. Facilitators will inform participants that they will/have been enrolled on the list and that participants should confirm their registration. The facilitator should participants that they can adjust their preferences for notifications, e.g. web only, daily email digest or email for every post.
|
Conclusion (Optional)
|
|
Concluding video reflection:
|
Activities
Activity 1- Creating an account on WikiEducator
Step 1: Getting to the "Create account" page
Your first activity is to get to the right page where you can create a new account. This is accessed from WikiEducator's home page.
Activity
|
An Internet connection is required for this activity.
- Open your browser (e.g. Firefox, Mozilla, Safari, Internet explorer).
- Direct your browser to the WikiEducator home page:
http://wikieducator.org by typing in the following website address:
- http://www.wikieducator.org
Remember to press your <enter> key.
- On the top right hand corner of your screen, you will see a link called "Log in / create account"
- Click on this link which will take you to the "Log in/ create account" page or go directly to the Create account page.
- Follow the instructions provided on screen, or read further.
Visit the Show me how video for a practical demonstration. (Not advised for low bandwidth connections.)
|
Step 2: Click on the "Create an account" link
WikiEducator distinguishes between two types of users:
- Users who already have a log-in account;
- New users who don't yet have an account. (As you have registered for this Wiki-taster we expect that you fall into this second category).
The next activity demonstrates how new users can get to the correct screen for creating a new account.
Activity
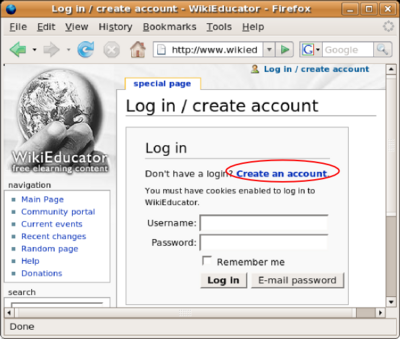 Click on the "Create an account" link shown above An Internet connection is required for this activity.
- Click on the blue link called "Create an account"
Tip: Remember that you must have an account with WikiEducator before entering details into the Username and Password text fields. In training workshops we have noticed that some participants enter a Username and Password at this time before creating an account on WikiEducator. This won't work because WikiEducator will not have access to your log-in details that you use on other systems. Once you have created an account on WikiEducator you can fill in your Username and Password on this screen to log in.
- If you make a mistake, don't worry - just follow the steps again and click on the blue "Create an account" link.
Visit the Show me how video for a practical demonstration. (Not advised for low bandwidth connections.)
Web sites that accept postings from the public, like this wiki, are often abused by spammers who use automated tools to post their unwanted links to many sites. As a mechanism to deal with this problem, WikiEducator uses a ReCaptcha feature to prevent automated spam on the site.
When you create an account for the first time on WikiEducator, you will see a graphic displaying distorted text characters (see screenshot image below). Computers cannot "read" the letters displayed in the graphic, so they must be entered by a human. In this way we can manage the electronic spam problem where computers search the Internet hoping, for example, to publish unwanted advertising on different sites.
Dealing with the Captcha
In the next part of this activity we will show you how to enter the letters from the Captcha feature before completing your registration particulars.
- The first step is to decipher the letters displayed in the graphic, and to enter these in the text box provided below the distorted characters. Note that these are case sensitive which means that you cannot use capital letters when the graphic uses lower case letters. Check to see that your <Caps Lock> key is off.
- In the example to the right, the letters Roosevelt mapping are displayed in the graphic. The user must type the same letter combination in the text field provided below. (Note: When you create your account, you will inevitably be given a different combination of letters.)
 Tip: Sometimes the letters are hard to decipher. There are three things you can do:
- Try changing the distance between your eyes and the computer screen. This will help to improve your focus in order to decipher the letters.
- If you find the letters are too difficult to decipher, press the "Refresh" button of your browser so that WikiEducator generates a new combination of letters, which may be easier to read.
- Use the audio clip button to listen to an audio cue which you must then type into the text field. This will generally be a short sentence.
- Don't worry if make a mistake with deciphering the letters. If you get this wrong the system will automatically provide you with a new combination of letters you can try. If you get stuck, ask someone to help you or read the instructions provided on screen.
Choosing a Username
- After typing in these letters, choose a username for yourself. Many people like to use a shortened version of their name or alternatively a combination of initials and surname. For example Wendy Green may choose the username: wgreen. The WikiEducator log-in is case sensitive, so you will need to remember whether you have used capital or lower case letters. This is the username you will use every time you log in to WikiEducator, so choose something that you can remember easily.
Choosing a Password
- You will now need to choose your own password for WikiEducator. Enter this in the space provided. To avoid typing errors with your password, you are required to re-enter your password immediately after the first password box. Remember that passwords are also case sensitive.
Entering optional information
- Type in your email address. This is optional, however it is useful to enter your email address because in the event that you forget your password, the system will be able to email this back to you on request.
- Type in your real name. This field is also optional, and is used for attribution purposes when people want to cite or use content you have created on WikiEducator.
Visit the Show me how video for a practical demonstration. (Not advised for low bandwidth connections.)
|
Activity 2 - Your first edit
Activity
Step 1: Go to your User page. Your User page is automatically created for you after you create an account on WikiEducator. To access it click on your username just to the right of the  image at the very top of any page. This will take you to your User page. image at the very top of any page. This will take you to your User page.
Tip: If you don't see your username, you must first log in. Click on the "log in" link on the top of the page, and log in with the username and password you created in the previous activity.
Step 2: When you get to your User page, click on the edit link at the top of the page to change your page into edit mode.
Step 3: If the rich text editor is not enabled when you are in edit mode click on the [Rich Editor] link (see: How to enable the rich editor).
Step 4: In the text box that appears type something about yourself, for example, "My name is ..........". You may also want to say something about your reasons for wanting to contribute to WikiEducator, or ways that people can contact you.
Step 5: After you have entered some text notice that underneath the box in which you were entering text there is a series of buttons that look like this:
File:Edit buttons.png
Step 6: Click on the "Save page" button.
Visit the Show me how screen movie for a practical demonstration. (Not recommended for low bandwidth connections)
|
Activity 3 - Developing your userpage with text formatting features
Activity
|
In this activity you will start adding information to your userpage, while experimenting with the different text formatting features.
- Go to your userpage
- Insert the following headings and subheadings:
- My profile (use a Level 1 Heading)
- Professional background (use a Level 2 Heading)
- Education (use a Level 2 Heading)
- My interests (use a Level 2 Heading)
- Professional (use a Level 3 Heading to indicate that "Professional" is a subheading of "My Interests")
- Personal (use a Level 3 Heading o indicate that "Personal" is a subheading of "My Interests")
- Start typing a few sentences to form paragraphs under each heading. Be sure to demonstrate a few text formatting features on your page:
- Bold and italic text
- Lists (Bullet lists or numbered lists)
|
Activity 4 - Creating a personal practice area in the wiki
Activity
| Activity 3: Creating a personal sandbox
Make sure that you are logged on to WikiEducator before proceeding with this activity.
- Click on the button called "Add a My sandbox link on your user page" below to add a link on your user page to your new personal sandbox.
A new window opens.
- Click on the "Save page" button beneath the editing window without making any changes or edits.
If you have done this correctly a link in red text, "My sandbox", displays on your user page.
- Click on this link and enter some text, for example: "Content coming soon ...."
- Click on the "Save page" button.
The text you wrote displays on your sandbox page.
Not sure how to proceed with the activity? Visit the show me how movie for a practical demonstration. (Not recommended for low bandwidth connections)
|
Activity 5 - Creating links in WikiEducator
Step 1: Creating an external link
Activity
| Creating an external link to Google or website of your choice
Have a go at creating an external links on your user page sandbox.
- Click on the link to your user page (remember it's located in the top right of the screen if you are logged in) and navigate to your sandbox page.
- Click on the edit tab and type the following text: "A good search engine" (or alternative title / name for your external link, for instance, "Wikipedia", "My organisation's homepage")
- Using your mouse, highlight the title for your external link (e.g. "A good search engine")
- Click on the Insert/Edit Link" button
- Enter the the full url for the external website in the link text field. For Google, enter http://www.google.com
- Click the "OK" button.
- Click the "Save" button to save your edit to the published view in the wiki.
- Test to see if your link is working properly.
|
Step 2: Creating an internal link
Activity
Creating an internal link
- Click on the link to your user page and navigate to your sandbox page.
- Click on the Edit tab (and select the rich editor if it is disabled) of your sandbox.
- Click on the insert/edit link button on the rich editor toolbar.
- Type Learning4Content in the Link text field of the Link dialog box (You should see several pages appear in the automatic search results as you type) as shown below.
- Click the OK button on the Link dialog box.
- After the dialog box closes, you will see Learning4Content in blue and underlined in the editing window. This is the internal link with the automatic description being the wiki page name.
- Click on the "Show Preview" button and you shoud see the internal link as: Learning4Content.
- When you are satisfied, click the "Save Page" button.
|
Step 3: Creating a new page
Activity
| New page link
You've probably already created your first page if you've made an edit to your sandbox under your User page. Let's have a go at creating a booklist page of your recent reads.
- Go to your user page.
- Click on the edit tab
- Type a description for your new page e.g. My Booklist.
- Highlight the description of your new page.
- Click on the insert/edit link button in the rich editor toolbar.
- Type /My booklist in the Link text field in the Link dialog box.
- Click the OK button on the dialog box
- The link should appear as blue and underlined in the editing window and red in the preview area.
- Click the Save Page button if you are satisfied with your link to a new page.
|


