External links
| Obsolete WikiEducator Rich Text Editor Tutorials (this editor is no longer in use) | ||
|---|---|---|
| Tutorial 5 | Introduction | Overview | External Links | Internal Links | New Pages | Interwiki Links | Show me how | |
Linking a page in WikiEducator with another website is called an external link, because the link will direct the user to an external website. In this section, we will show you two ways to connect your wiki content to external web sites.
Contents
Typing the full web address
If you type the full web address (that is the full URL including the "http://" prefix) in the edit window, the wiki will automaticaly recognise this as an external link and will display the raw web address when saved for the published view. For example:
http://www.oerfoundation.org
Note that the wiki will automatically treat this text as a link (as has been done with the URL above) and it will display the raw web address, including the "http://" part. However, this format is generally not recommended, as raw URLs are ugly and often provide no information about the content of a site.
Create an external link by typing the full URL
If you have done this correctly, you should have a link to Google (or the website you have entered) displayed as: http://www.google.com.
|
Using the "Insert/Edit Link" button on the Rich Editor toolbar
When using the Rich Editor, you can add a link by using the "Insert/Edit Link" button, highlighted in the toolbar below.

We recommend that you use this method for inserting external links because it provides a user-friendly description of the external web page.
Instructions
This is a two step process:
- Type the title for your link (that is, the words that you want to display to the user for the external link instead of the "ugly" URL).
- Decide on an appropriate description, phrase or title for your link, for example "eXe Web Site".
- Type this description of the link directly in the edit window, just like you would enter new text.
- Enter the web site address (URL).
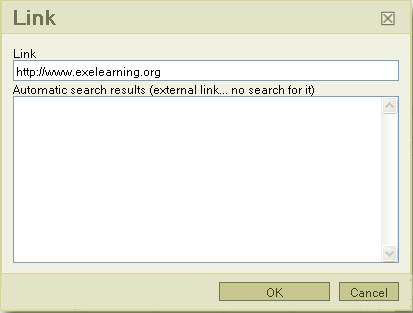 The "Link" dialog box
- Highlight the description you typed in step 1 above (like you did in the previous tutorial).
- Once the text description is highlighted, click on the "Insert/Edit Link" button in the Rich Editor toolbar (shown above).
- The "Link" dialog box appears, which includes a text field for entering the full URL (including the "http://" part) of the external link. The figure to the right shows the http://www.exelearning.org URL in the "Link" text field.

The result of this procedure is a blue-coloured, underlined link in the edit window. When you preview or save the page the link to the eXe web site displays like this:
Try this yourself
The best way to see how this works is to insert an external link on your sandbox page.
| Creating an external link to Google or web site of your choice
Have a go at creating an external link on your sandbox page.
The Link dialog box displays.
The link displays in blue and underlined in the edit window.
|
| A few things worth remembering
Deciding which words, letters or concepts you would like to display to the user as the hyperlink text (the blue link that displays in published mode) needs careful thinking.
|
Tips on editing external links
- If you need to change the title or description of an external link, you do not need to click on the "Insert/Edit Link" button. Move the cursor to a position within the link (the blue, underlined text in the editing window) and add/remove characters until you are satisfied with the result.
- You can create a link without first entering the title or description. In this case, you would start by clicking the "Insert/Edit Link" button without highlighting a block of text. The result will be a link with the URL (without the "http://" part included) automatically used as the title. You can now edit the title of the link as described in point 1 above.
- If you need to change the URL, position the cursor within the external link (the blue, underlined text in the editing window), click on the "Insert/Edit Link" button, and modify the URL to the desired result.
- You can open, edit or remove a link via the context menu. Position your cursor within the external link. If using Linux or Windows click the right-mouse button; if using Macintosh hold down the 'Control' key and click with the mouse. Select the relevant option from the menu that displays.
- If you enter the web site address for an external link and the resultant link displays as red text in the published view, check for a typing error in the URL. (Red links indicate an internal link for a new page in the wiki and therefore this cannot be a valid external link). Always type the full URL address, including the "http:// prefix, using lower case letters.
- To see how to create an external link using wikitext, see the original Wikieducator tutorial on external links.