Edit mode
| Obsolete WikiEducator Rich Text Editor Tutorials (this editor is no longer in use) | ||
|---|---|---|
| Tutorial 3 | Introduction | Edit Mode | First Edit | Show me how | |
A wiki page has two modes:
- The published mode - the view you are looking at right now; or
- The editing mode - which you use when editing text on the wiki.
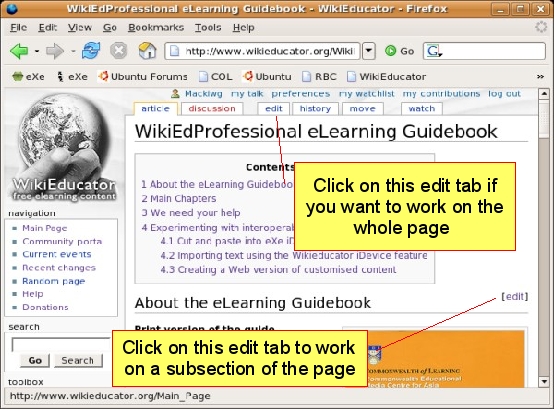
To activate the edit mode, you need to open the page in edit mode. If you are planning to edit the whole page at once, click on the edit tab which you will find at the top of the content area. This link is useful when working with new or short pages that do not have too much text. Subheadings, often used in longer content pages, can provide help in finding the appropriate place to edit.
The Mediawiki software has a useful feature on pages that contain subheadings. You will notice an edit link displayed next to each subheading on the right side of the page. You can use this subheading-specific edit link when you want to make changes to a particular subsection of the page.
When you click on one of the edit links, the page you are on will change into edit mode. Edit mode displays the text of the page you are on inside a special text area box. This is where you enter new content or modify existing content in the wiki.
Contents
Launching the rich text editor
When you click on the edit tab on top of a page or edit link next to a subheading, a new window will open in the editing mode. You can enable the rich text editor by clicking on the "Rich Editor" link illustrated below:
Users who prefer using standard wiki markup, can continue editing by entering text in the standard editing window (that is, without enabling or clicking on the [Rich Editor] link). Standard wiki markup is quite powerful for creating complex web pages; however, it can initially be difficult for users who are used to WYSIWYG editing in a word processor. For help in learning how to directly edit in the wiki, without use of the rich text editor, proceed to the tutorials for standard wiki markup.
Switching between the rich text editor and standard wiki markup
When editing using the rich text editor you will see the Rich Editor toolbar shown below.
In addition, if there is content in the edit window it displays in WYSIWYG format, like the content in a word processing document. Text written in bold displays as bold in the editing window (rather than the standard wiki markup format ' ' 'bold' ' ').
Many new users find the rich editing mode easier to start with when learning how to use a wiki. Once you have enabled the rich editor any page that you open in the edit mode during your current log-in session will have the rich editor enabled.
There are two ways you can switch between rich editing and standard wiki markup:
- Disabling the rich text editor by clicking on the [Disable rich editor] link above the edit window. Clicking this link switches editing back to the standard editing mode.
- Enabling temporary standard wiki markup using the "Wikitext" button.
Temporary wikitext
Sometimes it is useful to temporarily edit or view the wiki code for a page, for example to learn the standard wiki markup for adding an image or template. This can be done by clicking on the "Wikitext" button on the Rich Editor toolbar as highlighted in the figure below.
With the temporary wikitext mode enabled, clicking the "Save page" or "Show preview" buttons below the editing window will cause the edit mode to return to rich text editing.
Summary
There is a published mode and an edit mode for a wiki page. When you are in the edit mode of a wiki page you can edit using standard wiki markup (raw wikitext) or rich text. The rich text tutorials help you understand how to interact with the wiki using the rich text editor and the original tutorials help you understand how to interact with the wiki using wikitext. You are now ready for your first edit in WikiEducator using the rich text editor!


