VirtualMV/HTML/Basic/Forms
Introduction
Overview
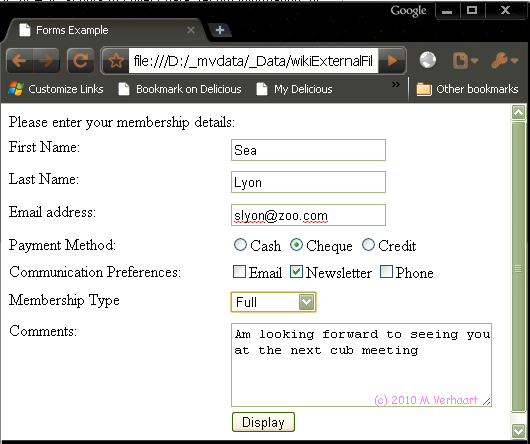
If you want to add interactivity to your site, then you can use HTML forms. The data is then (usually) processed by a web server, and may be sent to a database or an email server. HTML forms interact with CGI, PHP or ASP scripts to collect data, record information, or simply involve your readers with your Web page.
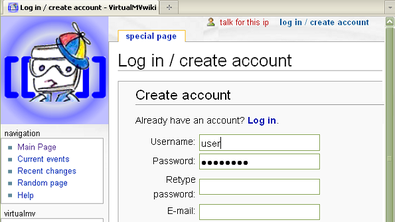
If you have not done so, I would be pleased if you would create an account on this wiki - then you can use the form feature to update any of the content (and even create your own wiki branch) - use the log in/create account link at the top right of this page.
- Forms are made of:
- text boxes,
- check boxes,
- radio buttons,
- drop-down lists,
- and other input fields.
<form> ... </form>
The <form> tag is the primary tag that surrounds all forms on a Web page. According to the HTML 4.0 specification, this tag is required for form elements to be displayed on a Web page.
You can place the <form> tag anywhere within the <body> of an HTML document, and all input tags, select tags, and textarea tags must be contained within it.
Attributes
action
- This attribute tells the browser where the server-side script is located that will process this form. Normally, this is a CGI, PHP or ASP script or some other program located on the Web server, but you can use email to send the form results.
- For example:
<form action= "mailto:mverhaart@infotech.ac.nz" enctype= "text/plain" method= "POST" >- The only time you would leave out this attribute is if you were using an onClick or other JavaScript method to access the form.
method
This can be either GET or POST. This is the method that the browser will use to communicate to the Web server and send the form information.
- GET
- the default, this method puts the form information in the URL after a question mark.
- For example: http://www.virtualmv.com/login.php?name=value
- POST
- this method sends the form information as a data block to the server through HTTP protocols.
In PHP the GET method displays the form (default). The POST method in included in the <form> tag so that the page is resubmitted to the same php page. The logic in the PHP code is used to determine whether it is a new form (GET) or one with data (POST)
Filename: formeg.php
<?php
include('include/header.html');
if ($_SERVER['REQUEST_METHOD'] =='POST') //form has been submitted
    // (2) POST request = Handle form data
    if $_POST['FullName'] != "" {
      echo'<h1>Hello '. $_POST['FullName']. '</h1>';
    }
} else {
    // (1) Get request = Display Form
    <form action="formeg.php" method="post">
      <p>Enter name: <input type="text" name="FullName" /> </p>
      <p><input type="submit" name="submit" value="Go!" /> </p>
    </form>
}
include('include/footer.html');
?>
For a fuller example see Ullman (2012)[1]
onSubmit
- If you want to perform JavaScript validation on your form, you will need to have a JavaScript call within the form tag.
- The onSubmit attribute tells the browser to complete a JavaScript script before submitting the form to the server.
<html>
<head>
  <script type="text/javascript">
    function fnDisplayName() {
      alert("Hello " + document.myForm.txtFname.value);
    }
  </script>
</head>
<body>
<form name="myForm">
  <p>Enter Your Fullname: <input type="text" name="txtFname" value="" /></p>
  <input type="button" value="Press Me" onClick="fnDisplayName()" /></p>
</form>
</body>
</html>
Input
- The primary tag used in HTML forms is the INPUT tag. The input tag, allows your readers to input data to your Web server.
- There are ten specific types of INPUT tag, you choose which type of input tag you would like by placing it in the type="" attribute. These are: text, button, checkbox, radio, file, hidden, image, password, reset, and submit
in HTML5 there are many new input tag attributes: See http://www.w3schools.com/tags/tag_input.asp
Input tag types
1. Text
<input type="text" name="FullName" size="30" />The text box is the most common input type and to make HTML easier, is the default for the INPUT tag. This input element allows your readers to type in any text information into the box.
<form>
  First name: <input type="text" name="FirstName" /><br />
  Last name: <input type="text" name="LastName" />
</form>
in HTML5 you can have grey text displayed in the empty text box using the placeholder attribute
<input type="text" name="FirstName" placeholder="First name">For the syntax refer to Refsnes Data (2010)[2]
2. Button
<input type="button" value="button" name="button" />- The button input type allows you to create custom input buttons that do not have the default effects of the submit and reset buttons.
- It is most commonly used with JavaScript forms with the onClick attribute so that data is not sent to the Web server until the JavaScript has processed it.
- This field is blank by default. If you want it to say something, use the VALUE="" attribute.
3. Checkbox
<input type="checkbox" />- With a checkbox element, you can give your readers a list of items to choose from.
- They can choose more than one in the list. Or it can be used as a "yes/no" toggle, when there is only one option.
- If you have a group of checkboxes, link them all together by giving them the same name. The values will all be sent to the form separately.
<form>
  <input type="checkbox" name="vehicle" value="Bike" /> I have a bike<br />
  <input type="checkbox" name="vehicle" value="Car" /> I have a car
</form>
This allows us to select either bike or car or both. If both are selected you will receive "vehicle=Bike&vehicle=car" which can be tricky to process. (If you want an either/or use the radio button).
For further information refer to Refsnes Data (2010)[3]
4. Radio
<input type="radio" />- With a radio element, you can give your readers a list of items to choose from.
- They can one in the list.
- If you have a group of radio elements, link them all together by giving them the same name. The values will all be sent to the form separately.
<form>
  <input type="radio" name="rad1" value ="bike" />I have a bike<br />
  <input type="radio" name="rad1" value = "car" />I have a car
</form>
<input type="radio" name="rad1" value ="bike" />I have a bike
<input type="radio" name="rad1" value = "car" />I have a car
5. File
<input type="file" />- The file input type allows your readers to upload a file to your Web server.
<form name="myform">
  <input type="file" name="txtfile" value="" />
  <input type="button" value="Show file" onClick="echoname()" />
</form>
6. Hidden
<input type="hidden" />- Hidden fields are used to "save state" within an HTML form.
- They are most often used in forms that have multiple pages and information that needs to be carried from one page to the next. They are not shown on the Web page, but the information is sent along with other form input fields.
<input type="hidden" name="hide_1" value=" " />7. Image
  <input type="image" src="../graphics/go_buttn.gif"
              width="20" height="20" alt="Go" border="0" />
- With the image input type, you have yet another option for a button on your forms. The image shown here happens to look like a button, but you can use any image as a button on your forms.
One thing to note, images as submit buttons don't allow for the tab key to move the focus to it, and this makes them less accessible for people with no mouse.
- Note this differs from
<a href="link.htm"><img src="go.gif" border="0"></a>as the a href doesn’t post the form.
8. Password
<input type="password" />- The password field looks almost identical to the text field. However, when you type in it, the letters are hidden. This allows you to have a little more security for passwords on your forms. Remember, however, that the passwords are not sent encrypted in any way. So don't rely on this to secure truly important secret information.
<form>
  Username: <input type="text" name="user" /><br />
  Password: <input type="password" name="password" />
</form>
9. Reset
<input type="reset" />- The reset button resets the form to its default value. With most forms, this is blank entries, but if the fields have starting values, the reset button will return the form to that.
- This "resetting" is done by the browser, not the server. This button will have the default value of "Reset", if you want it to say something different, change the VALUE="" attribute.
<input type="reset" value="Restart form"/>10. Submit
<input type="submit" />- In order for a form to be sent to the server it needs some form of submit button. This field sends the form information to the Web server when it is clicked.
  <form name="input" action="mailto:mverhaart.eit@gmail.com">
  Username: <input type="text" name="user" />
  <input type="submit" value="Submit" />
</form>
<select> tag
The <select> element combined with the <option> tag creates a list box, which allows a user to select one of a number of predefined list elements.
<form>
  <select name="cars">
    <option value="volvo">Volvo</option>
    <option value="saab">Saab</option>
    <option value="fiat">Fiat</option>
    <option value="audi">Audi</option>
  </select>
</form>
Attributes that can be added to the option tag selected="selected" to set a default value Multiple="multiple" to allow for more than one option to be selected
<textarea>
The <textarea> element defines a form control that can be used to capture multi-line text input. The <textarea> element requires a rows and cols attributes, which specify the visible numbers of rows and columns.
<form>
  <textarea rows="10" cols="50" name="txtArea">
The cat was playing on the table…
  </textarea>
</form>
Note: “The cat was playing on the table…” is the default value
 References
- ↑ Ullman, L. (2012) PHP and MySQL for Dynamic Web Sites, 4th Ed. Peachpit press. p. 85
- ↑ Refsnes Data (2010) HTML <input> Tag. Retrieved March 11, 2010 from http://www.w3schools.com/TAGS/tag_input.asp
- ↑ Refsnes Data (2010) HTML Forms and Input. Retrieved March 11, 2010 from http://www.w3schools.com/html/html_forms.asp
|
virtualMV | Superquick wiki guide | Please give me some feedback |
VirtualMV/HTML/Basic/Forms. (2025). In WikiEducator/VirtualMV wiki. Retrieved February 28, 2025, from http:https://wikieducator.org/VirtualMV/HTML/Basic/Forms (zotero)
|


