Using Audacity/The Interface

From WikiEducator
Jump to: navigation, search


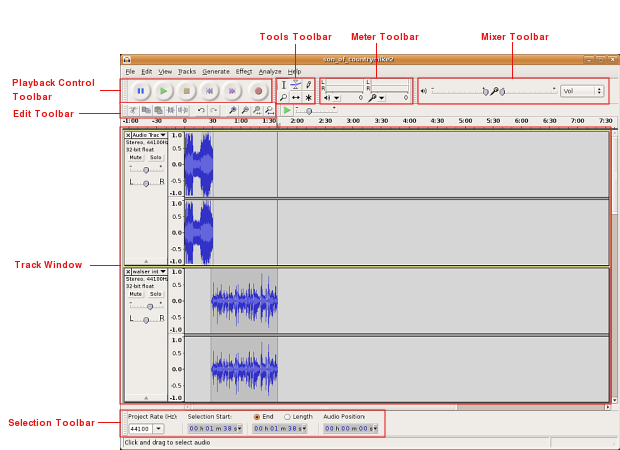
The Audacity Interface

Audacity interface diagram.png

Playback Control Toolbar

Audacity playback control toolbar.jpg

The Playback Control Toolbar functions much like the buttons on a DVD or CD player, or perhaps more accurately the buttons on tape deck. It enables you to preview parts of your project and add (record) new ones.

Button Action
Audacity rewind.jpg moves the cursor to the start of the project.
Audacity play.jpg plays your project from the position of the cursor. Use to listen to the audio in your project.
Audacity record.jpg pressing the record button will record a new track from your computer's sound input device.
Audacity pause.jpg pause playback or recording. Press again to unpause.
Audacity stop.jpg stops playback or recording.
Audacity fastforward.jpg moves the cursor to the end of the project.

Tools Toolbar

Audacity tools toolbar.jpg

These tools work directly on tracks in the Track Window.

Button Action
Audacity-selection-tool.png The Selection Tool use to select sections of an audio track to work on.
Audacity-envelope-tool.png The Envelope Tool this tool allows you to control how tracks fade in and out.
Audacity-draw-tool.png The Draw Tool allows you to draw on the waveforms of individual tracks.
Audacity-zoom-tool.png The Zoom Tool zooms in or out of a specific part of the audio.
Audacity-timeshift-tool.png The Timeshift Tool allows you to change the positioning of tracks relative to one another in time.

Edit Toolbar

Audacity edit toolbar.jpg

Button Action
Audacity cut button.jpg Cut removes selected audio data and places it on the clipboard.
Audacity copy button.jpg Copy copies the selected audio data to the clipboard without removing it from the track.
Audacity paste button.jpg Paste pastes whatever is in the clipboard into the track at the position of the selection cursor.
Audacity trim button.jpg Trim deletes all of the track except the current selection.
Audacity silence button.jpg Silence replaces the current selection with silence instead of removing it completely.
Audacity undo button.jpg Undo undo the last editing operation performed.
Audacity redo button.jpg Redo redo any editing operations that were just undone.
Audacity zoomin button.jpg Zoom In zooms in on displayed tracks displaying less time and giving a more detailed view of the track.
Audacity zoomout button.jpg Zoom Out zooms out displaying more time and a less detailed view of tracks.
Audacity fitselection button.jpg Fit Selection fits selected audio into the width of the screen to show the selection in more detail.
Audacity fitproject button.jpg Fit Project shows entire project in one screen.

Meter Toolbar

Audacity meter toolbar.jpg

Shows the input and output levels. You will use the input levels to test whether you are getting enough input through your mic or recording device.

Mixer Toolbar

Audacity mixer toolbar.jpg

These sliders control the mixer settings of the soundcard in your system. The selector on the right (labeled Vol in this image) controls what audio input you wish to use.

The slider near the small speaker icon will control the output of your soundcard affecting the overall volume of your project.

The slider near the small microphone icon controls the input of your soundcard; adjust this to increase the level of input on your microphone.

Track Window

Audacity track screenshot.jpg

New or existing tracks (or audio clips) in your project are lined up in the sequence that they are recorded or imported in this window. This example shows a stereo audio track; you can tell it is in stereo because of the two wave forms (one for left and one for right) that a present. Along the top of the Track window is a timeline in seconds, or even fractions of a second.

Selection Toolbar

Audacity selection toolbar.jpg