Speeding up data entry

From WikiEducator
Jump to: navigation, search


Entering data into a spreadsheet can be very labor-intensive, but Calc provides several functions for automating input, especially of repetitive material. They include autofill, selection lists, and the ability to input information into multiple sheets of the same document.

Duplicate existing content with the fill tool

At its simplest, the fill tool is a way to duplicate existing content. The contents of a cell will be duplicated to the highlighted cells, up, down, left or right.


Icon activity.jpg Follow Along
Find a blank worksheet in which you can try this out. Maybe Sheet3 in whatever you have open.
  • Type your name in a cell in the center of the workspace and press enter to exit edit mode.
  • Select the cell with your name in it.
  • Cursor positioned on cell handle
    Position the cursor on the black square in the lower right corner of the selected cell, until the cursor turns into a plus sign.
  • To duplicate, grab the cell handle and drag
    Click and drag the mouse in any direction to duplicate the cell contents into those cells.

The content of the "first" cell is duplicated into all of the highlighted cells.

Content of cell duplicated to adjacent cells


Calc also includes a Fill tool, available on the Edit menu. Highlight the cell to be copied and the set of adjacent cells to which the contents will be duplicated.

  • Select Edit > Fill
  • Select right, down, up or left, the direction in which the cells are to be duplicated.

Increment data entries in successive cells

In some instances you may want to enter a series of numbers or other type of data in a range of adjacent cells. To do this, you can use the autofill tool directly or via the Series... menu option.

The autofill tool completes the series following the pattern of values in the first two cells (for numbers) and the first cell (for dates and defined sort lists).


Icon activity.jpg Follow Along
Use the same sheet that you used for the activity above
  • Type 1 in A1 and 2 in B1
  • Highlight A1 and B1.
  • Grab the fill handle, in the lower right corner of B1.
  • Drag the handle to highlight cells C1:I1.
Drag the cell handle to I1

As soon as you let go of the mouse button, Calc autofills the values 3 - 9 into C3 - I3.

Cells C1 to I1 autofilled with 3-9

Let's continue with a few more examples:

  • Type 167 in A2 and 168 in B2.
  • Highlight A2 and B2.
  • Drag the fill handle across the other cells of Row 2 up to column I.

Note the resulting series of numbers.

Cells C2 to I2 autofilled with 169-175
  • Type 5 in A3 and 8 in B3.
  • Highlight A3 and B3.
  • Drag the fill handle across the other cells of row 3 up to column I.

Note that the numbers in the successive cells increase incrementally by 3, because A3 and B3 differ by 3.

Cells C3 to I3 autofilled incrementally by 3
  • Type Jan in A4.
  • Select another cell and then reselect A4.
  • Drag the fill handle across the adjacent cells.

Calc completes the series using the abbreviated names of the months.

Cells B4 to I4 autofilled with abbrev. for months of the year
  • Type January in A5 and February in B5.
  • Highlight A5 and B5.
  • Drag the fill handle across the adjacent cells.

Calc completes the series using the full names of the months.

Cells B5 to I5 autofilled with full names for months of the year
  • Type 27/07/09 in A6 and 28/07/09 in A7.
  • Highlight A6 and A7.
  • Drag the fill handle across the adjacent cells.

Calc completes the series with successive dates.

Cells B6 to I6 autofilled with successive dates


Icon present.gif
Tips:
  • Hold down Ctrl if you do not want to fill the cells with different values.
  • When a list reaches the last defined item, it will begin anew with the first item.


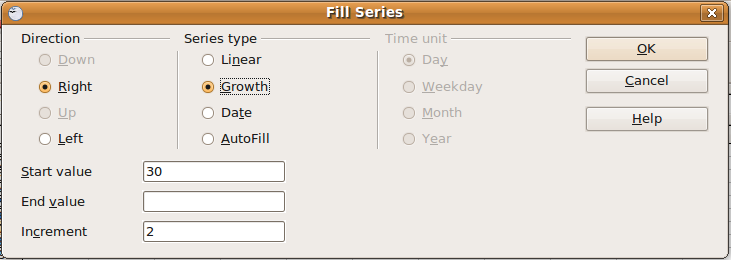
The Fill Series dialog can be used to create a growth series, wherein subsequent values follow an increasing or decreasing geometric pattern. For example, to create the series: 30, 60, 120, 240,...:

  • Highlight the cells to contain the series.
  • Select Edit > Fill > Series....

The Fill Series dialog displays.

  • Click on Growth under Series type.
  • Enter 30 in Start value.
  • Enter 2 in Increment (the value by which each term is multiplied to calculate the next term in the series).
The Fill Series dialog


Create your own sort lists to increment data entries

Calc uses sort lists to store the data for creating customized series. Calc provides a number of predefined lists, e.g., the month series in the last activity and offers users the functionality to define their own. You might want to create a sort list if you have a set of standard headings (e.g, students in a course, branch offices in a company).


Icon activity.jpg Follow Along
Let's create a user-defined sort list.
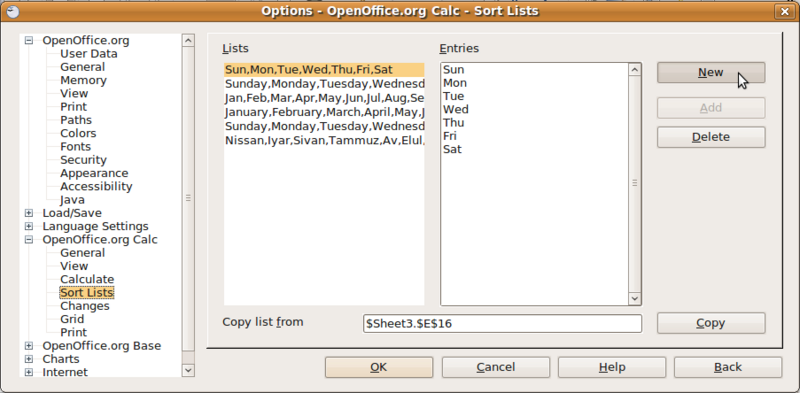
  • Select Tools > Options.

The Options dialog box displays.

  • Expand the OpenOffice.org Calc section in the lefthand box by clicking on the plus sign, OOoExpandButton.png.
  • Select Sort Lists in the sub-list that displays.
  • Click New.
    Options - Sort Lists dialog
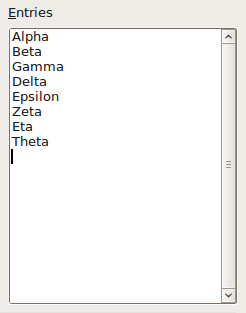
  • Entering the Greek alphabet as a sort list
    Type the names for the first 8 Greek letters into the Entries Window. Press Enter after each name.
  • Click Add when complete.

Your new sort list displays in the Lists window.

  • Click OK to exit the Sort List dialog

Now you can use your new sort list in a worksheet.

  • Type Alpha in A8 and Beta in B8 of the worksheet you are working in.
  • Highlight A8 and B8.
  • Drag the fill handle across the adjacent cells in the row.

Note that the series repeats beginning in cell I8.

Autofill the Greek letters into C8 to I8


Icon present.gif
Tip: In all of these cases, the Fill tool creates only a momentary connection between the cells. Once the cells contain the series, they have no further connection with one another.


Sharing content between sheets

You might want to enter the same information in the same cell on multiple sheets, for example to set up standard listings for a group of individuals or organizations. Instead of entering the list on each sheet individually, you can enter it in all the sheets at once. To do this, select all the sheets (hold down Ctrl and click on the tab for each of the sheets), then enter the information in the current one.

Note that this technique overwrites any information that is already in the cells on the other sheets—without any warning. For this reason, when you are finished, be sure to deselect all the tabs (hold down Ctrl and click each tab), so that each sheet can be edited without affecting the others.