Working with databases/Create a database/Table design

From WikiEducator
Jump to: navigation, search
OtagoPoly Logo S.png


Creating a Database

Now we’re going to have a look at creating a database with a single table.

As we have seen, a database contains a number of objects like a table and a query. In order to make it easy for other people to see what is inside your database, you should consider using a prefix in front of the name to distinguish between objects in the database.

For example, in order to distinguish between the table called Customers and a query called Customers we could type:

TBL_Customers QRY_Customers

Wherever possible try to avoid using spaces in the names of objects in the database and make the name easy to read. For example, if you want to run several words together there are several options:

current_student_information
Easy to read because the underscore character separates and spaces the words.

Or...

CurrentStudentInformation
Capitalise each new word. This is called camel case.

But not...

currentstudentinformation
Too hard to read


OP icon activity.gif

Activity

Please note: the following tutorial will open in a new window/tab. When you have finished the tutorial, simply close the window/tab and you'll return to this page.

Before you go on, please work through the following tutorial:

  • Setting up Tables and Fields


OP icon activity.gif

Activity

We are going to work through an exercise to create a new database. In fact, we will use the information we have gathered from the bookshop exercise described earlier.

  1. Open Microsoft Access 2007.
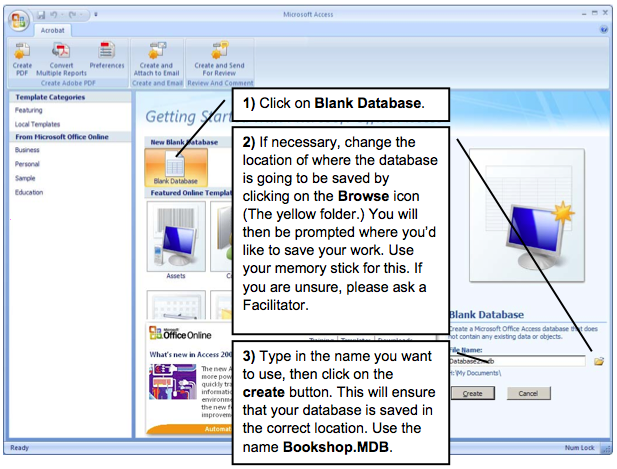
  2. The first thing we need to do is to save the database in a specific location. The following window should appear. Once it does, follow the numbered steps...

    Access-create-dialog.png
  3. At this point Access will create a new table in datasheet view. We will change this view to design view so that we can add new fields.

    Access has two different ways of looking at an object in the database. A default view or layout for the object, and a design view.
  4. Click on the View button and change from the default Table view to the Design view for the table. This is what we use when we want to add fields to the table.
You may be prompted by Access to save your work. Do this by:
    • In Office 2007 : Office Button ⇒ Save
    • In Office 2010 : File Tab ⇒ Save
  1. You will be prompted to provide a name for the new table. Use Books.
  2. Close your database


Table design view

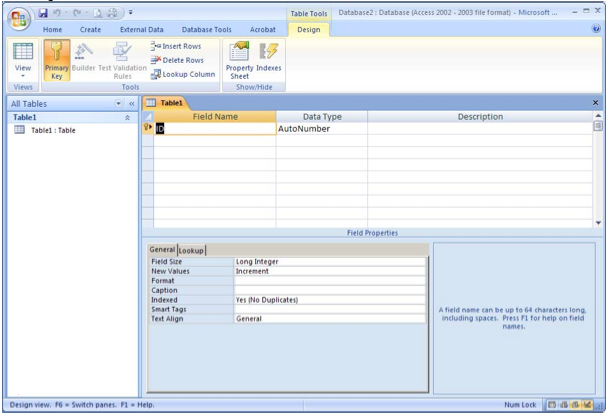
The central panel in design view is where you set out the fields to be used in your table. We are going to use this view to enter the facts that we have gathered, and turn them into fields in our table.

Access-designview.png

This panel is divided up into 4 main areas:

Field name
The name of the field. This will appear at the top of the column in the table view. Make sure you use a name that is meaningful and descriptive.
Data Type
This will become important to us in a little while. We need to tell the computer what sort of information is being stored. Is it text? A number? A date? Currency, etc.
Description
This helps you as the designer of the database, and anyone who might come along after you. Use this section to describe what the field is for.
Field Properties
Here we can further fine tune the qualities of the field.

First things first! Let’s enter in fields for our bookshop database.


OP icon activity.gif

Activity

  1. Open your bookshop database that you saved earlier.
  2. You will probably find that when you open the database for the first time, you see the default view. All objects that are in your database are visible in the Navigation Pane on the left hand side. Double click on the table that you have created that is listed on the left hand side.
  3. Change the table view to design view.
  4. We’re going to start this exercise by entering in the field names for our table. We will use the information we decided on in the planning exercise we completed in Unit 1. You might have something similar to the list below:
    • Book Title
    • Year Published
    • Paperback book?
    • Number of pages
    • Number of pages
    • Author
    • ISDN number
    • To be ordered?
    • Purchase Price
    • Retail Price
  5. You may have identified other fields automatically included in your database, such as the field called ID - don’t worry about this for now, we will talk about this later.
  6. Referring to your list of bookshop data (which will be our field names) click in the first empty row and enter in Book Title
  7. Continue down the list, adding in the correct field names. Don't worry about the Data Type for now, we'll look at that in the next section.
  8. Save your database.