Word processing/Working with text/Working with tabs

Word processing
Learn to use a word processor to produce documents for a business or organisation.
An OP Online course from the National Certificate in Computing (Level 2) programme.
| Word processing | |
|---|---|
| Working with text | Introduction | Character formatting | Paragraph formatting | Editing features | Working with tabs | Key points | Assessment |
Tabs are set using the ruler: before you continue with learning about tabs, ensure that your ruler is displayed. To check this go to the View Tab ⇒ Show/Hide Group and ensure that the ruler check box is checked.
Contents
Tab types
The following options are available for use when setting Tabs:

Below are examples of the different Tab Types:

There are two methods used for setting Tabs: using the Horizontal Ruler or by Using the Tab Stop Dialog Box.
Setting Tabs using the Horizontal Ruler
To set the Tab you need to select your chosen tab type from the tab button at the left hand side of the ruler.

Once you have chosen the tab type e.g. left you click once on the ruler at the position you would like your tab to be inserted e.g., 2 cm. You can set as many tabs as necessary.
Tab guidelines: it is generally accepted to use left aligned tabs for text columns and right aligned tabs for numeric columns.
Setting Tabs Using the Tab Dialog Box
If you want your tab stops at precise positions that you can't get by clicking the ruler, or if you want to insert a specific character (leader) before the tab, you can use the Tabs dialog box.
To display the Tabs dialog box, double-click any tab stop on the ruler, or do the following:
- On the Home tab, click the Paragraph Dialog Box Launcher
- In the Paragraph dialog box, click Tabs
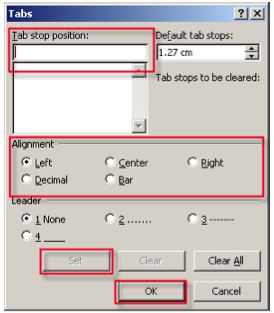
- Enter the location you would like the Tab Stop to be inserted e.g. 3.5 cm in the Tab stop Position field
- Indicate the alignment of the Tab Stop - e.g. Left
- Click Set to complete the Tab Stop
- If you want to create additional Tab Stops repeat steps 3 – 5. Once you are finished setting Tab Stops click OK

Moving between Tab Stops
When text is entered, to move to the next tab use the Tab Key (which is shown as ⇒)

Deleting Tab Stops
You can remove a tab stop by dragging it (up or down) off the ruler. When you release the mouse button, the tab stop disappears.
To delete a single Tab Stop using the Tab Dialog Box:
- Click once on the tab to select
- Click Clear

To delete all Tab Stop using the Tab Dialog Box:
- Click once on the tab to select
- Click Clear All
Adjusting Tab Settings
Once you have set tabs you may want to adjust them to ensure an even and appropriate spacing between columns.
The following steps outline how to adjust tabs using the ruler:
- Select all the text in the tabbed columns
- Using the mouse select the tab stop and drag it along the ruler to its new location.
- Release the mouse button to complete the adjustment
The following steps outline how to adjust tabs using the Tab dialog box:
- Clear the tab you wish to adjust
- Enter in the new Tab position and alignment
Use either the Ruler or the Tab dialog box for the following exercises.
Left Aligned Tabs
- Open a new blank document
- Click on the ruler at 3 cm, 8.5 cm and 12 cm all Left Aligned
- Enter the following using the tab stops you have created

Centred Tabs
- Open a new blank document
- Click on the ruler in the centre of each column; at 3 cm, 8.5 cm and 12 cm all using centre alignment
- Enter the following using the tab stops you have created

Right Aligned Tabs
- Open a new blank document
- Click on the ruler at 6 cm, 10.75 cm and 14.75 cm all right aligned
- Enter the following using the tab stops you have created

Decimal Tabs
Generally right aligned tabs are used for aligning figures. In some cases it may be more appropriate to use decimal tabs, for example when using figures with different amounts of decimal places, or negative amounts.
- Open a new blank document
- Click on the ruler at 8 cm and 12 cm using the decimal tab option
- Enter the following using the tab stops you have created

Using Mixed Tabs
You are able to create multiple tab types, as shown below:

Have a go at recreating the tabs below:

Using Leader Tabs
You can add dot leaders between tab stops or choose other formatting options in the Tabs dialog box. Leaders are a series of …….. or _________ which appear between the tab stops.
Leader tabs help to “guide the eye” across the page from one column to another e.g. in the index or contents page of a book. When using tabs, you apply the leaders on a specified tab stop usually leading up to a specified tab stop e.g. leader dots appear up to the right tab.
An example of leader tabs is shown below:

To create this leader tab example follow the instructions below:
- Open the Tabs Dialog Box
- Enter the tab stop position 14 cm
- Choose Right as the alignment
- Choose Option 2 for the Leader
- Click OK
- Enter the text and press the tab key to move to the tab stop location (14 cm). The leader tab will appear.

Leader tab exercise 1
Leader tab exercise 2
|


Adjusting the line spacing of tabs
When using leader tabs you will need to consider the space you leave for text to be written: you may need to adjust the line spacing. It is recommended to use either one and half line spacing or double line spacing.
To adjust the line spacing:
- Select all the text you would like to adjust the line spacing of
OR
set the line spacing before you create your tabbed document - From the Paragraph Group on the Home Tab
- Select the Paragraph Dialog Box Launcher to open the Paragraph Dialog Box
- Using the Line Spacing Drop Down Arrow select either 1.5 Lines or Double
- Click OK

|
Please note: the following tutorial will open in a new window/tab. When you have finished the tutorial, simply close the window/tab and you'll return to this page. You might like to check out the following tutorial: Don't forget to check out the video included in the tutorial.
|