User:Leila Boyle/My sandbox
Bold
Italics
Underline
Bold and italics
Bold and underline
Italics and underline
Bold and italics and underline
Contents
Heading 1
Lorem ipsum dolor sit amet, consectetur adipisicing elit, sed do eiusmod tempor incididunt ut labore et dolore magna aliqua. Ut enim ad minim veniam, quis nostrud exercitation ullamco laboris nisi ut aliquip ex ea commodo consequat. Duis aute irure dolor in reprehenderit in voluptate velit esse cillum dolore eu fugiat nulla pariatur. Excepteur sint occaecat cupidatat non proident, sunt in culpa qui officia deserunt mollit anim id est laborum.
Heading 2
Lorem ipsum dolor sit amet, consectetur adipisicing elit, sed do eiusmod tempor incididunt ut labore et dolore magna aliqua. Ut enim ad minim veniam, quis nostrud exercitation ullamco laboris nisi ut aliquip ex ea commodo consequat. Duis aute irure dolor in reprehenderit in voluptate velit esse cillum dolore eu fugiat nulla pariatur. Excepteur sint occaecat cupidatat non proident, sunt in culpa qui officia deserunt mollit anim id est laborum.
Heading 3
Lorem ipsum dolor sit amet, consectetur adipisicing elit, sed do eiusmod tempor incididunt ut labore et dolore magna aliqua. Ut enim ad minim veniam, quis nostrud exercitation ullamco laboris nisi ut aliquip ex ea commodo consequat. Duis aute irure dolor in reprehenderit in voluptate velit esse cillum dolore eu fugiat nulla pariatur. Excepteur sint occaecat cupidatat non proident, sunt in culpa qui officia deserunt mollit anim id est laborum.
Heading 4
Lorem ipsum dolor sit amet, consectetur adipisicing elit, sed do eiusmod tempor incididunt ut labore et dolore magna aliqua. Ut enim ad minim veniam, quis nostrud exercitation ullamco laboris nisi ut aliquip ex ea commodo consequat. Duis aute irure dolor in reprehenderit in voluptate velit esse cillum dolore eu fugiat nulla pariatur. Excepteur sint occaecat cupidatat non proident, sunt in culpa qui officia deserunt mollit anim id est laborum.
Heading 5
Lorem ipsum dolor sit amet, consectetur adipisicing elit, sed do eiusmod tempor incididunt ut labore et dolore magna aliqua. Ut enim ad minim veniam, quis nostrud exercitation ullamco laboris nisi ut aliquip ex ea commodo consequat. Duis aute irure dolor in reprehenderit in voluptate velit esse cillum dolore eu fugiat nulla pariatur. Excepteur sint occaecat cupidatat non proident, sunt in culpa qui officia deserunt mollit anim id est laborum.
Heading 6
Lorem ipsum dolor sit amet, consectetur adipisicing elit, sed do eiusmod tempor incididunt ut labore et dolore magna aliqua. Ut enim ad minim veniam, quis nostrud exercitation ullamco laboris nisi ut aliquip ex ea commodo consequat. Duis aute irure dolor in reprehenderit in voluptate velit esse cillum dolore eu fugiat nulla pariatur. Excepteur sint occaecat cupidatat non proident, sunt in culpa qui officia deserunt mollit anim id est laborum.
- This is my first item.
- This is my second item.
- This is my third item.
To do list
- Complete Day 3 stuff
- Complete Day 4 stuff (with a 30-minute time limit!)
More list stuff
The following:
# The first item in the list
# The second item in the list
#* The first nested bullet
#* The second nested bullet
# The third item in the list
gives:
- The first item in the list
- The second item in the list
- The first nested bullet
- The second nested bullet
- The third item in the list
Day 5
When using plain syntax (ie no Rich Editor), you can add external and internal links very easily.
External links
Three ways of doing external links:
- Simply type the full URL out so http://www.google.co.nz gives http://www.google.co.nz
- Enclose the full URL followed by the words you want the link to come from in square brackets so [http://www.google.co.nz Google Search Engine] gives Google Search Engine
- Enclose the full URL only in square brackets to act as a kind of footnote so [http://www.google.co.nz] gives [1]
Internal links
Simply enclose the part of the URL following http://wikieducator.org in two sets of square brackets.
For example: [[Main_Page]] gives Wiki Educator's Main_Page; [[Learning4Content]] gives the Learning4Content section of Wiki Educator; and [[User:Leila_Boyle]] gives my User:Leila_Boyle user page:
Day 6: Wednesday, Week 2
This was actually done in two parts:
- on Saturday 31 July, 2010. Started tutorial at 06:39, 31 July 2010 (UTC) and stopped at 07:40, 31 July 2010 - so about an hour.
- on ???
Yet to do:
- Uploading a new image on WikiEducator from my computer - see http://wikieducator.org/Wikieducator_rich_text_editor_tutorials/Images/Basics#Uploading_a_new_image_on_WikiEducator_from_your_computer
- Frames & Thumbnails - see http://wikieducator.org/Wikieducator_rich_text_editor_tutorials/Images/Frames_and_thumbnails
Objectives: Images and my 2nd wiki certification!
Activity 1
- Click on the link to the wikimedia commons. I clicked on http://commons.wikimedia.org/
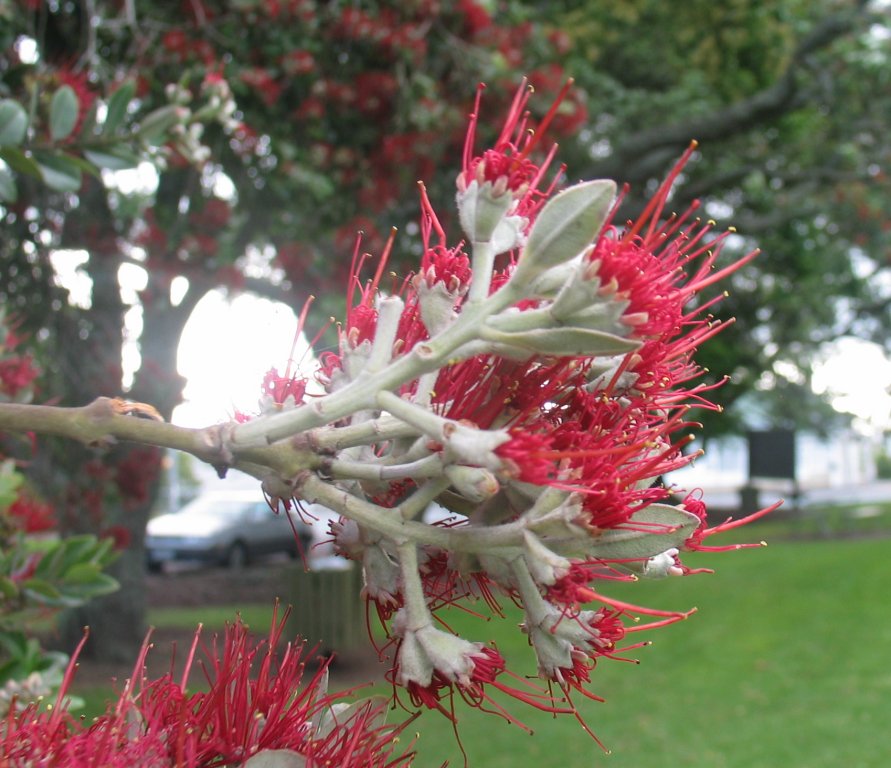
- Enter a keyword or keywords in the search text area. I used flower .jpg zealand as my key words and found a lovely image taken by gadfium of a Pohutukawa flower (NZ Christmas tree which flowers in summer over the Christmas/New year period covering NZ with beautiful red colour.
- Select the file you are most interested in.
- Write down the exact location and name of the file or save this URL on your user page for use in a future activity.
- My URL = http://commons.wikimedia.org/wiki/File:Pohutukawa_flower.jpg
- Name of this file on the Wikimedia Commons: Pohutukawa_flower.jpg
- Explore the image file on the Commons, and scroll down to the "Permission" section and read the licensing information This image has been released into the public domain by its author, gadfium. This applies worldwide. In some countries this may not be legally possible; if so: gadfium grants anyone the right to use this work for any purpose, without any conditions, unless such conditions are required by law.
Activity 2
Add an existing image to your user page or sandbox by using the Rich Editor (by clicking on the Insert/Edit Image button in the toolbar).
- I clicked on the Insert/Edit Image button:
The Image Properties dialog box was displayed.
- I typed "Message_pad.jpg" in the Image file name text area. As I typed, available files were displayed in the Automatic search results window.
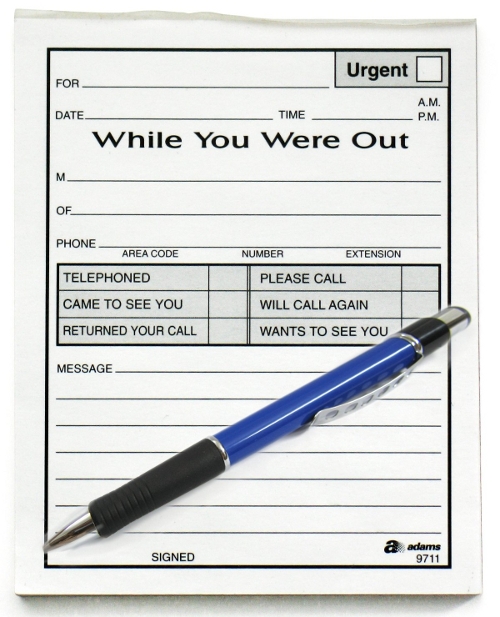
- I clicked on the identical file name which appears in the Automatic search results window. I saw a preview of the image, a message pad with pen, which appeared in the area to the right of the text boxes.
- I clicked on OK at the bottom of the dialog box to see the image displayed in the wiki page.
- I clicked on Save page.
Here is the result!
Activity 3
I am now going to add a Wikimedia Commons file to my sandbox
The image I am going to add is the pohutukawa flower image I found earlier and it's image name is Pohutukawa_flower.jpg
- I clicked on the Insert/Edit Image button in the Rich Editor toolbar. The Image Properties dialog box displayed.
- I typed my "image name" (Pohutukawa_flower.jpg) in the Image file name text area. As expected, I did not see a preview of the image in the dialog box.
- I clicked on OK to see the image displayed in the wiki page and saw the image I expected which was very cool! So easy...
- I clicked on on Save page as I was satisfied.
Now the image is published on my page just below. Very pretty!
Day 7: Thursday, Week 2
This was started at 06:06, 2 August 2010 (UTC) and completed at 06:53, 2 August 2010 (UTC) - so about 45 mins.
Collaborative Editing
In this workshop I:
- was introduced to the practice of wiki ethics,
- explored the Recent changes page and saw how we can monitor all edits in WikiEducator,
- took a look at the diff & history links, and
- learnt how to Revert a page to a previous version.
Key points
WikiEducator work is based on a consensus model. In practice members agree to work as follows:
- Draft plans, outlines and suggestions are created on the wiki. Anyone is free to create a new wiki page in relation to any content.
- Use your discretion when editing, feel free to correct any typing mistakes or improve the layout of pages you see in the wiki. Minor edits, improvements and new additions are usually done without discussion.
- In the case of any substantive change you would like to make, first post a comment or message on the talk page or email the primary authors to share and discuss your ideas for any changes.
- Consensus discussions take place in the discussion pages (i.e., pages with titles that begin with "Talk:" which can be accessed via the discussion tab which you will find above the content area of each page).
- Once consensus is achieved, please make the necessary changes on the relevant wiki page.
- If you want to start working on your own without having others help you out, we advise creating these pages as sub-pages of your User page. Your User page area is a personal space and this tells other users that you would like to create this content on your own.
Activity: see how Recent changes works
- I went to "http://WikiEducator.org" in a new tab.
- I clicked on the Recent changes link in the navigation menu to the left of this screen and took a look at some of the changes that have been made recently. Felt like a bit of an online stalker as I read some of the comments people had made in "Talk:" sections of the site!
- I don't know what the instruction (Use the back arrow to move back between pages as you click on the various links on this screen to see what changes have been made.) actually means? Need to ask someone about this.
Activity: see how the history tab works
- I took a look at the history of the tutorial page (http://wikieducator.org/Wikieducator_rich_text_editor_tutorials/Collaborative_editing/Diff_and_history) by:
- firstly clicking on the history tab at the top of the page.
- then I selected the versions I wanted to compare by clicking the radio button beside each and click on the Compare selected versions button at the top (or bottom) of the list.
- Red font shows the differences on the yellow (older) version on the left and the green (more recent) version on the right.
- I got back to the original page and closed the history information by clicking on the page tab at the top of the page.
Activity: Pseudo Vandalism - Using the undo link to revert a page to a previous version
In this activity I added a "vandal" entry on my own user page and corrected it using the "undo" function.
- From my user page (http://wikieducator.org/User:Leila_Boyle) while logged in, I clicked on the edit tab so I could make a change.
- I entered the following text: "This is a dummy vandal entry." right at the top of the page.
- I clicked on the Save page button. I could see my pseudo vandal entry on my user page.
- I clicked on the history tab above the content area of my user page.
- I checked that the radio buttons for the two most recent edits are highlighted green on the history page.
- I clicked on the Compare selected revisions button.
My most recent change, i.e. "This is a dummy vandal entry.", displayed in red text in the right hand version.
- I clicked the undo link above the right hand version of the comparison, to the right of the "Latest revision as of..." heading.
A new comparison displays with the "vandal entry" on the left and a blank area on the right. This new right hand version was a preview and was not yet saved.
- I scrolled down to the bottom of the page, noting that the summary window automatically describes the "undo revision". I didn't bother to further edit the summary.
- I clicked on the Save page button.
I had now reverted my page back to a previous version, effectively removing my dummy vandal entry!
Day 8: Friday, Week 2
This was started at 06:55, 2 August 2010 (UTC) and completed at 07:29, 2 August 2010 (UTC), 2 August 2010 (UTC) - so about 35 mins.
Objectives: Day 8 - Communication and Interaction
Today I:
- Learnt how to use the Discussion or Talk pages in the wiki,
- and explored some useful features like the Watchlist, and the My Contributions link.
How to use the talk pages
- Find the relevant talk page: Every page in WikiEducator has a corresponding discussion tab which you will find at the top of the page. Think about the purpose of your contribution, for example:
- If you want to talk about the content of a page in WikiEducator - then you should post your thoughts on the relevant content page in the wiki;
- If you want to communicate with a specific WikiEducator user - then you should post your comment on the talk page of the user concerned;
- Scan existing threads on the talk page: After clicking on the discussion page, scan the headings of the existing threads on the talk page:
- If there are no existing discussions, click on the "Start a new discussion", link. Think of a descriptive title for your thread and enter this in the subject field. Type your response in the standard text box and click on "save page" button to post your comment. If you want to monitor replies, make sure to check the "Watch this page" option before saving your post. WikiEducator will automatically sign your post
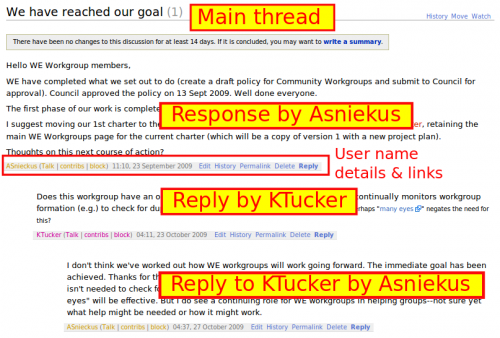
- If you want to reply to an existing thread then click on the "reply" link which you will find below each individual post and next to the User name who posted the relevant item on the discussion page.
- If none of the threads or headings relate to what you want to say, you should click on the "Start a new discussion" link close to the top of the relevant discussion page.
- If you want to communicate directly with a user who posted an item on the talk page, click on the "talk" link which you will find below the relevant discussion item next to the user name of the author.
Tips on using the talk pages
- Try to keep on topic: Try to keep discussions on the topic of how to improve the associated content.
- Discuss edits: The talk page is particularly useful to talk about edits. If one of your edits has been reverted, and you change it back again, it is good practice to leave an explanation on the talk page and a note in the edit summary that you have done so. The talk page is also the place to ask about another editor's changes. If someone queries one of your edits, make sure you reply with a full, helpful rationale.
- Make proposals: New proposals for the page can be put forward for discussion with other editors, if you wish. Proposals might include changes to specific details, page moves, merges or making a section of a long page into a separate section or page.
The following guidelines are also considered good practice for talk pages:
- Try to be concise: If your post is longer than 100 words consider shortening it. Long, rambling messages may be difficult to understand, and could be either ignored or misunderstood.
- Keep the layout clear: Remember that you can use the standard layout features including , bold, italics and lists in your posts on the discussion pages. Keep the talk page attractively and clearly laid out, and avoid repetition, muddled writing, and unnecessary digressions. Talk pages with a layout are more likely to attract continued participation.
Activity: Replying to an existing thread
In this activity I learnt how to reply to an existing thread on a discussion page. I did this by going to this thread directly. I replied to Mackiwg's comment here.
Another way of doing it would have been to:
- click on the "discussion" tab at the top of the tutorial page (ie http://wikieducator.org/Wikieducator_rich_text_editor_tutorials/Communication_and_interaction/Discussion).
- finding the thread entitled: "L4C -- Test discussion thread" posted by my facilitator
- clicking on the reply link which I found below the post next to the author (user name) who initiated this thread.
Am I going to be lucky - is someone from the community going to leave me a message on my own talk page?!?!?
My Talk pages
Every page on the wiki has an associated discussion or talk page, even your User page. The talk page of your User page can be used by others to contact you to discuss projects or edits that you have made. The my talk link at the top of this page (assuming you are logged in) will take you to your talk page. Other wiki users may use your talk page as a way to contact you to discuss a project or to introduce themselves.
Summary
- You can talk about content pages in the wiki by posting a message on the corresponding talk page of the content page concerned. Click on the discussion link at the top of your browser.
- You can leave a message on the User page of an WikiEducator. Go to the User page of the person you would like to leave a message and click on the discussion link you will find on the the user's User page.
Useful Features
My Watchlist
This feature of the wiki watches the pages specify. There are two ways I can add a page to my watch list:
- The watch tab displayed on the top of your browser when logged-in to the wiki
- Checking the watch page radio button in the edit view before saving your page.
Users who are logged-in have the convenient ability to "watch" pages by clicking on the watch tab at the top of the page. This will add the page you are currently on to your watchlist. The watch link will change to unwatch for any page you have added to your watchlist. Clicking on unwatch will remove the page from your watchlist.
The my watchlist link that appears along the very top of the page after your login name acts like a personal Recent changes page for pages that are on your watchlist. It gives a list of all watched pages, ordered backward according to the time of the last edit of the page. Any future changes to a page on your watchlist or its associated Talk page will be listed in your my watchlist page. The page will also appear bolded in the list of recent changes to make it easier to pick out.
Each line on the my watchlist page shows details about the last edit: the day it was edited, whether it was a minor or major edit, the time, a link to the page, and the difference between the current version and the last one, the history, the user name and the edit summary.
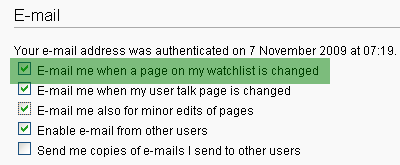
If you are editing a page you can also add the page to your watchlist by clicking on the "Watch this page" checkbox shown highlighted in green in the figure below.
Email notification
If you are logged into the wiki you will have the ability to modify some preferences on how the wiki works for you. One of the preferences available to you from your my preferences page is to notify you via email when a page you're watching is changed. This can be a very useful way to keep track of changes to pages or projects you are interested in but only works if you have supplied and authenticated an e-mail address. For more information adding an e-mail address to your profile see item 6 in the user profile tab of your preferences page.
My Contributions
The my contributions page is a special page that keeps track of which pages you have worked on. The link is located at the top of the page to the right of the user homepage link. Checking your contributions is a useful way to refresh your memory about pages you have worked on (and to easily access them again). You can also use my contributions to find out whether there have been any subsequent edits. This makes it possible to "watch" pages even if you haven't put them on your watchlist.
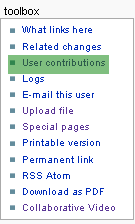
Other people's User contribution pages can also be accessed and are useful for seeing how other users have contributed. To see another user's contributions, bring up the user's User page (User:username) and click on User contributions in the left hand toolbox as shown in the figure below.
