Researching and Presenting Data/Presenting/Animations and transitions
| Researching and Presenting Data | |
|---|---|
| Presenting your presentation | Introduction | Viewing your presentation | Checking your presentation | Animations and transitions | Slideshow options | Printing notes and handouts | Key points | Assessment |
Contents
Slide Transitions
|
Please note: the following link will open in a new window/tab. When you have finished, simply close the window/tab and you'll return to this page.
You might also find it helpful to view the video on page 2 of the tutorial.
|
|
For Slide Transitions and Custom Animations it is important to keep them consistent, and that they are used to enhance the presentation rather than distract the audience from the information you are presenting. Too much movement and objects flying in can be distracting so choose carefully the effect you want to create.
|
Add Custom Animation to individual objects
|
Please note: the following link will open in a new window/tab. When you have finished, simply close the window/tab and you'll return to this page.
You might also find it helpful to view the video on page 2 of the tutorial.
|
Tourism Dunedin part 10Use your Tourism Dunedin PowerPoint presentation to add Custom Animations.
Keep the animations consistent for each slide. Don’t use too many different effects.
|
Adding Timing Effects
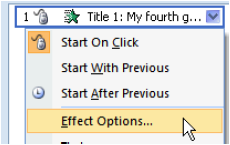
The default Start is On Click, which means that the title won’t appear until you click your mouse. Using the default On Click start is not a good effect for a professional presentation, because the presenter has to constantly click the mouse instead of presenting the topic! We are going to change this:
- Click on the corresponding number of the animation to show the drop down list
- Choose Effect Options
- From this down arrow on your animation choose Effect Options
- A Box dialog box will appear: choose the Timing tab
- Click on the Start down arrow
- Choose After Previous
- Choose Delay
- Choose Speed
- Change to 5 seconds (Very Slow)
- Click on OK
This will give a smooth and professional look to your presentation. One action will follow on smoothly after the previous action with a slight delay.
|
Please note: the following link will open in a new window/tab. When you have finished, simply close the window/tab and you'll return to this page.
|


