CCNC/CCNC Module 5/The database application/First Steps with Databases/Login to an existing Database
| First Steps |
Opening a Database | Login to an existing Database | Create a new Database | Save a Database | Get Help | Close a Database | Self Assessment | Summary & FAQs |
Contents
Login to an existing Database
Upon completion of this tutorial the learner will be able to:
|
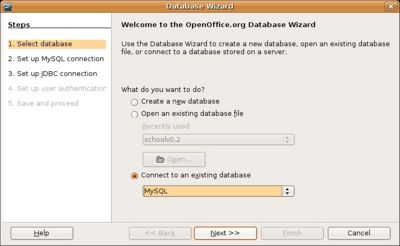
Select a data source
OpenOffice 2.0 Base allows you to connect to many different data sources. Base natively supports some flat file database formats, such as the dBase format. You can also use OpenOffice 2.0 Base to connect to external relational databases, such as databases from MySQL or Oracle.
It is important to remember that this describes connecting to a non-OpenOffice database. For all of this module you will be creating and using an OpenOffice 2.0 database.
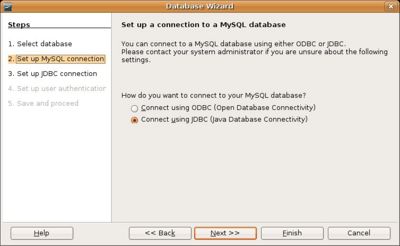
Select a connectivity method
Choose to use either Open Database Connectivity (ODBC) or Jave Database Connectivity (JDBC). If you choose ODBC you will have had to previously configure an existing data source. In this example we will select JDBC as it is a more common method when using Ubuntu and MySQL.
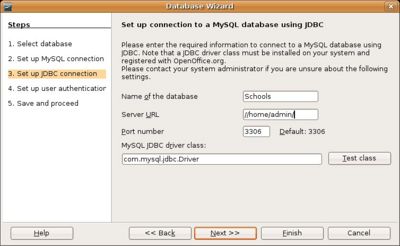
Set the connectivity parameters
Set the connectivity parameters by entering values in the text fields.
- Name of the database is where you will enter the name of the database you want to access.
- Enter the URL for connecting to the database, for example, for the MySQL-JDBC-Driver, enter "jdbc:mysql://<Servername>/<DB-Name>", where "DB-Name" is the name of the database. For more information on the JDBC driver, consult the documentation that came with the driver.
- port is the default port for MySQL databases, namely 3306.
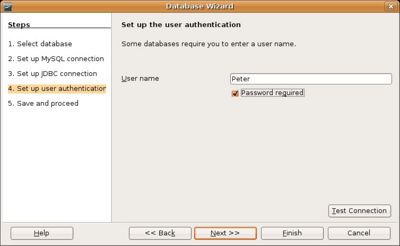
Set the user name and password
Enter the user name for the database connection. This is important for it will correspond with the database permissions for the given user.
Log in to the database
Upon completion of the connection wizard you will be prompted for the users database password. If you have difficulty accessing the database contact your local administrator.


