Animal Inventions
| Instant wiki maker | Making handouts | Editing tips |
Contents
- 1 Student worthiness
- 2 Primary biological content area covered
- 3 Materials
- 4 Handouts
- 5 Description of activity
- 6 Lesson plan
- 7 Potential pitfalls
- 8 Reaction to the Teaching Experience
- 9 Math connections
- 10 Literature connections
- 11 Other Resources and Connections
- 12 Connections to educational standards
- 13 Next steps
- 14 Citations and links
Biology In Elementary Schools is a Saint Michael's College student project from a course that ran between 2007 and 2010 and fully described in this book chapter. The student-created resources have been preserved here for posterity. Link under 'toolbox' for printer-friendly versions of the exercises. Click on handouts to print full resolution versions. Please see Wikieducator's disclaimer, our safety statement, and the Creative Commons licensing in English and in legalese.
Student worthiness
Tried and trusted!
One note: We found that this lesson is made up of two major parts:
- (1) the observation of the live animals
- (2) the creation of the animal invention itself. Since our lesson time frame is a mere 20 minutes, we had a hard time giving both sections appropriate time. We suggest putting aside 45-60 minutes to teach this lesson. The longer time will be much more accomodating to the content, as well as to bring everything together full circle.
Primary biological content area covered
Students will:
- Name the characteristics of animal groups.
- Classify the major animal groups such as: mammals, birds, reptiles, amphibians, fish, and insects.
- Identify the elements of specific habitats that each animal needs in order to survive.
- Wonder, plan, investigate, reflect, share and act through the scientific method.
Materials
Live Animals:
- Arthropods (Invertebrates)
- Bess Bugs
- Crayfish
- Chordates (Vertebrates)
- Catfish
- Mud Puppies
- Humans
Non-living Animals:
- Chordates
- Bird Skeleton
- Preserved Turtle
- Human Skeleton (if available)
- All the Animals
Other Materials:
- Observation Sheet
- Classification Worksheet
- Large Post-it Note Paper
- Markers
- Glue (Hot Glue Gun would be ideal)
- Variety of common, art, and household materials including:
- Cotton Balls
- Cardboard coffee cups
- Pipe cleaners
- Feathers
- Plastic straws
- Clothespins
- Colored paper
- Egg cartons
- Foam pieces
- Toilet Paper Rolls
- Styrofoam Cups
- Scaly-like material
- Leather material
- Individual tanks for some animals
- Small pieces of cardboard
Handouts
- Worksheets
Description of activity
Students will be classifying animals into six major animal groups, while also describing the characteristics of the animals that are found in each group. Then, students will identify which animal group they are most interested in. Once students have chosen an animal group, they will decide on at least three characteristics that are found on all of the animals in that group, and use those characteristics when building their animals. Finally, they will then create an animal out of the creative materials.
Lesson plan
- Students will begin by observing a variety of living and non-living animals. They will record characteristics of the animals and their habitats on their observations sheets.
- Students will convene as a group and discuss what they observed for each animal.
- With these observations, students will identify the characteristics that belong to each animal group. They will be written on the Post-it Note paper by the teacher under the appropriate heading.
- Once these characteristics have been sorted out, students will classify each animal they observed into their specific animal groups.
- Using these observations, students will discuss how these characteristics fit into their specific habitats.
- Students will use this information to choose one of six animal groups for their project.
- They will then choose a minimum of three characteristics of their chosen animal group to portray in their animal creations.
- Using a variety of creative materials (listed above), students will create a 3D animal focusing on the three characteristics that they have chosen.
- Once students have completed their animal creation, they will share with the group what their animal is, what animal group it belongs to, what characteristics they chose to portray, which habitat their animal would best survive in (based on the chosen characteristics) and why.
- If time allows, students will complete the animal classification worksheet as a group.
Potential pitfalls
- Some students may be afraid of coming into contact with the animals. Be prepared to talk with students about handling them in an appropriate and gentle manner.
- Time may be an issue, manage time wisely or if possible, allow for a longer period of time to complete the experiment. For example, we split into two stations (the observing station and the animal creation station)
- Elmers or any other wet glue may not be ideal for building 3D models. Hot glue guns will work best and therefore each student needs their own adult supervisor to help them glue his or her pieces together.
- Once the animal observation section ends, move the animals out of the line of sight of students, especially while giving directions. This will avoid distractions because some students may be extremely fascinated by the animals. Bring the animals back to a visible area at the end so that students who are interested can continue to observe. If a student would like to see the specimen once more for a reminder, take them separately over to view the animal. Having two stations that are a fair distance away from each other would be the best way to resolve this problem.
Reaction to the Teaching Experience
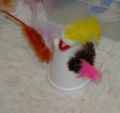
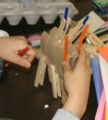
The lesson went surprisingly well, especially since we had to quickly reorganize into two separate stations in order to be able to complete the activity the best we could within the available time. The students were extremely knowledgeable about the animal groups, the characteristics of the animals in each group, and the habitats in which they lived. The students did a great job of being fully engaged throughout the entirety of the lesson which often time ended up being longer than twenty minutes. When the students made their way to the creation station they blew all three of us away with the animals they chose to portray and the materials in which they used to do so. The students completed the experiment with higher skill and interest level than was originally anticipated. Overall, it was a great experience to work with such a great group of enthusiastic, knowledgeable, and creative students! Below are some photos of some of the products students created.
- Student Creations
Math connections
During the observations, students will be using several math skills including counting (counting insect legs, gills, fins, and the number of animals present), and noticing symmetry within the animals. We will also make a bar graph to show which animal group the class is most interested in. This will be completed by the teacher in front of each group and sent back to the classroom for them to discuss.
Literature connections
- Eyewitness Books: Reptile by Colin McCarthy
- Birds, Nests, and Eggs by Mel Boring
- Eyewitness Juniors: Amazing Mammals by Alexandra Parsons
- Water Hole: Around the Clock with the Animals of the Grasslands by Zahavit Shalev
- Extreme Animals Dictionary by Clint Twist
- I see a kookaburra! : discovering animal habitats around the world by Steve Jenkins & Robin Page Animals and Camouflage in their Habitats
Literary activity Animal Inventions
Other Resources and Connections
Eyewitness DVD: Fish by Bill Butt, and David Hanson
Connections to educational standards
Grade Expectations:
There are no S1-2:30 at the 1-2 grade level, but the SPK-K:30 standards can be reviewed.
SPK-K:30
Students demonstrate their understanding of Structure and Function-Survival Requirements by:
Observing and recording the parts that make up living things
Science Concept: a. Living things (plant and animals) are made of parts that enable them to survive.
S1-2:4 Conducting Experiments
Students demonstrate their ability to CONDUCT EXPERIMENTS by:
Describing observations using senses rather than feeling
and
Recording observations of similarities and differences
Next steps
In warm weather, students can take field trips outside to notice more animals than the ones that were presented during the experiment. This can be as simple as walking to the playground, or going to a local stream. They can classify those animals and discuss the different habitats that they found them in.
This lesson is an incredible choice for a differentiated classroom because it allows for various means and methods for assessment. If a student in your class is very verbal, allow for them to take the time give a brief report to a small group or large group about one of the animals you are observing. If a student is less inclined to speak publicly, invite them to write a brief response in paragraph form about any observations they took note of while checking out a specific specimen.
Also, the creative part of the lesson (creating the actual animal) is an ideal way for students to express a specific animal group with their artistic sense and interest.
Citations and links
Vermont Grade Expectations. [3]


