Where do they Live?
| Instant wiki maker | Making handouts | Editing tips |
Contents
- 1 Where do they Live?
- 1.1 Student worthiness
- 1.2 Primary biological content area covered
- 1.3 Materials
- 1.4 Handouts
- 1.5 Description of activity
- 1.6 Lesson plan
- 1.7 Potential pitfalls
- 1.8 ATTENTION! Must Do
- 1.9 Art connections
- 1.10 Literature connections
- 1.11 Connections to educational standards
- 1.12 Demo Photos
- 1.13 Reflections
- 1.14 Photo from the Class
- 1.15 Citations and links

Biology In Elementary Schools is a Saint Michael's College student project from a course that ran between 2007 and 2010 and fully described in this book chapter. The student-created resources have been preserved here for posterity. Link under 'toolbox' for printer-friendly versions of the exercises. Click on handouts to print full resolution versions. Please see Wikieducator's disclaimer, our safety statement, and the Creative Commons licensing in English and in legalese.
Where do they Live?
Student worthiness
Tried and trusted.
Primary biological content area covered
Students will be able to:
- visualize how various habitats look
- identify what kinds of animals live in these habitats
- list the basic requirements for survival; food, water, shelter
Materials
Materials each student group will need:
- shoe box or 2-liter bottle (depending on their habitat)
- colored pencils
- markers
- scissors
- Elmer's glue
- adhesive tape
- drawings of animals
Materials for students to choose from:
- sand
- rocks
- pebbles
- twigs
- water
- blue food coloring
- green Easter grass
- dried alfalfa hampster grass
- popsicle sticks
- various colored pipe cleaners (with extra green)
- various colored construction paper (especially blue and green)
Handouts
The only handouts necessary for this activity are printouts of animals that can be cut out and colored by the students. The pictures we are currently using are under copyright, but are being used with permission of this website: Enchanted Learning. http://www.enchantedlearning.com/coloring/. Copyright 1996 - 2007.
Description of activity
Each student group will be assigned one of three habitats: ocean, desert, or forest. They will create their assigned environment inside of a shoebox (for forest and desert) or a 2-liter bottle (for ocean). Sand, grass, leaves, stones, water, and other materials will be provided along with various art supplies for students to create more features that they feel are necessary for their environment. Students will then choose the appropriate animals that live in their habitat from the drawings provided and place them into or on the outside of their models.
Lesson plan
The focus of the lesson is to help students understand the different habitats in which plants and animals thrive. The three habitats we will explore are the ocean, desert, and forest. After introducing the habitat to the students, they will be asked to list different elements that are necessary in their assigned habitat for animals to survive (5 minutes).
The students will work together in smaller groups to create one of the three habitats inside of a shoe box or plastic bottle (depending on their particular habitat). The students will have access to all of the materials and they are free to choose the appropriate materials for their habitat. Using the materials, the students will work together to create their habitat (15 minutes).
After creating their habitat, students will pick out and color the appropriate animals for their environment from the ones provided. The cut out animals will then be placed either inside the habitat or on the outside of it (5 minutes).
After the habitats are assembled, students can share and explain their habitats with each other, including why they made the choices that they did (5 minutes).
The students will spend the remaining time cleaning up the materials and work area.
Potential pitfalls
This project was initially designed to use all natural materials, such as grass, twigs, and leaves from outside. However, because we did this in the winter, we had to alter the materials.
Students will need assistance in adding the water and sand to their habitats because they may try to put in more than is necessary.
The ocean habitat accumulates algae over time. This could provide the opportunity for students to use a microscope and explore.
ATTENTION! Must Do
Do not allow students to put the dried alfalfa hamster grass in the ocean habitats. It will quickly rot and smell!
Art connections
This activity is also strong in the art discipline because students construct a habitat through putting together various materials using their creativity. They will be able to color their animals and use various art supplies such as colored pencils, markers, pipe cleaners, popsicle sticks, and paper to build their assigned habitat. With extra time, this activity can integrate the arts even further by allowing students to spend time creating more elaborate and detailed trees, coral, flowers, rivers, etc. The more varying materials that you can supply, the more creative your students will be, which enhances the art connection. As is often done with art pieces when they are finished, students could circulate around the classroom and view the other habitats and then make a comment about an artistic element that they liked and thought worked well in a habitat besides their own. This can be done with science features as well, but is a common procedure in viewing the artwork of others.
Literature connections
- Jenkins, Steve. 2005. I See a Kookaburra: Discovering Animal Habitats Around the World. Houghton Mifflin Co.
- This book includes many unusual animals that students may not be familiar with. The teacher could read this book aloud to the students and then go back through a second time and ask them to identify the habitats that each animal lives in and why they think so. A list of the animals and habitats can be made on large chart paper. This list can serve as examples of other animals that live in the habitats being studied that the students did not think about. This activity also helps students to apply what they have learned about animals' needs and their habitats to animals and places that they may not be familiar with.
- Eugene, Toni. 1985. Creatures of the Woods. National Geographic Society.
- Gibson, Barbara. 1987. Creatures of the Desert World. National Geographic Society.
- These books are a great resource to simply have on hand when students begin to make their habitats. Students who are struggling to identify the characteristics of their habitat can look through these books to gain more ideas. These books are also a great place for students to learn about animals that live in their habitat that they are not familiar with.
- Joanna Cole. 1992. The Magic School Bus On the Ocean Floor. Scholastic Inc.
- Jenkins, Steve. 1998. Hottest Coldest Highest Deepest. Houghton Mifflin Company.
Connections to educational standards
Vermont Science Standards
7.13: Students understand the characteristics of organisms, see patterns of similarity and differences among living organisms, understand the role of evolution, and recognize the interdependence of all systems that support life. This is evident when students identify characteristics of organisms (needs, environments that meet them, etc).
Demo Photos
- Habitats
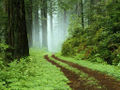
Figure 1. Forest Habitat
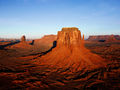
Figure 2. Desert Habitat
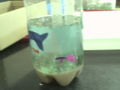
Figure 3. Ocean Habitat
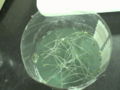
Figure 4. Ocean Habitat


Reflections
The habitat building went really successfully the students listened while we gave instructions and seemed excited for a hands-on activity. The assigned groups worked well together and no messes were made. They appeared to enjoy the project and we asked questions on where other animals not shown would live. The students responded well and took something from "Where do they Live?"
I agree that the project went really well. The students all seemed to enjoy it and were active participators. The only thing I would really change is having only two people or at the max three work on one habitat because I thought that four was a bit too many people for the little box. I did like how they worked together however and definitely think it's a good idea to keep it a group project. They all were able to throw out ideas in the group brainstorm but when it came to building the actual habitat I found that some kids did a lot more than others. Also if there is more time, I think having the students draw animals as well as selecting the correct animals for their habitat would be a good idea because many of the students wanted to draw their own. Overall I think it was a great success!
I think that the project went well and most of the students were excited to be building a habitat. The students worked well together and mainly agreed on what should be in the habitats. Having four students working on one habitat, however, made it so some of the students, usually the more reserved ones, did not have much to do. Having smaller groups would have been more ideal. The students understood the concept of the project really well and were able to identify the animals that should go into each habitat and were usually able to explain why. We did well asking the students additional questions about animal interdependencies when they finished the habitats more quickly than other groups.
Overall, I think that our activity was quite successful for each group of students. The students seemed excited to make their habitats, with the freedom to choose from all of the materials. The students were very cooperative and worked well together in their groups of four. Ideally, this project would work better if the students were able to make their own habitat. The students had a decent amount of prior knowledge about habitats, but if we had more time I think it would helpful to have a mini-lesson about habitats, before the activity. The activity ran smoothly for each group, but the activity did get monotonous because of the limited materials. I think this activity would work best in any other season besides winter. This would allow the students a chance to gather their own natural materials for the habitats, allowing for more creativity. In addition, if the students were able to gather their own materials, they would be able to create other habitats besides the three chosen for them. There are some places where the activity could be improved, but overall I believe it was quite successful.
Photo from the Class
- February 20
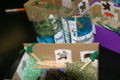
Figure 5. Habitats Created by the Students

Citations and links
Enchanted Learning. http://www.EnchantedLearning.com. Copyright 1996 - 2007.