Water cycle in a bottle
Biology in Middle Schools home | |Elementary School sister project
Biology In Middle Schools is a Saint Michael's College student project. Link under 'toolbox' for a printer-friendly version. Click on handouts to print full resolution versions. Please see Wikieducator's disclaimer, our safety statement, and the Creative Commons licensing in English and in legalese.
Primary biological content area covered
Students will be exposed to the concepts of:
A. Water's properties; what is it made up of
B. The solid, liquid, and gas phases of water
C. The recycling characteristics and continuous stages
D. The scientific method
E. Future implications (global warming) and how students can do their part to preserve one of Earth's most important natural resources
Materials
Materials for Lesson Plan 1
This first activity is designed for students. Students will work in groups of 4. The following materials are needed:
Students will need:
1. clear, 2 liter soda bottle per group of 4
Teacher will need:
1. measuring cup
2. large graduated cylinder
3. 2 small, clear plastic cups per group of 4
4. water
5. salt, 1/3 cup per group of 4
6. sharpie
7. freezer
Materials for Lesson Plan 2
This is an over all demonstration including all phases of the water cycle. It is to be demonstrated by the teacher, while the students keep a journal recording all their predictions, observations, hypotheses, results (diagrams or charts), and conclusions.
Teacher will need:
1. a clear 2 liter soda bottle with a top
2. matches (2-3)
3. measuring cup; ½ cup warm water
4. flashlight
Students will need:
1. journal
Materials for Lesson Plan 3
This is a good activity to wrap up with. Students will create their own water cycle in a bottle, making their own observations and predictions. Through each step in building it, they should be able to understand why each part is necessary and how it contributes to the cycle of water as whole.
Students will need:
1. 1 2-liter soda bottle
Teacher will need:
1. markers
2. small plants or seeds of plants that will grow within 1-2 days
3. potting soil
4. water
5. scissors
6. tape
7. knife
8. plastic wrap
Lesson Plan 1
This activity is a way for students to understand more about water on Earth. By measuring different amounts of water throughout each step, it demonstrates on a smaller scale the different amounts of water found on Earth.
Procedure:
1. Write your groups initials on the soda bottle and cups with a permanent marker
2. One group member should measure out 2,000 milliliters (mL) of water.
3. Pour the 2,000mL of water into the empty soda bottle
What is the water in the soda bottle representing? Discuss this with your group members and record your ideas in your journal.
4. From the full 2 liter soda bottle, measure out 40mL of water
5. Pour the 40mL of water into one of the small plastic cups.
6. Place this cup in the freezer
What will happen to the water placed in the freezer? What is this water representing? Discuss and record your ideas in your journal.
7. From the 2 liter bottle again, measure out 20mL of water
8. Pour this 20mL into the other small plastic cup
What does this water represent? Discuss your ideas and record them in your journal
9. Measure 1/3 cup of salt
10. Pour the salt into the remaining water in the 2 liter soda bottle
What does the remaining water in the 2 liter soda bottle represent? Discuss and record ideas with your group members.
Now you have learned where most of the water on Earth exists and the different amounts, which vary greatly.
Lesson Plan 2
To be demonstrated by the teacher.
This is a quick and fun way to demonstrate the water cycle in a visual way for students.
Procedure:
1. Measure ½ cup of warm water
2. Pour into 2 liter soda bottle
3. Light 1 match, let it burn until it reaches the wood, blow it out
4. Quickly place the match into the 2 liter soda bottle
5. Repeat steps 3&4
6. Put the top on the soda bottle
7. Shine a flashlight through the soda bottle so students can observe “a cloud forming”
8. Squeeze the bottle tightly for about 1 minute. Students should start to see some of the water will evaporate because of the pressures.
9. Stop squeezing the bottle. The decrease in pressure causes a drop in temperature, dust particles collect and a cloud should begin to form.
10. For a few minutes let the bottle sit.
11. Shine the flashlight through the bottle one more time.
12. Discuss with the class the steps of the water cycle they were just shown.
For the teacher:
Along with this activity, there are some questions that you should ask the students and they should answer them as well as record observations in their notebooks.
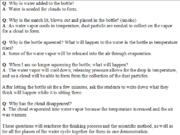
Questions to go along with this are listed under "Handouts": Activity 2
Lesson Plan 3
Building your own water cycle in a bottle
Procedure:
1. Cut the bottom off of the soda bottle (approx. 60mm); don't throw out!
2. Place soda bottle on its side
3. Put the soil inside, about 1/3 full
4. Plant 2-3 plants inside
5. Tightly tape back on the bottom that was cut off in Step #1
6. Remove the top from the bottle and carefully water the plants
7. Put the cap back on and place along a window or best place in the classroom that gets sunlight
What do you notice?
A review
You will eventually see that the sun gives off energy in the form of heat. The plants you've planted are absorbing some of the water you fed them. This water will be released through the leaves (transpiration/evapotransporation). After this, the water will rise and condense (condensation); you should be able to see this on the top of the bottle. The "rain drops" on the top will eventually fall, in the form of precipitation, and accumulate in the ground. This process will continue and if you can see these things happening, you have successfully created you own mini water cycle!
Handouts
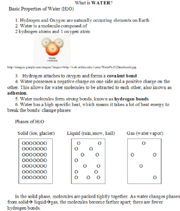
Please refer to these handouts as a guide throughout the lessons. Handout 1 is appropriate as an introductory activity for the students and is available to the right.
Description of activity
Briefly describe the activity, but provide enough detail so that the activity can easily be assessed by other teachers without your intimate knowledge of the topic.
1. Students will learn the basic properties of water
2. Students will learn that there are 4 stages in the water cycle; evaporation, condensation, precipitation, and accumulation
3. Students will learn in detail about each stage; how water gets from one phase to the next
4. Students will learn that the cycle is continuous
-If there is extra time after the other experiments are completed,students can try 3 separate activities to enforce these concepts-each time keeping a journal and making predictions and observations about what they think might happen (ex. Wipe wet sponge on chalkboard, what will happen?..etc.)
(ex.): Hypothesis: What will happen if one student fills a cup to the top, while another student fills it 1/3 of the way? Instead of just leaving them, what if one cup is placed on a heater in the sunlight, while another is placed in the freezer? For each step of the water cycle, students should record a hypothesis, with a description or diagram of how they set-up their experiment, observations, and results. For a conclusion, students should work in groups of 3 or 4 to discuss what happened and why relating to the water cycle.
I. Refer to Handout I for an Introduction to Water
II. Stages of Water Cycle
Evaporation: When the sun heats the Earth’s surface and water changes from the liquid form to water vapor and is released into the air
Condensation: Water vapor condenses, is cooled, and changes from a gaseous phase to a liquid phase
Precipitation: When the water in the air becomes dense or too heavy to remain in cloud form, falls as rain, sleet or snow.
Accumulation: As the precipitation falls, it collects and hits the earth, either on land or in lakes or rivers. Water that falls and remains on the ground is called ground water. Ground water may even run back into the lakes and oceans, where it will then be re-evaporated.
The cycle continues on like this indefinitely.
III. Lesson Plan Activities 1 and 2
IV. Class Observations and Discussion
V. Fun Facts Sheet and Project to do at Home
Potential pitfalls
The experiment for Earth's Water cannot be performed by students themselves due to the fact that there is a lit match involved. It is strongly advised that teachers complete this demonstration and students watch, learn and observe.
Literature connections
What children's literature interfaces with the activity you have described. Are there specific library materials that you should have on hand to tie this idea into the broader curriculum?
Schmid, Eleonore.1990. The Water's Journey. New York, NY: North-South Books.
Waldman, Neil.2003. The Snowflake: A Water Cycle Story. Millbrook Press.
Connections to educational standards
Vermont standards can be found in web links at the bottom of this page.
S:1-S:8- All pertain to Scientific Inquiry and the Scientific Method
S:14- The physical sciences- where students can demonstrate a knowledge of phase change in the water cycle
S:48-Universe, Earth and Environment- students can understand the natural processes of the Earth; The Water Cycle
S:49- Universe, Earth and Environment- Students understand the importance of water as a natural resource and how to conserve
Next steps
After learning about water and how it has been continuously reused and recycled, students should explore how to reduce, reuse, and recycle in other ways. One very important topic is global warming. The current climate changes have a strong influence on the water cycle itself. As humans are producing increasing levels of CO2 into the atmosphere, greenhouse gases such as water vapor increase as a result. By educating classrooms early on the issues associated with global warming and the anthropogenic impacts, students can learn how to make individual efforts aimed to reduce harmful emissions. A lesson on global warming, making students aware that this is real and happening now, would be an opportunity for the younger generation to start doing their share now, making it a larger “go green” effort.
A great additional activity to do at home or as a review of the water cycle, just download the game cubes and print!
Citations and links
While brand new ideas are very valuable and most welcome here, tried and trusted ideas of others will probably make up the bulk of the material on this site. It is important to respect the copyrights of others, and also to acknowledge their ideas. A full citation to published materials is essential and also useful. If there are online materials that would be useful to supplement your program, link to them from here.
Graham, S., Parkinson, C.,Chahine, M. The Water Cycle. [Internet]. NASA. [18 April 2009]. Available from <http://earthobservatory.nasa.gov/Features/Water/>
Interactive Learning Tool of Water Cycle Stages
Science and Literacy: Activities and facts about the water cycle
Water: A Never Ending Story; Background Information and Activities
Water_cycle_in_a_bottle/background background
| Work in progress, expect frequent changes. Help and feedback is welcome. See discussion page. |


