Water Lily Lesson
| Instant wiki maker | Making handouts | Editing tips |

Biology In Elementary Schools is a Saint Michael's College student project from a course that ran between 2007 and 2010 and fully described in this book chapter. The student-created resources have been preserved here for posterity. Link under 'toolbox' for printer-friendly versions of the exercises. Click on handouts to print full resolution versions. Please see Wikieducator's disclaimer, our safety statement, and the Creative Commons licensing in English and in legalese.
Student worthiness
This idea has been tried and trusted.
Primary biological content area covered
- Capillary Action
Materials
Each student group will need
- Paper Template
- Crayons/Colored Pencils
- Scissors
- Shallow Container
- Water
- Electrical Tape
- Capillary Tubes
- Food Coloring
- Projector
- Paper towels
- Stop Watch
Teacher will need to have prepared shallow containers with water already in them for each student group.
Handouts


Description of activity
<kaltura-widget kalturaid='cp9o53o2kn' size='M' align='L'/>
During this activity students will be simulating the blooming of a beautiful water lily. They will get to decorate and cut out their own "flower" and watch it open while learning about plants and capillary action.
Topic of the Lesson/ Subject: Water Lily’s Grade/ Course: Biology, Grade 2 Time: 20
Directions:
- Introduce the subject, capillary action, by splashing water on the table and asking the students how they would go about cleaning up the mess. Also ask the kids what they do at home when they make a mess with water, juice, milk, etc.
- Pick student to clean up the mess.
- Pass out templates, crayons, and scissors.
- Have each student decorate their own lily and then cut them out. (figure 2)
- Each "petal" then must be folded into the middle so that the tips of each petal are touching. (figure 3)
- Have templates prepared with electrical tape covering them, and ask the kids which one they think will open, or which one will open faster (the one they made or the one we made).
- Have students write their hypothesis and what they think is going to happen to the lilies.
- Place decorated lilies on the surface of the water that is located in the middle of the table.
- Time how long it takes for the lily to open.
- Observe the petals of the lilies open slowly. (figure 4)
- Explain capillary action using trees as an example.
- Allow kids to see how the water climbs the sides of the capillary tubes by projecting the tubes filled with different colored water on to the wall. (figure 1)
- Why do the petals open?
Paper is made out of trees therefore they share some of the same characteristics. Trees in order to survive must soak up water from the ground through their roots. Because the paper is made up of the same substances as the tree it soaks up the water through the plant fibers located in the paper.
- Make connection to opening activity (cleaning the water off the table).
- Like the paper towel that was used to clean the table, the paper water lily absorbs the water. There are openings between the fibers in the paper/paper towel that absorb the water, therefore, making the lily open or the paper towel soak up the spill.
- Why didn't the flower covered in electrical tape open?
- The electrical tape stopped the paper from absorbing the water, therefore it couldn't open. The tape is made out of a different material than paper, and when the lily was covered in tape all of the openings in between the fibers in the paper were blocked from the water. Therefore, no water could be absorbed.
- Clean up
Objectives: -Students will understand why the paper picks up the water -Students will understand the connection to the paper and the tubes -Students will be able to cut out their lily -Students will be able to decorate their lily -Students will hypothesize about what will happen to their lily -Students will be able to predict what will happen to the taped lily
Focusing Questions:
-Why does the paper pick up the water? -What is the connection between the paper and the tubes? - Can you cut your lily? - How will you decorate your lily? - How do you make a hypothesis? - How do you make a prediction?
Formative Assessment: Students will first be asked to cut and color a water lily. Then students will hypothesize about what they think will happen to their flower when it is put in water and what they think will happen to the flower that has tape on it when it is put in the water.
| Time: | Instructional Strategies | Learning Opportunities |
|---|---|---|
| 5 | Water spill on the table, Capillary tube demo | Visual provided with water spill and tubes auditory provided with explanation. |
| 7 | Students cut out and decorate lily | Visual source and worksheet provided one on one teacher will go around helping students as needed (auditory) Cutting kinesthetic |
| 3 | Students will hypothesize about their lily’s and make a prediction about the tape lily | Auditory and verbal |
| 3 | Students will make observations and time their lily’s as they open | Auditory observations, Visual observations, Kinesthetic timing |

Figure 3:Capillary Action Demo showing how water climbs the sides of the tubes.
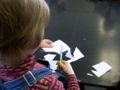
Figure 4:Child cutting out the water lily template(fig.1).
Figure 5:The folded water lily before it is placed in the water.
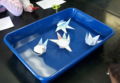
Figure 6:The open water lily after it had been placed in the water.


Potential pitfalls
The only major pitfall to this activity is when the child placed their lily petal-side down in the water. This caused the lily to sink even when the mistake was corrected. As with any mistakes made in science, they can be turned into a learning opportunity.
Math connections
By using stop watches and recording how long it takes for the lilies to open, the students learn about seconds as a unit of time. To further this connection each group of students can record their data into a T-chart. This data can then be made into a graph or chart documenting how fast the lilies took to open. The graph can then be used to compare and contrast different methods of construction and additional pitfalls can be documented.
Art connections
The students will work with primary colors to decorate their lilies and cut them out themselves before they observe what happens when the lily is placed on the water. When working with the primary colors blue, yellow, and red students will discuss how to create the secondary colors, green (blue and yellow), orange (yellow and red), and, purple (red and blue). Students will be asked to color each petal with two of the different primary colors (IN WASHABLE MARKER), as the water is absorbed into the paper the colors will bleed to create the secondary colors!
Connections to educational standards
Vermont standards can be found in web links at the bottom of this page.
Vermont Department of Education Arts Grade Expectations: Visual Art 3 Arts Grade Expectations – Visual Art: Grades 1-2 Grade Expectation Number Skill Development Visual Arts Skill Development: Grouped with VT Standards 1.13, 1.15, 1.18, 5.22, 5.28, 5.29, 5.30 A1-2:10 Students show skill development when CREATING art by… •Using line in various media (e.g., pencil, marker, cut-outs, etc.) to create shape and image. •Handling and naming of art tools and materials. •Using elements of 2D and 3D design (e.g., 2D—mixing primaries to create secondary colors; 3D—forming a 3D object with texture).
Scientific Questioning S1-2:1 Students demonstrate their understanding of SCIENTIFIC QUESTIONING by… •Posing observational questions that compare things in terms of number, shape, texture, size, weight, color, motion, etc. (e.g., How fast does a Lady Beetle move compared to a Bess Beetle?). •Investigating and completing questions to identify a variable that can be changed (e.g., What will happen if…? or I wonder if I change…?). •Generating new questions that could be explored at the end of an investigation.
Survival of Organisms and Cells No S1-2:30 at this grade level Teachers may review Grades PreK-K Structure and Function Concepts. •Observing and recording the parts that make up living things (i.e., roots, stems, leaves, flowers, legs, antennae, tail, shell). Science Concept: a. Living things (plant and animals) are made of parts that enable survival.
M2: 15 Measures and uses units of measures appropriately and consistently, and makes conversions within systems when solving problems across the content strands. (Benchmarks in Appendix B.)
M2: 28 In response to a teacher - or student-generated question or hypothesis, collects appropriate data, organizes the data, displays/represents the data, and makes observations about the data to draw conclusions about the question or hypothesis being tested.
All GE's were taken from [1]
Next steps
Links to diffusion could also be made using this activity. Lilies could also be made out of different materials and then tested and compared to the paper lily's results.
Reflections
This experiment, though simplistic in nature, was very exciting for the second graders that we presented it to. The instant results captured the students attention and, therefore, made it easy to complete the scientific method on a grade appropriate level. The students showed a prior knowledge of the concept of a hypothesis or an educated guess. This was helpful for the flow of instruction because after a brief reminder the students were able to move forward and create their hypotheses. The students' hypotheses were for the most part correct proving an understanding of the topic being shown through experimentation.
- "I think the tape lily won't open and my lily will open".
- "I think my lily will sink".
- "I think my lily is going to open".
- "I think mine floats".
- "The yellow will open".
Over all the activity ran fairly smooth. The structure of our lesson plan seemed to flow in an organized manner. When the paper lilies were placed correctly in the water the results were almost always instant. There was one lily that was put in the water upside down, so it sunk instead of opening. As a result next time this experiment is run the instructor should emphasize the importance of placing the lily petal-side up. At one point the time allotted for our lessons was cut by five minutes so that all students would be able to go to each station; therefore, in order to cover all the material we cut out the coloring aspect and had the children just write their names on their lilies.
Some lessons that we learned while in the process of teaching this experiment multiple times are: to pass out and collect materials throughout the lesson and to allow the students to draw their own conclusions from the experiment. We found that if we had all supplies out and ready for the students before they arrived the students would play with the materials instead of listening to instructions. It was much easier to distribute/collect materials as needed to avoid distractions. By allowing students the opportunity to formulate their own conclusions from the experiment it instilled a sense of independence because they were able to come to an understanding of the material on their own. We even had one girl who was able to come up with the right answer on her first try!
In conclusion, we found that the one thing that can make or break your lesson is the delivery. Being enthusiastic and excited about the experiment helps to enhance the students' interest in the learning process; therefore, it is a "must do" for the success of any lesson.
Citations and links
Press, H.J. Science Experiments. Sterling:New York, 1995.
1.http://www.education.vermont.gov/new/html/pubs/framework.html