Water Cycle in a Bottle
| Instant wiki maker | Making handouts | Editing tips |
Contents
- 1 Water Cycle in a Bottle
- 1.1 Student worthiness
- 1.2 Primary biological content area covered
- 1.3 Materials
- 1.4 Handouts
- 1.5 Description of activity
- 1.6 Lesson plan
- 1.7 Potential pitfalls
- 1.8 Math connections
- 1.9 Literature connections
- 1.10 Connections to educational standards
- 1.11 Next steps
- 1.12 Citations and links
- 1.13 Reflections

Biology In Elementary Schools is a Saint Michael's College student project from a course that ran between 2007 and 2010 and fully described in this book chapter. The student-created resources have been preserved here for posterity. Link under 'toolbox' for printer-friendly versions of the exercises. Click on handouts to print full resolution versions. Please see Wikieducator's disclaimer, our safety statement, and the Creative Commons licensing in English and in legalese.
Water Cycle in a Bottle
Student worthiness
This is a borrowed experiment. Tested with success.
Primary biological content area covered
This activity will expose students to the different stages of the the water cycle.
Materials
- Scissors
- 3 soda bottles
- 60 cm of candle wick string or other absorbent string
- Soil
- 2 plant seeds
- 2/3 cups of water
- Ice
- Drill
- Drill bit of slightly larger diameter than string
Handouts
- Click to see full-size handouts:
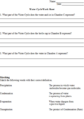
Water Cycle Experiment Questions
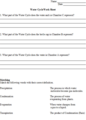
Water Cycle Work Sheet
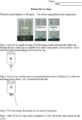
Set Up Sheet 1
Set Up Sheet 2


Description of activity
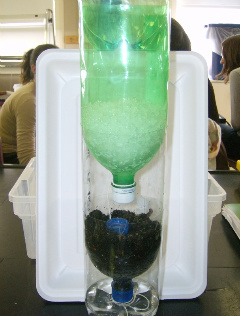
In this activity students will be able to view the different ways water travels and the different forms in which water can be found. The experiment focuses mainly on evaporation, transpiration, condensation and precipitation within the 3 different soda bottle chambers. Students will create their own water cycle chambers by using 3 soda bottles (2 with the bottoms cut off) turned upside down and placed one inside the other. The bottom soda bottle will be filled with the most water representing ground water, the middle soda bottle is filled with some moist soil and beans along with another soda cap or film canister to represent an ocean/lake and the top chamber is then filled with ice cold water to represent clouds in the atmosphere. The chambers are then connected by strings which show evaporation, precipitation and percolation. Over time the students will be able to observe how our environment reuses and recycles water and how the water cycle keeps plants alive.
Lesson plan
Teacher Set Up
- 1. Remove Labels from Soda Bottles and Rinse them out!
- 2. Take one bottle and with a marker draw a line around the bottle where the top of the label normally ends. Cut this line. You will be using the end with out the cap. This is Section A of the experiment.

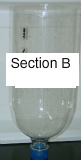
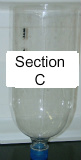
- 3. Take your second and your third bottle and draw a line with a marker just below where the label would normally end on a bottle. Cut around these lines. These will be Sections B and C. Note: Make sure both of these sections have bottle caps.
 :::::
:::::


- 4. Drill a hole in one of the caps. Be sure the hole is just large enough to thread your string . Place the drilled cap on Section B.
- 5. Place the intact cap on Section C.
Student Set Up
- 1. Give each student or group sections A, B, and C.
- 2. Cut a 40 cm length of string. Fold the string in half and insert the folded end through the hole in the cap of Section B. This should create a loop inside Section B. Make sure there is enough string hanging from the cap to reach the water that will be placed in the bottom of Section A.
- 3. Fill Section B with enough moist soil to cover the loop of string (about 1 cup). Note: The string should run up into the soil and not be pressed against the side of the column.
- 4. Cut a 20 cm of string and tie it around the bottle neck of Section C so that one end hangs down at least 5 cm.
- 5. Add 2/3 cups of water to Section A.
- 6. Wet both strings thoroughly (to the point of saturation).
- 7. Plant several fast-growing plant seeds in the soil around the sides of Section B.
- 8. Place the film can (or another bottle cap) on top of the soil at the center of Section B so that the wick tied to Section C hangs into it.
- 9. Place Section C back on Section B and fill C with ice water.
- 10. Use clear packaging tape to stabilize the completed system.
- 11. On a blank sheet of paper, draw your water cycle column and fill out the Water Cycle Experiment page. (Note: This page can be found in the Handouts section.)
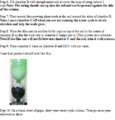
- This is what the final product should look like:

Potential pitfalls
When running this activity in a classroom setting, it may be difficult to have several groups because with 3 soda bottles needed per group, there may be a soda bottle shortage.
Math connections
The students can measure the growth of the plants weekly and create a bar graph to show the rate of growth over time. By creating a bar graph, the students will be able to clearly see the growth of the plant over time. The x-axis should be the date that the plant was measured and the y-axis should be the actual measurement in centimeters of the plant.
Literature connections
- Relf, Pat, June 1, 1996, The Magic School Bus: Wet All Over, Scholastic Paperbacks.
- Sjonger, Rebecca and Kalman, Bobbie, April 30, 2006,Water Cycle,Crabtree Publishing Company; 1 edition.
Both of these books will aid you in teaching the water cycle and putting the vocabulary into context for the children.
Connections to educational standards
- 7.13: Students understand the characteristics of organisms...and recognize the interdependence of all systems that support life.
Next steps
After this experiment is over, take apart the soda bottles, but keep the plants. You can distribute the plants to the students and talk about their major parts, dissect and look at them under a microscope. This experiment can also be tied into the 3 States of Matter, or talking about how clouds are made. Have any left over soda bottles? Check out the WikiEducator page "Cloud Creations" for an interesting project on creating clouds in a bottle.
Citations and links
- http://www.msichicago.org/ed/env/envsample.html Project Idea
- http://www.csr.utexas.edu/grace/education/activities/pdf/Water_Cycle.pdf Additional Resources
Reflections
- This was an interesting way to learn about the water cycle. Although nothing seems to happen immediately, the students soon see over time how the water cycle works. It's also exciting to watch the plants grow! The kids loved digging into the dirt, putting the beans and ice in, there was almost not enough jobs to go around! This activity was fairly hands on, and it does have a lot of information and vocabulary that goes with it. Also, we found that using the drill to make the hole in the cap was much easier than using a nail and hammer as the original instructions called for. Overall it was a great learning experience for everyone.
- I thought that this experiment was a great way for students to see how the water cycle works. The three different bottle sections allowed the students to clearly see which section represented the groundwater, which represented the plant and soil, and which represented the clouds. If I were to run this experiment again, I would definitely make sure that I provided students with a handout of vocabulary words because it would help solidify the terms in their heads. Although results were not seen right away, students could clearly see how the water cycle recycles water because although the students do not water the plants, they still grow.
- This was a great activity to learn about the water cycle, however, the terms were a bit difficult for the students to grasp. As each group went by we used new ways of using the vocabulary and asked questions so that the students to get a better grasp of the vocabulary.