VirtualMV/Flash12 (CS6)/Basic/Animation/Movie Clip/Content
Contents
Overview
Creating a Movie Clip animationBy the end of these exercises you should be able to:
|
Introduction
Animated gifs allow you to create a single object that will repeat while on the stage independent of whatever else is happening. Flash allows you to do the same by turning your animation into a movie clip. A movie clip has its own timeline so it can be faster or slower than the rest of the movie.
Step 1: Set up a Flash movie
- Create a new Flash 2.0 movie ( jnlMovieClip )
- On Layer1 add a title "Movie Clip Demo" and extend over 15 frames
- On Layer2 insert 2 keyframes in frame 1 and Frame 2
- Turn on Gridlines (View > Grid > Show Grid Ctrl+')
- Select the Rectangle tool and set the fill colour to the red radial fill
- With Layer2/KeyFrame1 selected insert a 3 x 2 grid box
- set the fill colour to the green radial fill
- With Layer2/KeyFrame2 selected insert a 3 x 2 grid box (You may like to make it look like the lights on a police patrol car)
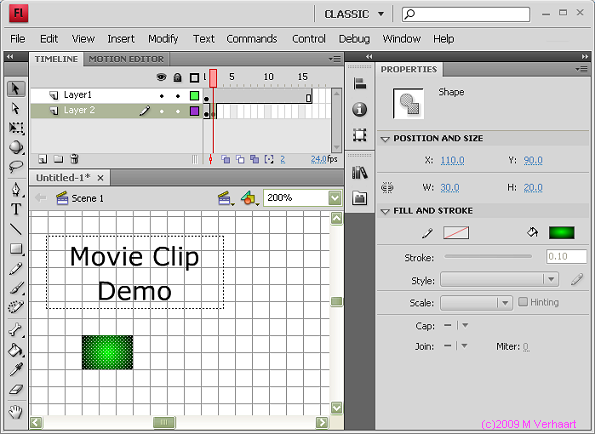
You movie should look something like the following diagram:
If you run the movie the red/green rectangles will flash quickly then disappear, then reappear, etc..
Step 2: Save the animation as a movie Clip
So what we want to do is create a movie clip of the two rectangles.
- Select both keyframes (only) from Layer 2 (ctrl+click each keyframe)
- Right click on the selected frames and choose Copy Frames
- From the menu bar select Insert > New Symbol Ctrl+F8, the Create New Symbol dialog box appears
- Give the movie clip a name e.g. mcFlashingBox (the Type should be set to Movie Clip), then [OK]
Flash switches you to Symbol Edit mode
- Right click on Layer 1 / Frame 1 and choose Paste Frames
You have now created a movie clip (Click on the left arrow just above and to the left of the stage. This will close the Movie Clip Editor)
In your library you should have mcFlashingBox
- You can now remove Layer 2.
Step 3: Adding the Movie Clip
- Insert a new Layer
- With the new Layer selected (you may want to move it below layer1 first) drag the Movie Clip from the Library onto the stage
Note that no effect is shown when you move the red position bar. However, when you run the movie the flashing rectangles will appear.
Notes
If you want to save the movie clip as a new one - to modify slightly
- right click on the Movie Clip and choose Convert to symbol.
- Type a new name for the clip, then select [OK] and a new clip is now added to the library.
Just double click in the Library to bring up the Movie Clip editor.
Video Tutorial
|
