Underwater vision
| Instant wiki maker | Making handouts | Editing tips |
Contents
Biology In Elementary Schools is a Saint Michael's College student project from a course that ran between 2007 and 2010 and fully described in this book chapter. The student-created resources have been preserved here for posterity. Link under 'toolbox' for printer-friendly versions of the exercises. Click on handouts to print full resolution versions. Please see Wikieducator's disclaimer, our safety statement, and the Creative Commons licensing in English and in legalese.
Underwater Vision
Student worthiness
Tried and trusted.
Primary biological content area covered
- Hypothesizing - Before looking at the ocean scene, students hypothesize what they expect to see on the fabric under each different color or light. For example: under what color light do they expect the fish to be brightest.
- Investigation - In this experiment, students are asked to investigate how the color of the fish and the water change when looking at the ocean scene with different colored filters and lights. They work to investigate whether or not their hypotheses relating to color of the fish and water are correct or incorrect. They do this by looking at the ocean scene several times, comparing one to the other.
- Vision - Every child sees different things and this idea can be explored by asking children to brainstorm what they see, and expressing it to the class. The students may see the same colors and sometimes they may notice different things, pointing out the idea that, while we all see, we are all very unique in what we actually perceive.
Materials
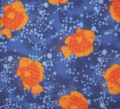
- Large fabric swatches (1 meter square or larger), preferably of an underwater ocean scene, such as blue backgrounds with red and/or multicolored fish. AVOID FABRICS WITH ANY WHITE IN THEM.
- Blue "party" bulb with socket
- Red "party" bulb with socket
- Electrical power strip (and extension cord if needed)
- Blue filter strips (one for each student)
- Red filter strips (one for each student)
- Green filter strips (one for each student)
- Clothespins or other easy to paint object
- Red, green, and blue paint
- Red, green, and blue markers
- Paintbrushes
- Index cards
- Underwater Gallery
Handouts
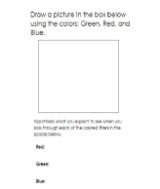
This worksheet can be used to help students hypothesize what they expect to see when looking through the three different colored filters. The worksheet also asks students to draw a picture of an object using the colors red, green, and blue. This picture will then be looked at under each of the different colored lights. The students will be able to compare their hypotheses to what they actually see under the lights.
Description of activity
Students will use skills in hypothesizing, making educated guesses, and prior knowledge to access what kind of light will work best when taking pictures underwater. The students will be asked to look at a piece of fabric portraying an ocean scene with water and fish. After looking at the fabric with white light, students will be asked to look at the same fabric using three colored filters (red, green, and blue) and three different colors of light (red, green, and blue). The students will then be asked to decide which filters and colored lights work best with one another, and which ones should not be used when diving underwater to look at fish. Since the fabric portrays the fish in an orange-red color with the water being a darker blue, the red light is going to illuminate the fish, causing them to stick out from the background. The blue and green lights are going to make it difficult to see the fish. When combining the blue light and blue filter, the ocean scene is going to look dark and this is the same with the green light and the green filter. This experiment allows students to be actively involved, while forming educated guesses as to what they expect to see when using each of the different filters and colored lights.
Lesson plan
- Before beginning the experiment, students will be given a worksheet (seen above) in which they are asked to draw a picture using red, green, and blue markers. After drawing their design, students will be asked to hypothesize what they expect to see when their drawing is looked at three each of the three filters (red, blue, and green) in white light.
- Next, with the piece of ocean fabric hanging up, students will be asked to look at the fabric first with a green light shined upon it. The students will look through the three colored filters (green, blue, red) and will then be asked to describe what they see when looking through each of the colored filters.
- After looking at the ocean fabric with the green light shined upon it, students will be asked to look through the three colored filters (green, red, blue) again describing what they see when looking through each, while a blue light is shown onto the fabric.
- After looking at the fabric through both the green and and the blue light, students will be asked to look at the ocean scene with a red light shined upon the fabric. They will again use each of the three filters to look at the fabric, describing what they see while looking through them.
- After completing the experiment with the different colored lights and filters, students can then experiment with their pictures, placing them in front of the fabric and looking at them with each of the different lights and filters.
- After looking at their designs, students can brainstorm about what they saw, and decide if their hypotheses were proven to be correct, or if they were proven false.
- The lesson can be closed by showing the students that there are many different kinds of light. Things can appear differently under each different kind of light.
- You can also explain to the students that as the ocean gets deeper, the light begins to fade and it becomes dark. Sometimes photographers need to bring cameras with red light into the ocean to take photos of fish. You can ask the children to brainstorm about why they think red light is used instead of blue or even green.
Potential pitfalls
If the light bulbs are not bright enough, they will not produce the desired effect. For best results, use new bulbs so that they are at full-power. If the room is not dark enough, incoming natural light will inhibit the effects of the bulbs and the colored photo filter strips. In addition, if the fabric you choose to use doesn't contain enough color contrasts, or doesn't involve red and blue hues, the effects of the light and colored strips won't be as dramatic as they can potentially be. It is imperative that high-quality photo filter strips be used. Cheap, colored, cellophane sheets do not do this activity the justice it deserves. In doing this activity, we found it complicated when using a small room; the kids like to move around and touch the fabric so a large room is necessary in minimizing any accidents between students.
Math connections
This activity could lead to a venn diagram that compares the three colors (red, green, and blue). It could show how the colors mixed, which worked best together, and which didn't work well together.
Literature connections
- "Rainbow Fish" by Marcus Pfister. (This book will allow children to imagine what life might be like under the sea!)
- "Why Is Blue Dog Blue: A Tale of Colors" by George Rodrigue,Bruce Goldstone.
Connections to educational standards
S3-4:2 Students demonstrate their understanding of predicting and hypothesizing by....Identifying simple patterns of evidence used to develop a prediction and propose an explanation.
Next steps
- Once this activity has been completed, students can continue to experiment with light, discussing what would happen when other colors are used in making their designs. Would these different colors change when looked at with each of the colored filters?
- Students can also experiment with a different colored fabric, seeing if the red light still works to illuminate the fish, if not is there a a connection between the color of light and the color of fish on the fabric?
- The students could test their hypotheses about the fabric by using a fish tank with brightly colored fish in it. Shine the different colored lights into the tank to see if their hypotheses still stand. What is different or the same about the colors in the tank and on the fabric?


