OERUG Resources
Contents
- 1 Steps for creating your OER school portal on WikiEducator
- 1.1 Step 1: Preview an example below
- 1.2 Step 2: Create the layout of the landing page for your school's OER portal
- 1.3 Step 3: Link the school portal page your created from the OERUG portal page
- 1.4 Step 4: Entering the text in the boxes on your portal page
- 1.5 Step 5: Creating the subpages linked from the navigation template
- 1.6 Step 6: Inserting the navigation template on each of the sub-pages linked from your navigation
- 1.7 Step 7: Customising your navigation template by inserting your school logo
- 2 Professional development and support resources
Steps for creating your OER school portal on WikiEducator
Preliminary things to do:
- Create an acount on Wikieducator
- Log in to Wikieducator
Step 1: Preview an example below
- Gayaza High School
- Note the navigation template at the top of the page and two column layout displaying the main boxes on the page.
Step 2: Create the layout of the landing page for your school's OER portal
- The portal page uses a customised template which will automatically create the two-column layout for your school portal page and insert the navigation template onto the landing page.
- The input box provided below will insert the wiki template syntax used for a portal page and save this under the name of your school in WikiEducator.
Create a portal page for your school in WikiEducator
|
Step 3: Link the school portal page your created from the OERUG portal page
This step involves creating an internal link to your school portal page you created in Step 2 above, from the main OERUG landing page.
- Go to OERUG
- Add a link to your school page using the standard syntax for an internal link:
[[Your_School_Name_Goes_Here|Your School Name]]
for example:
[[KCB|Kings College Budo]]
- Remember to save your edit which should appear as a blue link to your school portal page. Should a red link appear after saving the page, this would suggest a typo in the syntax above. Check the capitalisation and exact name of the page you created in Step 2 above.
Step 4: Entering the text in the boxes on your portal page
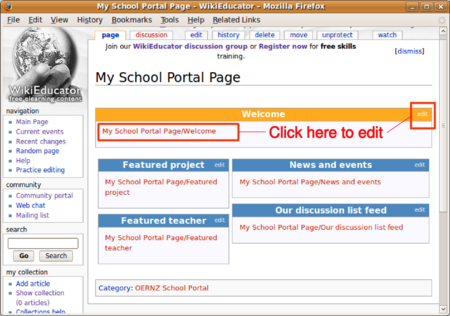
The template we use for generating the layout of the portal page automatically creates a sub-page for each corresponding text box displayed on the portal page. The portal page is a little different from normal wiki pages because the text for each box is "fed" or "pushed" into the relevant text box from its corresponding sub-page (rather than being edited directly on the portal landing page itself). While this may sound confusing -- all you need to do is to click on the relevant "edit" link of the text box you want to edit, and a new window will open taking you to the correct page for editing.
Authoring the content for each text box on your portal page is easy.
- Click on the corresponding edit tab or red link, and start entering your text.
- Remember to save your edits.
- To return back to the portal page, click on the breadcrumb link (the blue link displayed under the title of the page).
- Repeat this process for authoring and saving text for each of the text boxes.
- Remember that you can use standard wiki text for formatting, links and images on these portal pages.
The navigation template creates standard links for the following subpages:
- OERUG: This inserts a link back to the OERUG portal in WikiEducator.
- About: This is where you enter general information about your school. You may want to consider subheadings for: Location, Background, Web Resources and Contact Details.
- OER Projects: This is where you can list all your schools' OER projects.
- OER Contacts: Here you should list the teachers and school staff who are active participants in your OER initiative. The purpose of this page is to help teachers from other schools to connect and find opportunities for collaboration. Consider identifying the different roles and subject areas of your team.
Steps
- Click on the red links displayed in your navigation template on the home page for your school portal. A new window will open.
- Enter the relevant information for this subpage, alternatively just type: Content coming soon .... and save the page.
- To return back to the home page of your portal, click on the breadcrumb link (the blue link displayed under the title of the page).
The sub-pages contained in the navigation template displayed on your home page, will not have a navigation template. You need to insert the syntax to display the navigation.
- Go to the home page of your school OER portal.
- Copy the following syntax:
{{OERUG_school_portal_nav}}
- Click on the "About" link displayed in the navigation template and paste the syntax above at the top of the page.
- Remember to save your page.
- Repeat this process for the "OER Projects" and "OER Contacts" by inserting {{OERUG_school_portal_nav}} onto each of these pages.
It is possible to customise your navigation template by adding your school logo. You will need to be familiar with the syntax used for inserting images and manipulating the size.
- Go to the homepage of your school's OER portal
- Delete the following syntax on your home page:
{{OERUG_school_portal_nav}}
- Make sure that you have a copy of your school logo in jpg, png or gif format ready to upload in WikiEducator.
- Now insert the following syntax:
{{OERUG_school_portal_nav|Logo= [[image:My_school_logo.jpg|100px]]}}
for example:
{{OERUG_school_portal_nav|Logo= [[image:Warrington_school_logo.png|100px]]}}
- You may need to adjust the size of the display of the image. For a larger display try replacing with 120px in the syntax above.
- Note the right alignment of the image is done automatically by the template.
- To ensure that your logo appears on each sub-page listed on the navigation template you will need to repeat this process on each sub-page, ie delete {{OERUG_school_portal_nav}} and replace with {{OERUG_school_portal_nav|Logo= [[image:My_school_logo.jpg|100px]]}}
Professional development and support resources
- Basic wiki skills
- Editing using open office -- ideal for working off line and exporting as wiki text
- Guidelines for developing a teaching resource

