Text and Images/Printing and managing files/Print options
| Text and Images | |
|---|---|
| Printing and managing files | Introduction | Print options | File management | Key points | Assessment |
Printing
When you've finished a document, you often need to print it - so you can distribute it, or even just for proofreading.
|
Please note: the following tutorial will open in a new window/tab. When you have finished the tutorial, simply close the window/tab and you'll return to this page. Before you go on, please work through the following tutorial: Don't forget to watch the short video demonstration included in the tutorial!
|
When creating flyers or handouts you may find it easier and cost effective to print two to a page. Before you adjust the print settings you will need to create a copy of the flyer on a second page:
Creating a copy of the flyer
- Select all text by using the keyboard shortcut Ctrl+A
- Choose Copy from the Home Tab
- Click once at the end of the document
- Insert a page break by using the keyboard shortcut Ctrl+Enter
- Choose Paste From the Home Tab
- Your flyer will now appear on the second page
Adjusting Print Settings
- Go to the Microsoft Office Button (2007) or File Button (2010)
- Select Print.
- Click on Properties.
- Select the Layout Tab.
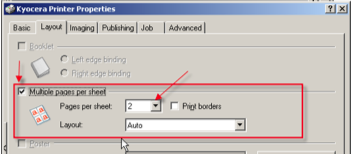
- Tick the Multiple pages per sheet box and change to 2 pages per sheet:

- Click OK
Note: This example is for a Kyocera printer. The dialogue boxes for other printers may look a little different, but the process is usually very similar.

