Sprouting Artwork
| Instant wiki maker | Making handouts | Editing tips |
Contents
- 1 Sprouting Artwork
- 1.1 Student worthiness
- 1.2 Primary biological content area covered
- 1.3 Materials
- 1.4 Handouts
- 1.5 Description of activity
- 1.6 Lesson plan
- 1.7 Potential pitfalls
- 1.8 Mathematical Connections
- 1.9 Literature Connections
- 1.10 Art Connections
- 1.11 Connections to educational standards
- 1.12 Next steps
- 1.13 Citations and links
Biology In Elementary Schools is a Saint Michael's College student project from a course that ran between 2007 and 2010 and fully described in this book chapter. The student-created resources have been preserved here for posterity. Link under 'toolbox' for printer-friendly versions of the exercises. Click on handouts to print full resolution versions. Please see Wikieducator's disclaimer, our safety statement, and the Creative Commons licensing in English and in legalese.
Sprouting Artwork
Student worthiness
This activity has been tested at least once. We performed it with a bunch of third graders and it seemed to be a big hit.
Primary biological content area covered
This activity shows how seeds sprout. It demonstrates the idea that seeds protect the baby plant inside, providing it with everything necessary to begin the growing process.
Materials
- Lima beans
- Water
- 18 new rectangular kitchen sponges (for 36 students paired up)
- Scissors (enough pairs for the students to share.)
- Mustard seeds (one pack for each group)
- Plastic wrap or resealable plastic bags
- 2 spray bottles
- Rulers and/or stencils in a variety of simple shapes ( i.e. hearts, triangles, circles, squares)
- 18 paper or plastic plates
- Markers
Handouts
|
|
Sprouting Artwork
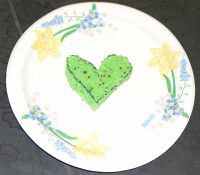
Today you will be making a work of art using seeds! In a few days you will get to see these seeds sprout and grow, and after a few weeks, you will be able to taste your plants and use them to spice up your food! Here’s what to do:
- Pick your favorite shape and, using a ruler or a stencil, and a marker, draw that shape onto your sponge.
- Use your scissors to carefully cut out your shape.
- Soak your sponge in water and then squeeze it so that the extra water comes out (the sponge should be wet, but not soaked and dripping).
- Place your sponge on your paper plate and sprinkle mustard seeds on top of it. It is important to try to spread the seeds evenly.
- Cover your sponge with a piece of plastic wrap at night time, and uncover it the following morning. Keep it in a spot where the sun is sure to reach it. Be sure to spray your sponge with water (using the spray bottle) every day in order to keep it moist. Placing the sponge in a resealable plastic bag (day and night) significantly improves success.
- Pay attention to your plant! You will notice that changes will happen over the next couple of weeks. After a few days your seeds should sprout, and within about 12 days, your little garden should be growing well. You will then be able to smell and taste your plants.
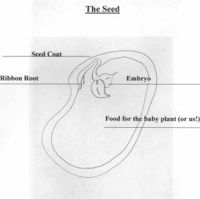
- You should also include a handout showing the inside of a seed with the parts labeled. (See the above diagram)
Description of activity
In participating in this activity, students will realize that seeds can sprout and grow without being immersed in soil. After looking at the inside of a lima bean and learning about the different parts of the seed, the students will grow their own little garden of mini-mustard plants in any shape they desire, using a sponge as the base. The kids will be able to care for the seeds soon after they sprout. They will be able to "taste" their mustard plants and even use them to spice food.
Lesson plan
- The day prior to the lab, teachers should soak lima beans in water so that they are softened and ready at the time of the activity.
- Once it is time for the activity, teachers will explain the basic structure of a seed. They should then pass out a diagram with the parts of a seed labeled. After doing this, take one or two of the soaked lima beans, and split them length-wise using a knife or a pair of scissors. Then ask the students to point out the different parts of the bean on their diagram.
- The teacher should then pass out the instructions for the activity (These can be found in the "handouts" section of this wiki). They should then observe the students performing this activity and provide aid when needed.
- Once finished, the teacher should explain to students that the seed has a limited quantity of food, and therefore the plants will probably not live longer than a month. They should use this opportunity to explain how all organisms need energy to survive: Ask how they could keep the plants alive longer; ask where different types of organisms get their food/energy; ask what would happen if that energy source was taken away, and use this opportunity to show how organisms rely on one another.
- Have the students wrap their sponges in plastic wrap, and label them by writing their names in marker on the paper plate. This way it will be easy to tell which is theirs to prepare for transport home.
- Have students prepare the materials to bring back to any student(s) who was absent.
- Make sure all students actively participate in the clean up.
|
|
Potential pitfalls
If students are not attentive to keeping the sponge moist, the seeds will not sprout properly.
NOTE: Be sure that the plants get enough sunlight.
Mustard seeds may not be available at the time of your experiment; you may need to improvise by providing other seeds that sprout quickly and are edible.
The sponges may be difficult to cut, especially with scissors made for young children; adults should be prepared to offer assistance if needed.
Mathematical Connections
If the teacher wishes, geometry can be incorporated into the lesson by having students review the qualities of the shapes they choose.
i.e. If they choose a square, they can make sure that their sponge shape has four equal sides and four right angles.
Literature Connections
From Seed to Plant by Gail Gibbons
How a Seed Grows by Helene J. Jordan
Art Connections
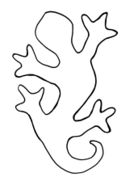
Students can create "Bean Mosaics" using different kinds of beans of many colors and shapes. Use the list of materials below to make these fun creative mosaics by gluing the beans to a pattern of an animal on paper.
- Patterns for animals such as turtles, lizards, stars etc.
- Oak-tag Paper
- Elmer's Glue
- Goya Beans
Connections to educational standards
This section is used to help teachers track and document the educational standards that the activity meets.
The following standards are those which fit to this activity.
S:4- students demonstrate their ability to conduct experiments
S:30- students demonstrate their understanding of structure and function
S:34- students demonstrate their understanding of energy flow in an ecosystem
Next steps
Students will be able to apply their knowledge in a variety of situations in the future. They can continue caring for their plants, and use their senses to observe them as they grow. Also, students should be able to relate their knowledge to their own life; for example, they should realize that if plants didn't get what they needed to grow, then we wouldn't either.
Citations and links
This idea was adapted from: Hirschfeld, Robert, Susan Milord, and Nancy White. The Kid's Big Book of Science and Nature. Charlotte, Vermont: Williamson Publishing, 1995.
Vermont Grade Expectations http://education.vermont.gov/new/html/pubs/framework.html


