Power Up Your DNA
| Instant wiki maker | Making handouts | Editing tips |
Biology In Elementary Schools is a Saint Michael's College student project from a course that ran between 2007 and 2010 and fully described in this book chapter. The student-created resources have been preserved here for posterity. Link under 'toolbox' for printer-friendly versions of the exercises. Click on handouts to print full resolution versions. Please see Wikieducator's disclaimer, our safety statement, and the Creative Commons licensing in English and in legalese.
Student worthiness
We have tried this activity on two occasions three different people each time.
Primary biological content area covered
The Human Body, Specifically DNA
DNA stands for Deoxyribonucleic acid and it involves the instructions for all living organisms that determine their genetic make-up. In this experiment, it is important for students to understand what exactly they're finding while they're doing it. Encourage student involvement with questions, such as, why are your eyes blue, do your parents have the same colored eyes as you, etc. Explain to students that you look like your parents because they have some of the same genetic make-up as you. A double helix, which is the structure they're going to make with the Twizzlers® and gummy bears, contains every organisms' DNA. Explain to students that they will be making their very own DNA necklace, by getting a sample of their cheek cells. They will be able to see a small strand of their DNA, while also making a double helix model with the candy.
Materials
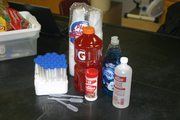
- Gloves
- Zip Lock Bags
- 2 Large Bottles of PowerAde® (or any sports drink)
- Dish Detergent
- 15ml centrifuge tubes (Test tubes would be a good alternative!)
- Meat Tenderizer
- Rubbing Alcohol
- Pipettes
- Cups, 1 per child
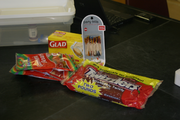
- Gummy Bears, 16 per Student
- Twizzlers®, 2 per student
- Toothpicks, 8 per student
See figure 2 for above materials
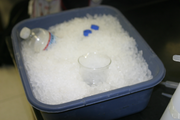
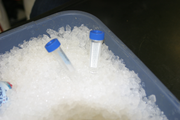
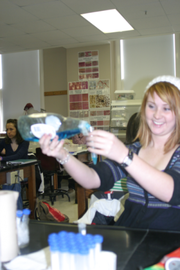
Make sure the alcohol is cold before you use it for this experiment. See figure 3:
Description
We are planning an activity to allow students a closer look at their actual DNA and to develop a greater understanding of DNA in general. The students will go through a series of steps to extract their DNA from a mixture. First the students will swish a sports drink in their mouth and then spit it out into a tube that contains dish detergent. They will then mix the sports drink and dish detergent and let the mixture sit. During this time we plan to have the students construct a double helix out of Twizzlers®, gummy bears and tooth picks. Then the students will add meat tenderizer to the mixture and let it sit still for a period of time. A small strand of their DNA will rise from the mixture and the students will extract their DNA and place it in a small capsule for them to keep.
Lesson Plan
1. Give each student a small cup of sports drink. Have them each swish the sports drink around in their mouth vigorously for at least a minute. Once a minute is up, have them spit the drink back into the cup.
2. Add approximately 0.25 mL of detergent into a test tube. With the hand holding the test tube, make the students wear a glove.:
3. Pour the cup of gargled sports drink into the test tube of detergent until it is about half full.
4. Have each student add a pinch of meat tenderizer into the test tube.
5. Using the gloved hand, cover the top of the test tube and mix the solution back and forth five times.
6. This mixture will need to sit for at least ten minutes.
7. During this time period, pass out the plastic baggies filled with Twizzlers® (2 per student), gummy bears (16 per student), and toothpicks (8 per student).
8. The students will then construct a double helix by placing two gummy bears on each toothpick and connecting them in between the Twizzlers®. The gummy bears should be tightly packed together. The gummy bears should be color coordinated in order to distinguish between adenine (A), thymine (T), guanine (G), and cytosine (C).
9. Once 10 minutes is up, use a pipette to add cold rubbing alcohol to the test tube. The alcohol should run down the side of the test tube so that it sits on top of the liquid already inside.
10. Leave this to sit for another ten minutes. The test tubes should not be shoved or bumped during this time.
11. While waiting during this ten minute time period, have students finish up their double helix projects. Once finished, give them time to clean up their spaces (throw away cups, etc).
12. Bring the students together to discuss the color coordination on the double helix and why it is structured in that manner.
13. Once the second ten minute time period is up, the test tubes should have a layer of white strands along the surface. Using a pipette, suck up the DNA carefully and transfer it to the small capped tube. The air should be squeezed completely out of the pipette before the DNA is transferred.
14. The students will then have their own small containers with their DNA as well as their double helix of candy.
Potential pitfalls
As long as the test tubes are set out for at least ten minutes during the appropriate times and aren't jostled, the experiment works extremely well. The candy is a nice treat as well!
Art connections
The students will be constructing their own double helix out of candy. This will mimic the ideas of modeling and sculpture because they will have to align the gummy bears and twist the Twizzlers® to create a double helix.
Literature connections
During the ten minutes needed to wait for the mixture to settle, the students will create a model DNA out of candy but after that reading a story like, Have a Nice DNA by Frances Balkwill would be a good activity.
Balkwill, Frances R., and Mic Rolph. Have a Nice DNA (Enjoy Your Cells, 3). New York: Cold Spring Harbor Laboratory, 2002. Print.
Connections to educational standards
7:14 Students demonstrate understanding of the human body — heredity, body systems, and individual development — and understand the impact of the environment on the human body. This is evident when students: b. Identify the parts of the human body, and demonstrate understanding of how the parts work together to perform functions that satisfies common needs; d. Identify the pattern of human development.
Next steps
Once this activity has been completed, students can use their home-made projects of the double helix in order to learn about bondage. The students can learn which acids link to the other ones based on the colors they used for their diagram. They can also see how the double helix twists around to make a spiral by twisting it themselves. These activities will be hands-on and exciting for the students. Students will also have the opportunity to see their DNA and it can be kept somewhere in the classroom. This can also open up doors for a broader range of teaching based on DNA and the double helix.
Reflections
This activity was a lot of fun for students to participate in. They loved working with the candy in order to construct their double helices. They also thought it was cool that they were going to be seeing their own DNA. The activity got a little bit messy with the students swishing Gatorade around in their mouths for a whole minute and some children took longer than the allotted twenty minute lesson period we were given; however, students seemed to have a blast with it and so did we.
Citations and links
We found these resources especially helpful when creating our experiment:
http://biology.arizona.edu/sciconn/lessons2/Vuturo/vuturo/dna.htm
http://www.bloodvialjewelry.com/dna.html
http://www.umaine.edu/nsfgk-12/images/PDFs/gumdrop.pdf

