Plastic Milk Blobs
| Instant wiki maker | Making handouts | Editing tips |
Contents
- 1 Student worthiness
- 2 Primary biological content area covered
- 3 Materials
- 4 Handouts
- 5 Description of activity
- 6 Lesson plan
- 7 Potential pitfalls
- 8 Math connections
- 9 Art connections
- 10 Literature connections
- 11 Connections to educational standards
- 12 Next steps
- 13 Reflections
- 14 Citations and links
Biology In Elementary Schools is a Saint Michael's College student project from a course that ran between 2007 and 2010 and fully described in this book chapter. The student-created resources have been preserved here for posterity. Link under 'toolbox' for printer-friendly versions of the exercises. Click on handouts to print full resolution versions. Please see Wikieducator's disclaimer, our safety statement, and the Creative Commons licensing in English and in legalese.
Student worthiness
We have tried and tested this experiment with 40 first grade students! We discovered that using ice cold milk and a little extra vinegar works the best!
Primary biological content area covered
Chemistry: we are demonstrating chemical change.
Materials
- Skim milk
- White vinegar
- Microwave proof bowl
- Teaspoon
- Strainer
- Microwave
- Tablecloth
- Popsicle Sticks for Mixing
Handouts
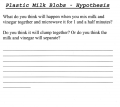
Before beginning this experiment the students will be making a hypothesis about what will happen when they put 1.5 cups of milk and 4 teaspoons of vinegar together and heat it in the microwave. They should be specific about whether they think that these two liquids will stay separate or come together to form a solid.
The next handout that should be given to students is a checklist of the steps that they will need to complete in order to make a plastic milk blob. This is a great way for the students to stay organized and make sure that they completed every step in order.
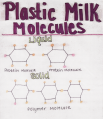
Another handout that the students will be receiving is "Plastic Milk Molecules." This handout is a visual aid for students to see the chemistry behind this experiment. This shows them how the milk and vinegar molecules become bound together to form one molecule.
The handouts are below! Feel free to print these off and use them in your classrooms!
Description of activity
Through a series of steps we will be turning milk into a solid. The individual protein strands within the milk and the vinegar will combine to make the solid, also known as a polymer molecule strand. This lesson will show students how liquids turn into solids through a chemical reaction. This is a great hands on science activity for students which can be done in classroom and outside of the classroom!
Lesson plan
1. We will begin our lesson with our Plastic Milk Blobs-Hypothesis worksheet. This will be used to ask students what they think will happen when the milk and vinegar are microwaved together.
2. Then we will have students break into groups of 2 or 3.
3. We will have students begin Plastic Milk Blob Checklist with our help.
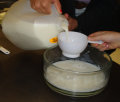
4. Students will measure out 1 1/2 cups of milk and put it in a microwavable bowl.
5. Then Students will pour 4 tea spoons of vinegar into the microwavable bowl.
6. Next students will place the bowl in the microwave for one minute and thirty seconds.
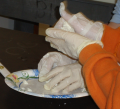
7. A teacher will take the bowl out of the microwave and then the student will stir the mixture untill the Plastic Milk creates a blob.
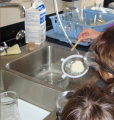
8. With the students help a teacher will strain the liquid out of the bowl so that only the Plastic Milk blob remains.
9. Students will put their blob in a plastic bag with their name on it.
10. We will conclude by explaining how the milk and vinegar became a solid, using our Plastic Milk Molecules handout as a visual aid.
Now students can bring their Plastic Milk Blobs home to dry and to make fun shapes!!!!
Potential pitfalls
We encountered some potential pit falls while running this lesson. The first pitfall we encountered involved the amount of vinegar used. We found that when an extra teaspoon of vinegar was used the mixture bound together more effectively. We also found that the activity worked better when the milk was cold. As time went on and the milk got warmer the mixture would not form into a milk blob as easily. When this happened, we spent more time stirring the mixture after it came out of the microwave and less time letting the students play with milk blobs. It was also unfortunate that the students could not see what was happening with the mixture when it was in the microwave (this is because the microwave window was tinted, and to high up for students to view). The last problem we encountered was the mess the blobs created when students played with them. Because the blob needed a few minutes to dry, it did not stick together (especially when students were playing with it). In the future we could let the mixture dry before students mold or play with the blobs.
Math connections
When students are creating their plastic milk blobs they must pay careful attention to the specific measurements on their checklist. Students will use their measurement knowledge when putting the milk and vinegar into the bowl. They will also have to keep track of the amount of time that this mixture is in the microwave. If time allows you can also have students play around with the different measurements of each liquid and the length of time the mixture is in the microwave. They could keep tracking of their findings and figure out which proportion of liquid/heat gives them the best blob!
Art connections
When students have completed microwaving and mixing the Plastic Milk mixture they can let it sit for a few minutes to dry. Then students can mold the blob into various shapes! Once their shapes are completely dry students can paint them! This is a great activity which incorporates both science and art!
Literature connections
Here is a great book to use while conducting this experiment! It does not talk about the exact experiment that the students will be completing, however, it talks about chemistry and there is a chemical reaction in the experiment they will be conducting!
Chemistry: Getting a Big Reaction, created by Basher Written by Dan Green
Connections to educational standards
S1-2:12 Students demonstrate their understanding of the States of Matter by…
- Identifying, describing, and comparing the state of matter of solids and liquids.
Next steps
After completing the experiment, students can do several different activities using their milk blobs! Students will be able to take what they created and mold them into shapes. Students can let there shapes air dry to let them harden into what they created. Another activity students could do using the scientific method is leave their milk blobs in the bags that we left them with and predict how long it will take for their milk blob to mold. Using a journal, they could state their hypothesis and record what their milk blob looks like, smells likes, and feels like each day until the milk blob needs to be thrown away! At the end of their experiment they can record their results and compare all the results with students in the class.
Reflections
This experiment worked great with the first grade students that we worked with! They really enjoyed making a hypothesis about what was going to happen when the mixture of milk and vinegar was heated in the microwave. They also loved being able to test their hypothesis to see whether they were right or wrong. We worked with 6 different groups of 5-7 children and we realized about half way through our time together that we really needed a tablecloth, so our best advice would be to use a plastic table cloth from the beginning because it gets messy! Also make sure to have eye guards for all of the children because vinegar could splash in their eyes!
The children had been to Shelburne Farms, VT and made cheese in the beginning of the school year so they already knew a lot about curds and were able to connect that field trip to our experience together. Although the children were young it was very difficult to talk to them about the actual science that was going on in our experiment and we ran out of time before we were really able to do so. Some advice would be to read up on the chemistry that occurs when the mixture of milk and vinegar is heated up and then tell your students about it to connect the activity to science.
Citations and links
This is a great source for science projects and activities : )

