Plant Dissection
| Instant wiki maker | Making handouts | Editing tips |
Contents
- 1 Plant Dissection
- 1.1 Student worthiness
- 1.2 Primary biological content area covered
- 1.3 Materials
- 1.4 Handouts
- 1.5 Description of activity
- 1.6 Lesson plan
- 1.7 Photo Gallery
- 1.8 Potential pitfalls
- 1.9 Literature connections
- 1.10 Art connections
- 1.11 Connections to educational standards
- 1.12 Next steps
- 1.13 Citations and links
- 1.14 Reflections
Biology In Elementary Schools is a Saint Michael's College student project from a course that ran between 2007 and 2010 and fully described in this book chapter. The student-created resources have been preserved here for posterity. Link under 'toolbox' for printer-friendly versions of the exercises. Click on handouts to print full resolution versions. Please see Wikieducator's disclaimer, our safety statement, and the Creative Commons licensing in English and in legalese.
Plant Dissection
Student worthiness
Tested with great success!
Primary biological content area covered
In this experiment we will focus on the different parts of a plant / flower and their functions needed for survival. We will cover the basic structures and important vocabulary. Students will have the opportunity to dissect a plant and work on critical scientific skills.
Materials
- Flower
- Plant roots
- Toothpicks
- Poster board
- Index cards
- Markers
- Pencils
- Tape
Handouts
- Click to see full-size handouts:
Description of activity
This is a very content driven experiment. Students will dissect flowers, with the main focus and emphasis being on learning the different parts and functions. Especially parts that are most necessary for survival. Students will also play a game to learn new vocabulary about plants.
Lesson plan
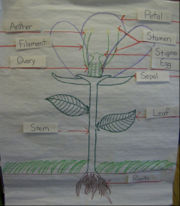
- Before teaching this lesson, please refer to Handout 2 to view a diagram of a plant and its parts. It is recommended to make this handout poster-size for students to reference to.
- Give each student Handout 1 (Plant Dissection Worksheet). Have students create a hypothesis on what they think a plant is made of and talk about what they already know about plants.
- Give each student Handout 3 (Plant Vocabulary).
- Go over the diagram of a plant (Large Poster) and discuss the different parts and purposes.
- Give students Handout 2 (Plant Parts Handout) and have them label the parts by referencing the big poster.
- Separate students into groups of 2 or 3 and hand out 1 flower and toothpicks per group.
- Begin dissecting flowers.
- Use the end of the toothpick to slice the stem down the middle.
- Observe the contents inside the stem. Have students write observations on Handout 1.
- Remove some petals in order to dissect the stigma, stamen, and ovary of the plant. Go over the parts and their functions.
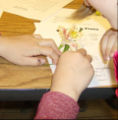
- While dissecting the different parts, have the students tape them next to the appropriate part on Handout 2.
- After dissecting discuss that cells make up the composition of a plant, just like humans. If time allows, you can work on the structure of a leaf and its cells in more depth. See Handout 4
- Wrap up the experiment by playing the "Plant Vocabulary Matching Game."
- "Plant Vocabulary Matching Game."
- To make this game, use the vocabulary words and definitions that are on the Plant Dissection Vocabulary Pages. For each word and definition, use a different index card. Write the vocabulary word on one index card and the definition on the other, do this for every vocabulary word. the object of the game is to match the correct vocabulary word with it's definition.
Photo Gallery
- Click to see full-size pictures:
Potential pitfalls
- It is important to get a flower that has enough parts to dissect. In this case, carnations may not be a good flower to use, instead try using a lily.
- It is a good idea to tell students not to use their toothpick until they are instructed by the teacher on what to do. This will help to prevent students from using it in inappropiate ways.
- The flower we had students dissect clearly had all the parts with the exception of the sepal. Since this flower is great for seeing all the other parts, it may be a good idea to have another flower nearby to show students the sepal.
- Students might not be interested in dissecting a plant, it is important to make the experiment as fun and engaging as possible. Once students know the details of a plant and all of the functions, they are more likely to understand the activity and enjoy what they are learning.
Literature connections
- Ehler, Lois, February 1992, Planting a Rainbow, Harcout Children's Books
- Cole, Joanna, February 1995, The Magic School Bus Plants Seeds : A Book About How Living Things Grow, Scholastic Inc.
Art connections
This project could very easily be connected to an art project as well. Tell students to take a few different colors of construction paper and create a cutout of a plant. If they like, the colors can correspond to different parts of the plant. For example, the green construction paper could be for the stem, leaves, and the sepals, pink construction paper for the petals, and yellow construction paper for the ovary, stigma, filaments and anthers, and brown for the roots. Have them glue or tape together the parts of the flower in the appropriate places, then have them label it. Or, for something a little more simple, after dissecting their flower they can draw what the flower looks like and label the parts.
Connections to educational standards
Vermont Standards
7.13 Students understand the characteristics of organisms and see patterns of similarity and differences among living organisms. This is evident when students:
a. Identify characteristics of organisms. (e.g., needs, environments that meet them; structures.)
http://education.vermont.gov/new/html/pgm_curriculum/science/gle.html
Grade Expectations
S3-4:30 Students demonstrate their understanding of structure and function-survival requirements by:
- Explaining how the physical structure/characteristic of an organism allows it to survive and defend itself.
Next steps
A follow up activity for this could be an experiment on a similar plant (bean) and learning what coniditions these plants need to live in for survival. The focus could be on how different plants need different environments in order to surive, yet they still have the same parts and characteristics.
Citations and links
http://pan.tcnj.edu/Plants-unit/1/lesson1.htm The World of Plants
http://www.brainpopjr.com/science/plants/partsofaplant/grownups.weml#teachers Dissecting a Plant and Observing its Parts
http://www.urbanext.uiuc.edu/gpe/case4/c4facts1a.html Plant Drawing and Definitions
Reflections
- This project was so much fun to do with the kids. At first I didn't think the kids would enjoy dissecting flowers, I thought they might find it boring, but they absolutely loved it! Starting off by having the kids label what parts they know (roots, leaves, stem, petal) went well because they all liked being able to put the label on the big poster. Having a big poster was a great idea too because the kids would refer to it if they couldn't remember where a plant part was. The one thing I would do differently next time would be to make a big poster that looks exactly like the handout. Because some of the lines were in different places it confused the students. Also, creating a word bank at the bottom of the handout, and giving them a vocabulary sheet worked out very nicely. I think using lilies was an important part too. It is very clear on a lily where the ovary is and the kids loved cutting it open and finding the eggs inside. Taping the plant parts to the page was great too. I heard a lot of students comment, "I'm going to take this home and show my parents what I learned!" It was a great experience, and the experiment went better than I could have ever imagined.
- This experiment went extremely well. We didn't end up using our vocabulary game with the time we had, but I think this would still be a fun game to end the activity. It could also be used as something for students to play if they are ahead of other students. This would be especially helpful for students who finish dissecting their flowers before others, for example. I think the best part of this experiment was the fact that students not only learned the parts of a plant, but they also got to hold them in their hands right afterwards. If the order had been reversed and they dissected the plants first, I don't think the activity would have worked as well because students wouldn't have known what they were looking for. Another thing I think worked when we did this experiment was making sure all students got to be involved. We made sure to have enough materials so that all students were able to dissect parts of the flower. We also made sure to call on different students to participate when we labeled the flower poster.
- This experiment was very successful and I was very pleased to see that the students were interested in the structures of a plant. I really enjoyed participating in their enthusiastic adventure with learning the structures of a plant! One of my favorite quotes was one of the students expressing her excitement because she never gets to dissect a plant at home! I cannot wait to continue this experiment and hope that teachers will use this fun and engaging activity to help students understand the basic structures of a plant and their functions. Another thing that I thought went well during our experiment was the student to teacher ratio. We each were able to aid two or three students when dissecting the flower and provide any needed assistance towards finding the different structures. I know that this may not be the case for all classrooms, but I was very pleased with the student's participation and contributions to our activity.


