Opening Our Minds
| Instant wiki maker | Making handouts | Editing tips |
Contents
- 1 Opening Our Minds
- 1.1 Student worthiness
- 1.2 Primary biological content area covered
- 1.3 Materials
- 1.4 Handouts
- 1.5 Description of activity
- 1.6 Lesson plan
- 1.7 Potential pitfalls
- 1.8 Math connections
- 1.9 Literature connections
- 1.10 Connections to educational standards
- 1.11 Next steps
- 1.12 Citations and links
- 1.13 Reflections

Biology In Elementary Schools is a Saint Michael's College student project from a course that ran between 2007 and 2010 and fully described in this book chapter. The student-created resources have been preserved here for posterity. Link under 'toolbox' for printer-friendly versions of the exercises. Click on handouts to print full resolution versions. Please see Wikieducator's disclaimer, our safety statement, and the Creative Commons licensing in English and in legalese.
Opening Our Minds
Student worthiness
Tried and trusted.
Primary biological content area covered
Students will:
- discuss what the brain controls:
- cerebral hemispheres
- conscious processes (e.g. kicking a ball, playing drums)
- unconscious processes, or what is on "autopilot" (e.g. breathing, blinking)
- discuss the nervous system and how messages are sent and received
- connect brain processes to things they can relate to (e.g. computers)
Materials
- Crayons
- Fatal vision goggles
- Inversion goggles
- Paper
- Plastic brain diagram
- Bright colored tape
- Sock
- Hammer
- Preschool hammering toy
- Two plastic cups
- Tray
- Water
Handouts
No Handouts Necessary
Description of activity
Students will complete a number of small tasks to help them understand both conscious and unconscious brain processes. We will discuss the left and right hemispheres of the brain and which aspects of the body each hemisphere controls. Students will then have the opportunity to participate in a number of fun activities that will exemplify how the brain sends and receives messages through the use of goggles that the students will each wear while trying to walk and do other everyday activities.
- Figures 1-4
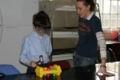
Figure 1. Fatal Vision Goggles #1
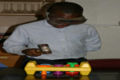
Figure 2. Fatal Vision Goggles #2
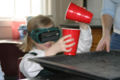
Figure 3. Inversion Goggles #1
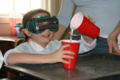
Figure 4. inversion Goggles #2


Lesson plan
Hemispheres (5 minutes)
Hand Experiment:
- With the plastic brain diagram, discuss how the brain is made of two hemispheres. Tell the students that the left hemisphere controls the right side of our bodies and the right hemisphere controls the left side of our bodies.
- To demonstrate how this works, the teachers will put their right arm over their left and turn their hands so their palms are touching and their thumbs are pointing downward. They will intertwine their fingers and, without letting go, twist their arms so that their hands move down and towards their body.
- The teachers will then have a student point to one of their fingers, without touching it, and ask the student to move it.
- Let the students try this by having them pair off and take turns being the person to point to the finger to be moved and the person doing the demonstration.
Drawing Experiment:
- Give each student a sheet of paper and a crayon.
- With their dominant hand allow them to draw a series of shapes (circle, square, triangle)
- Then with their non-dominant hand, allow them to draw the same series of shapes.
- Discuss why it is difficult to draw with their non-dominant hands
- ask the students who is left or right handed
- discuss what it means to be ambidextrous
Messages/Neurons (15 minutes)
- Discuss how the brain has the ability to control the body when it is told to do something such as kicking a soccer ball. Then, allow the students to give one another a high-five to exemplify the theory.
- Next, explain how the brain also has the ability to be a copilot. If the brain had to constantly and consciously tell our bodies to breath, pump blood, blink, etc. we would never be able to do many other activities because it would be too confusing, and brain resources being used are limited.
Goggles Experiment:
- Discuss how the brain is like a giant computer in how it sends and receives messages like in email. Relate to our eye sight in how we receive messages about what we are seeing and how the brain interprets these perceptions. Split the students into 2 groups--those who will wear inversion goggles and those who will wear fatal vision goggles. When finished with the activities, have them switch groups. This is done to save time and to keep the children's attention, as they will remain occupied. Allow the students to try on the fatal vision goggles and the inversion goggles and explain why each changes how they see the world. Also explain that the fatal vision goggles are also called beer goggles because they distort (or change) a person's vision in the same way alcohol can. When they try on the inversion goggles, be sure that the students are sitting, as some students fall over when trying on these goggles. As students wearing these fatal vision goggles walk, they tend to fall sideways, so having them followed by adults is essential.
- With the inversion goggles, students will:
- Pour water from one plastic cup to another. Be sure to have a plastic bin underneath to catch any of the water that does not make it into the cup.
- Hammer the preschool toy (make sure students keep the hand they are not using behind their backs)
- With the fatal vision goggles, students will:
- Walk a straight line on the colored tape on the floor
- Play catch with each other, using a ball of socks
- Give an adult a high five
- With the inversion goggles, students will:
- Bring the students back together in a large group and discuss the activities. Ask what was hard, what was easy, etc. Tell them that because they were seeing differently than normal, their brains were being sent different messages than they were used to, which is why the message coming out (what the students had to actively do) was difficult and different from how they would normally do it.
What the Video is Displaying:
- 1.The Fatal Vision Goggle Activity when the students had to walk a straight line.
- 2.The Fatal Vision Goggle Activity when the students had to hammer the shapes.
- 3.The Inversion Goggle Activity when the students had to hammer the shapes.
<kaltura-widget kalturaid='303206' size='L' align='R'/> Notice: In the video clips, take note of the student's struggles.
- 1.In the first activity, some of the students had the ability to walk the line without trouble; however, for the most part what is displayed in this video is how the majority of the students reacted. They would inch their way across the line with their arms out, flailing for balance.
- 2.In the second video the students were typically able to hit the shapes when told to hit a certain color. They discovered a few tricks to the activity so that they could hit the shapes on the first try. Notice how in this video, there were three instances when the student hit the yellow part of the toy rather than the color we had asked them to hammer.
- 3.Students REALLY struggled with this activity. In this video a child is wearing the inversion goggles and notice how when we handed her the hammer, she reached up for the hammer, and also, when she first attempted to hit the shapes she was hammering little motions in an upward position as apposed to downward toward the toy. Additionally, notice how she holds onto the hammer as opposed to how the student wearing the fatal vision goggles held the hammer in the previous video clip. They often turned the hammer on it's side to increase the likeliness of hitting a shape.
Potential pitfalls
- Although the list is small for materials needed in this experiment, they are all imperative. If for some reason it is difficult to obtain these items then that could cause a huge pitfall.
- Time could easily be an issue. There are a number of activities in this experiment and a few of them are activities that some of the students may get caught up on and want to spend more time. This could cause an issue with time management.
- Safety could be an issue, which is why it is important to monitor the students and ensure that they follow directions closely.
- Fatal vision goggles are costly, but once they are purchased, they are a long-term asset
Math connections
Students will be drawing geometric shapes with both their dominant and non-dominant hands. This can serve as an opportunity to reinforce specific shapes covered in an earlier lesson.
Literature connections
Teachers can use the non-fiction book, The Brain which uses simple text and photographs to explain the processes of the brain. They can also read Inside the Human Body. It documents the magic school bus trip through the main systems of the human body including the brain.
Citations
- Cole, Joanna & Degen, Bruce, 1990. The Magic School Bus: Inside the Human Body, Scholastic Books.
- Fitzpatrick, Anne, 2003. The Brain, Black Rabbit Books.
Connections to educational standards
Vermont Standards
- 7.14 Students demonstrate understanding of the human body heredity, body systems, and individual development and understand the impact of the environment on the human body. This is evident when students:
- 7.14.b. Identify the parts of the human body, and demonstrate understanding of how the parts work together to perform functions that satisfy common needs;
- 1.17.c. Use physical models to confirm and communicate relationships and concepts; and
- 1.17.d. Explain a scientific, mathematical, or technological concept; explain a procedure they have followed.
- 7.7.g. Extend and create geometric patterns, concrete and pictorial models
Next steps
- Neuron Creations
- Go more in depth with the parts of a brain and what they control rather than simply the hemispheres. This website is FULL of ideas and information http://www.miniscience.com/projects/ModelBrain/
Citations and links
Reflections
- This was by far the most fun I've had with teaching biology! The children loved everything about this. They were so enthusiastic and excited about the activities that we did and about the fact that the left hemisphere controls the right side of their bodies and vice versa.
- The concept of perception and neurons was well explained and perceived through the experiments that we had the students do. Not one second passed by where students didn't have a smile on their faces.
- Even the teachers and the chaperons were really into our activities. When we weren't using the goggles, you would see the adults sneak over and try them out. And they were constantly laughing about the student's reactions. The students even convinced the parents to wear the goggles and try each of our experiments.
- The time was perfect! At most we ran maybe a minute over. It was very easy to add or subtract an activity if needed. Each activity was short and therefore held the students' attention.
- The students had a blast with this activity and were very curious as to how the goggles worked. Many of the children examined the goggles, particularly the inversion goggles, to figure out what in the goggles made them see differently. This could lead to another great science activity about reflections or something similar. They could even make their own activity! Our inversion goggles were made from a kit!
- The students ended up learning that the fatal vision goggles were also called beer goggles because they distorted their vision in the same way that alcohol can. Many students made the connection, on their own, that this is why it was so dangerous to drive while drunk.
- This project was spot on. I was in the same room conducting a different project and at one point a child asked us when he could “go over there and do that" (IE, wear the goggles). This group was able to teach the necessary information while disguising it as fun. All of the students had fun and came out of the 20 minute session having learned lots about the brain as well as having had fun. WAY TO GO!!