Observing reactions
| Instant wiki maker | Making handouts | Editing tips |
Contents
[hide]- 1 Observing reactions
- 1.1 Student worthiness
- 1.2 Primary biological content area covered
- 1.3 Materials
- 1.4 Handouts
- 1.5 Description of activity
- 1.6 Lesson plan
- 1.7 Potential pitfalls
- 1.8 Literature connections
- 1.9 Chemistry connections
- 1.10 Practical living connections
- 1.11 Connections to educational standards
- 1.12 Next steps
- 1.13 Citations and links
- 1.14 Reflection
Biology In Elementary Schools is a Saint Michael's College student project from a course that ran between 2007 and 2010 and fully described in this book chapter. The student-created resources have been preserved here for posterity. Link under 'toolbox' for printer-friendly versions of the exercises. Click on handouts to print full resolution versions. Please see Wikieducator's disclaimer, our safety statement, and the Creative Commons licensing in English and in legalese.
Observing reactions
Student worthiness
Brand new and untested
Primary biological content area covered
The students will gain a better understanding of the importance and process of forming a hypothesis and making observations as they perform two quick experiments that each have visible reactions.
Materials
Student group materials:
- Three plastic one liter soda bottles
- Baking soda
- Water
- Tonic water
- Vinegar
- Ice cubes
- Cooler
- Balloons
- Salt
- Sugar
- Sand
- Hypothesis worksheets
- Stop watch
- Three petri dishes
Handouts
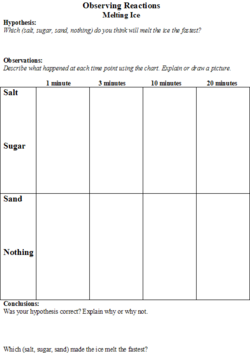
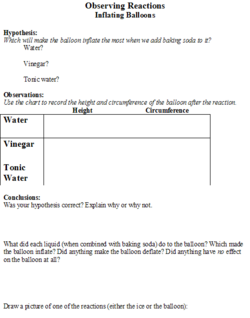
The students will be given a handout (Figures 1 and 2) on which they will make predictions about the effect that different substances (salt, sugar and sand) will have on the melting speed of an ice cube. They will also be able to predict the degree of inflation of the balloon based on the liquid (water, vinegar, or tonic water) that the baking soda is added to. There will be a place on the worksheet for the students to record their observations.
The stop watch will be used to determine how quickly the ice cube melts, in seconds. A tape measure will be used to measure the height of the balloon and the circumference of the balloon, in centimeters, after the baking soda is added.
Description of activity
To begin this lesson, we will ask the students what they know about forming a hypothesis and making observations. This lesson focuses on the importance of making different observations during experiments so we will explain this importance. We will also explain that there are many ways to make observations, such as making charts, notes, and drawing pictures.
We will be doing two experiments. First, we will melt ice cubes using three substances (salt, sand, sugar, in addition to a control ice cube that will not have any substance on it) and then we will add baking soda to three different bottled liquids (vinegar, tonic water, and water) to create a gas and inflate a balloon. These experiments will allow students to form and test hypotheses and to make observations.
We will hand out a worksheet on which they will form and record hypotheses before each of the two experiments. The students will hypothesize which substance will melt ice the fastest, and which substance will cause a balloon to inflate when mixed with baking soda. The observations that the students make during these two quick experiments will help them test and, after the experiments, either confirm or reject their hypotheses.
Lesson plan
1. The teacher will give a brief description of what the scientific method is- focusing more on forming a hypothesis and making observations. She will briefly discuss that the class will be doing two types of experiments and making a hypothesis about what is going to happen in each. The class will then observe the experiments and record what they see by creating charts and drawings.
2. The teacher will introduce the first experiment by explaining that the class will be melting ice using different substances (salt, sand, and sugar) with one control (using no substance). She will ask the students to hypothesize which substance will melt the ice the fastest and have them record their hypotheses on the worksheet.
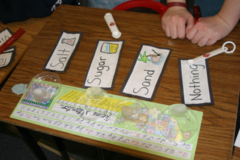
3. The first experiment that the class will do involves four ice cubes and three substances (salt, sand, and sugar). The students will place four ice cubes in individual petri dishes and simultaneously put sugar on one, salt on one, sand on one, and the fourth will be the control, so nothing will be put on it.
4. On the students’ worksheets, there will be a chart where they will draw pictures of what each ice cube looks like at 1 minute, 3 minutes, 5 minutes, and 10 minutes. At the end of the experiment, the students will get to see if their hypotheses were confirmed by looking at their observations.
5. Next, the teacher will set up the next experiment by putting vinegar into a water bottle, putting water into another one, and tonic water into a third one. Then she will put 1 tsp of baking soda into three different balloons. The students will be told that there will be a reaction when the baking soda is added to the substances, and they will hypothesize which bottle will make the biggest reaction.
6. After they state their hypotheses, the students will observe as the teacher puts the balloon on top of the water bottles and drops the baking soda to mix with the liquids. Depending on the liquid (vinegar has the biggest reaction), the balloon will inflate because of the chemical gas (carbon dioxide) that was released by the reaction between the two substances.
7. The students will get the chance to observe what they found and once again determine where their hypotheses were right or wrong.
Potential pitfalls
When working with ice there is always a potential pitfall based on temperature of the room. If the room is excessively warm then all of the ice cubes will melt quickly and the salts melting properties will be overlooked. Another factor that could cause the ice to melt faster is the students touching the ice because of the warmth of their hands. The time span in which they observe the melting ice cube can be so quick, documenting the observations may be rushed. Also, if the wrong amounts of baking soda and vinegar are used there could be a mess caused by overinflation and rupturing of the balloon.
<kaltura-widget kalturaid='314503' size='L' align='R'/>
Literature connections
Book titled, "Our Iceberg is melting" by John Koller. Publisher, St. Martins Press. This book takes a look at how our world is constantly changing. In the book their is one bird who overcomes the situation into which they are thrust. The teacher can take this opportunity to discuss the influence humans are having on the environment. Students can participate in caring for the environment by doing something as simple as turning off the water while brushing their teeth.
Then, ask the students to pick one situation in their own lives when they over came an obstacle. They can write a short story about what steps they took to over come the obstacle. This activity should be self-esteem building. The obstacle can be as simple as not being able to throw the baseball from left short stop to home plate, and how practice made the task easier.
Penguin Chick by Tatham, B. & Davie, H. HarperCollins Publishers. Dec. 2001.
This book looks at how a penguin is raised and the responsibilities involved in caring for a living being. Do the students have a dog or cat that they take responsibility for taking care of? What other responsibilities do the children have? Do they feel any obligations to care for the environment? The penguin’s habitat is made up of ice. Discuss how global warming may affect this in the future and the responsibilities each student has to do his or her part in maintaining the well being of the environment through small tasks such as turning off the water while brushing one’s teeth.
Chemistry connections
1. Salt lowers the freezing temperature of water. That's why we use road salt in the winter - to melt the ice!
2. Baking soda can also melt ice because, like salt, it contains a small amount of sodium.
3. When baking soda and vinegar combine, they react to create carbon dioxide gas. That's why our balloon inflates!
Practical living connections
Falling on the ice can have serious consequences, especially for the elderly. Why are those who are older more susceptible to these injuries? What can you do to make your bones stronger? How can you use the conclusions derived from the ice cube melting experiment to make your home side walks safer?
Connections to educational standards
S3-4:13 Students demonstrate their understanding of the properties of a gas by…
· Experimenting with gas in a closed container (such as a balloon or a bag) and describing how pressure on the container changes when the volume of the gas changes.
Next steps
-Try the baking soda and vinegar volcano experiment! There is a link provided below for more information.
-Try melting ice and attaching a string to it. There is a link below for more information, including a video demonstration.
-Try these experiments using other materials - have your students brainstorm their ideas. Don't forget to make hypotheses!
-Have the students come up with their own way of observing and collecting data- they can make their own charts or come up with a way to visually show the data.
Citations and links
http://www.familieswithpurpose.com/funwithgas.html - Baking soda and vinegar bottle experiment
http://www.madsci.org/experiments/archive/854444893.Ch.html - Baking soda and vinegar VOLCANO experiment!
http://www.teachersdomain.org/resources/phy03/sci/phys/matter/zsalt/index.html - A different take on melting ice with salt - attaching a string!
http://science.howstuffworks.com/question58.htm - Explanation of how salt melts ice in the winter
Reflection
I thought that it was really great that we had two separate opportunities to carry out this lesson. The first experience allowed us to see what we needed to work on and to take suggestions from the teacher of the class that we were working with. She suggested that we label our ice cubes and bottles using not only words but also images of what substances we used, for the students who have trouble reading. Another benefit was that I was able to see that the worksheet that I had developed was too wordy and needed to be simplified. We took advantage of these discoveries and were able to improve our lesson for the second go-around, and it went much better once we made those changes. -Janine
I feel that this combination of experiments worked very well together. The worksheet was very helpful because the children who have a hard time speaking and writing English were not at a disadvantage because pictures were more descriptive than words in this case. Also, it was good to have two things going on at the same time because it held the attention of the students. After making the one and three minute observations the ice cubes were forgotten by the children as the reaction between the baking soda and other liquids took their full attention. When the balloon was filled with carbon dioxide as a result of the reaction between the vinegar and baking soda the students were extremely pleased, they felt they had done some real science. While all this was happening the ice with the salt on it had gone through a lot of changes, and the kids found this far more interesting than I had anticipated them to. It was good because they related it to the roads and what winter in Vermont is like. The only down fall to having such an interesting experiment is that the students wanted to touch everything, and do it all at once. We just let each child take a turn at adding the reacting factor to the experiments and this seem to be satisfactory.
-Julie
At first, I was nervous about doing two different experiments in one lesson because the two experiments were very different. The fact that the students were doing a lot of observations during both of them tied it in very nicely. They got to see how important it is for scientists to observe the experiments and record the data. It was also a very good experiment because it allowed the students to understand and realize that not every hypothesis they make will be correct. They realized by the end of the two experiments that it was okay that their hypothesis was wrong because that is part of science. The experiments were also very visual and engaging which helped keep the students to concentrate and pay attention. I also thought that using the handout that we made was a very good idea because it got the students to be organized and at the end of the lesson, they had all of the information they needed on one sheet of paper.
-Mary Beth


