Milky Plastic
| Instant wiki maker | Making handouts | Editing tips |
Contents

Biology In Elementary Schools is a Saint Michael's College student project from a course that ran between 2007 and 2010 and fully described in this book chapter. The student-created resources have been preserved here for posterity. Link under 'toolbox' for printer-friendly versions of the exercises. Click on handouts to print full resolution versions. Please see Wikieducator's disclaimer, our safety statement, and the Creative Commons licensing in English and in legalese.
Student worthiness
Tried once and worked well
Primary biological content area covered
- Chemical Reaction
- States-of-Matter
Materials
Materials Required for Teacher's Use:
- Microwave
Materials Required for Each Student Group:
- Skim Milk
- White Vinegar
- Microwavable Safe Bowls
- Measuring Cup
- Tablespoons
- Popsicle Sticks
- Cheese Cloth
- Plastic Ziplock Bags
Handouts
 Figure 1. Click to see the full-size handout]]
Description of activity
This is quick and easy way to make plastic out of household materials. By combining milk and vinegar you can begin making plastic within minutes. The drying time for the plastic is about a day, but you can make the initial substance in about five to ten minutes.
Lesson plan
Activity
- Pour 250 mL of skim milk into a microwave safe bowl.
- Heat the milk for 1 minute or until the milk is hot. Be careful when you take out the milk because it will be hot. Have the teacher handle the hot liquids.
- Pour 4 Tablespoons of vinegar into the 250 mL of heated skim milk. The students can do this part with help.
- Once the vinegar and milk have been combined, start stirring the solution with the Popsicle stick.
- After the solution has been mixed you can then strain it. If your container is small enough, cover the top in cheese cloth and turn it upside down and empty out the container. If you are using a bigger container, carefully pour the solution into the cheese cloth.
- Carefully ring out the forming plastic. The drier it is the better. Make sure you do this process in a timely matter and don't play around with the forming plastic to much. If it cools to much, when you go to make it into the formation you want it will be too dry and it won't combine and adhere to itself.
- Place the forming plastic carefully onto a plate to dry.
- Make sure to put the milk back so it doesn't go bad. Wash out the measuring cup, the tablespoon, and the container.
- The plastic will take around 24 hours to really dry. Make sure you leave it in a place where it will be undisturbed and with as much airflow as possible.
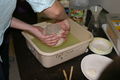
Gallery

Students making plastic
Straining plastic substance


Potential pitfalls
The only real pitfall of this experiment is the amount of time it takes for the plastic to dry. It takes a total of 24 hours for the plastic to completely hardened and dried. The other pitfall is that if the plastic "blob" is not put into a shape as soon as it is taken out of the cheesecloth, it does not adhere to itself and can become clumpy.
Literature connections
Inches, A. and P. Whitehead. 2009. The Adventures of a Plastic Bottle: A Story About Recycling (Little Green Books).
Once this experiment is complete and time allows then you can talk about the recycling property of plastic.
Connections to educational standards
S1-2:12 Students demonstrate their understanding of the States of Matter by identifying, describing and comparing the state of matter of solids and liquids.
S1-2:14 Students demonstrate their understanding of Physical Change by heating and cooling (changes in temperature) can change states of matter
Next steps
If time allows the teacher can have the students weigh out each of the liquids and find out how much the produced plastic weighs. With this information you can find out how much liquid is needed to produce a desired amount of plastic. To cover an art education standard the students can add food coloring to their milk to produce a plastic with the same color. Then the students can roll them into beads if time allows.
Reflections
Meaghan - This experiment for the most part went very smoothly. We ran into a few problems the first time we ran through the experiment; however, we came up with new way to get through the experiment. After the first run of the experiment the rest of them went smoothly the way we originally planned it. Most of the kids really enjoyed the experiment. Some of them were a little off put by the smell and others were a little grossed out by the texture, but I think everyone was still excited. For the most part Neil and I had to strain the liquid until it came time to actually wring it out. This worked out for the best because I think kids straining it the way we chose may have been the problem for our first run. The liquid was also still fairly hot so it was good that Neil and I were the ones that were handling that.
Neil - This experiment went fairly well for the most part. In the beginning of the experiment we ran into a problem with the amount of plastic that was being made from each individual container. We did make up for this though, by using more containers to compensate for the overall plastic being made. The other problem with this experiment is that it created a very bad smell, which tends to make the kids not want to touch the plastic. It was very interesting because our last experiment dealt with beetles and the children, for the most part, did not have a problem picking them up and touching them. Yet in this experiment less kids wanted to touch the plastic then the beetles in the past experiment, and by a large margin. So I would recommend this experiment, but toward students who are very willing to get there hands dirty regardless of a smell.
Citations and links
Herrick, Jack, and Others. "How to Make "Plastic" out of Milk - WikiHow." WikiHow - The How-to Manual That You Can Edit. 3 Mar. 2010. Web. 26 Apr. 2010. <http://www.wikihow.com/Make-%22Plastic%22-out-of-Milk>.
"Reeko Science Experiment - Making Plastic." Reeko's Mad Scientist Lab - Science Experiments for Kids, Science News, Fun Stuff - Sure Beats School! Web. 26 Apr. 2010. <http://www.reekoscience.com/Experiments/ExpMakingPlastic.aspx>.
Common mistakes
There are a few common mistakes with this experiment. First is that it is important to use the correct milk for the optimum amount of plastic. Skim milk by far works the best but 2% works fairly well also. Another mistake is that the cheese cloth is not closely held against the Tupperware that holds the milk and vinegar solution. If the cheesecloth is not held tightly, some of the plastic pieces will slip through and not be able to be collected. The final common mistake is that if the plastic "blob" does not get enough air and is kept in a plastic bag for example, then the plastic will begin to grow mold.