LowVision/Geometry&Measurement
Contents
Geometry & Measurement
* To Introduce the content of this strand of the Mathematics Curriculum
|
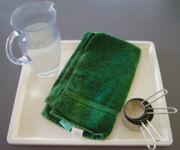
Just a Cupful
If it is not possible to complete the activity where you are, please go to the following link [Sandy] to see the efforts of a very patient (slightly grumpy) volunteer/victim!!!!
|
Content of the Strand 'Geometry & Measurement'
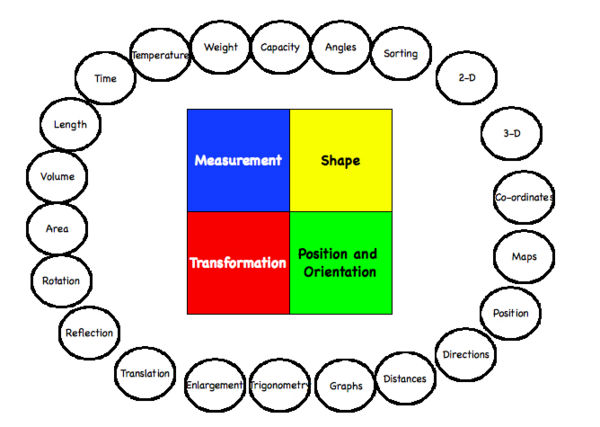
There are four components of this strand shown in the diagram: Measurement, Shape, Position & Orientation, and Transformation. As students progress through from Curriculum Levels 1 to 6 they will be expected to explore an increasing number of the concepts (shown in bubbles) linked to these four areas. For students that are Blind or have Low Vision, developing an understanding of many of the basic concepts should be reasonably straight forward. Especially when regular house hold items can be used as the learning materials. To demonstrate this point consider the Level 1 activities on [Length]. Exploring 'the length of a worm' or 'the length of my foot' should present little difficulty. However, the activity 'near and far' assumes that a child has made the cognitive step to relate a 'block' to a 'building'. The visual similarities of these two objects is sufficient that most sighted children accept this connection by the time they are at school. For the child who is Blind or has severe Low Vision this connection must be quite challenging. They must relate an audio and tactile experience of a building to the experience of holding a block. Buildings produce a variety of sounds and echos, they have different textured flooring, vertical walls, doorways to pass through; but without being able to encircle a building to assess it's general form the similarities with a block would be tentative. A potential strategy for developing this understanding is explored at this link: Learning Sequence.Many aspects of this Strand are highly visual in nature, such as the use of maps. They require the use of symbolic representation that does not easily relate to an accessible format for Blind and Low Vision students. For example, while the use of perspective in visual diagrams is common practice, providing interest and additional information to the observer; in tactile diagrams a similar attempt to render a three dimensional house would not increase understanding but has the potential to generate confusion. Provide careful sequencing when moving from three-dimensional (concrete) to two-dimensional (symbolic) presentations. Use a logical sequence of simple-to-complex displays, emphasizing critical features and information. (Kapperman, Heinze & Sticken, 2000) In the latest version of the 'The Hitchhiker's Guide to Braille Mathematics' Level one activities for Geometry and Measurement are centred around real objects, ensuring that the language and concepts are well established and generalized. Only at Level two are Braille Mathematic symbols introduced along with specialized equipment such as tactile rulers.
Why Do You Need to Know About That?
This Strand of The New Zealand Curriculum in Mathematics is only pursued up to Level 6. This is perhaps due to the practical nature of the concepts and skills that it develops. How to tell the time, read a bus timetable, working out where you are and where you are going, and knowing how to make cakes. These are all requirements of many peoples everyday lives, which includes the lives of people who are Blind or who have low vision. For this group of learners in New Zealand their is a companion or complementary curriculum which they work on simultaneously. This is known as the Expanded Core Curriculum (ECC) which is divided into eight areas: communication skills; visual efficiency skills; physical abilities; developmental orientation and mobility; physical education; social skills; life skills; assistive technology; and career and future planning. There are numerous points of overlap between the ECC and this strand of the NZ Mathematics curriculum, very closely aligned objectives exist between the ECC area of 'developmental orientation and mobility' with the NZ Curriculum area called 'position and orientation'. Similarly the ECC area called 'life skills' is concerned with the development of specific skills necessary to study the NZ Curriculum area of 'measurement.' What is acknowledged in the Expanded Core Curriculum is that there are experiences and concepts casually and incidentally learned by sighted students that must be systematically and sequentially taught to the visually impaired student (Hatlen, 1997). This means that it is not simple enough to make printed materials bigger or to present a child with reformatted materials. What is needed at times is a different approach to learning, or a combination of approaches; a different device or technique to achieve the same outcome.
Some General Examples of Alternative Equipment
The table below demonstrates a selection of alternative devices that could be used when studying Geometry and Measurement.
| Equipment | Description |
|---|---|
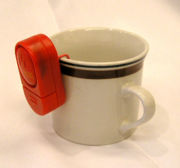
| An electronic level indicator used for filling cups with liquid. Provides an audio signal to notify the user that the vessel has been filled. | |
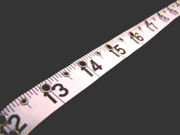
| This measuring tape has tactile markers which identify each cm. A different marker is used to indicate every 5cm distance and then every 10cm distance. Practice in using the tape measure is needed and the ability to work with multiples of 5 and 10 make the process more effective. | |
| Rulers with raised marks to indicate distances. Different marks are used to indicate different sized gaps. | |
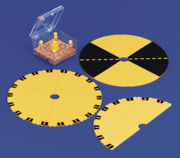
| This kit includes both a tactile protractor with raised lines indicating the different angles. It also contains the pin kit in order to assemble lines of string on a pin board to create tactile angle displays. | |
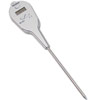
| This is an example of a talking thermometer that is suitable for cooking and hobbies. | |
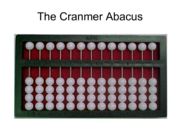
| While there are regular abacus in many classrooms this one is designed for effective use for people who are blind. The abacus has a felt mat inside to prevent the beads from slipping and tactile markers to guide number placements. The abacus is a useful tool for addition, subtraction, multiplication and division. A student must have a good grasp of numbers to use the abacus effectively. The techniques for using the abacus will need to be taught to the learner. | |
| This is an example of a talking scientific calculator. Necessary for students to be able to calculate Trigonometry problems and Pythagoras. The following link will take you to some further information regarding the use of this equipment [[1]] |
Alternative Strategies
The use of alternative equipment is not always possible or appropriate, sometimes a student needs to develop alternative strategies. If we think back to the 'Just A Cup' activity a student could use the electronic level indicator, shown at the top of the table above, to complete the activity. The use of such a device would almost certainly increase the time it would take to complete the task. Alternatively a student could be taught strategies, along with when each strategy is appropriate to use. Thinking back to Sandy in the video example, he used a finger across the top of the cup to gauge when each cup was full. Fine in science and Maths, even in cooking provided your hands are freshly washed, but such a strategy would be inappropriate and potentially painful for pouring tea. Especially if it was someone else's cup!!!
Methods for Measuring liquids include:
- placing a finger over the edge of a glass or cup to detect the level of the liquid tactilely as it reaches the finger
- holding the glass or cup as it fills and determining the level of the liquid by the weight of the vessel
- attending to the temperature change on the outside of or above the vessel as it fills with a hot or cold liquid
- listening to the change in the sound that the liquid makes as it fills the vessel (the pitch rises as the container fills)
- using an object that floats above the liquid (such as a ping pong ball or ice cube) to detect the liquid tactilely as it approaches the rim of the container
(Ponchilla & Ponchilla, 1996)
A person needs to develop experience of pouring with cold before hot liquids and they also need to experience a variety of liquids with differing viscosities (eg. water, yoghurt, syrup) as well as pouring solids such as flour and sugar. This final link presents an example, including reference to strategy, methodology and adaptive devices that could be used to follow the NZ Curriculum for Measurement at Level 2. Level 2 Measurement
References
- Hatlen, P. (1997). Core curriculum for blind and visually impaired students, including those with additional disabilities. Retrieved August 7, 2009, from http://www.tsbvi.edu/Education/corecurric.htm
- Kapperman, G., Heinze, T. & Sticken, J. (2000). Mathematics. In A.J. Koenig & M.C. Holbrook (Eds.). Foundations for education for blind and visually handicapped children and youth: Theory and practice. (2nd ed.). Austin: Texas School for the Blind and Visually Impaired.
- Ponchilla, P. E. & Ponchilla, S.V. (1996) Foundations of rehabilitation teaching with persons who are blind or visually impaired. New York: American Foundation for the Blind.
