Insulation Exploration
| Instant wiki maker | Making handouts | Editing tips |
Biology In Elementary Schools is a Saint Michael's College student project from a course that ran between 2007 and 2010 and fully described in this book chapter. The student-created resources have been preserved here for posterity. Link under 'toolbox' for printer-friendly versions of the exercises. Click on handouts to print full resolution versions. Please see Wikieducator's disclaimer, our safety statement, and the Creative Commons licensing in English and in legalese.
Student worthiness
Tried and Trusted.
Primary biological content area covered
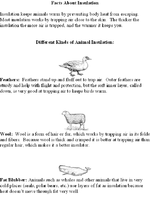
Animal adaptations: various forms of insulation. Insulation works by retaining heat. Many forms of insulation, such as feathers, wool, and hair, work by trapping air close to the skin. Other forms of insulation, like blubber, are simply poor conductors of heat because of their thickness and substance, and therefore work well for retaining heat. Human skin is not equipped with the same kind of insulation properties other animals have. Different animals have different forms of insulation depending on environmental needs. Students will be able to identify the various types of insulation that animals use, discover why certain animals have certain types of insulation based on their environmental needs, and test to see which insulation works the best.
Materials
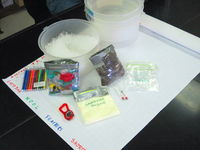
- Plastic Ziploc Sandwich Bags
- Wool roving (washed, pre-spun wool)
- Feathers
- Shortening
- Ice Water, Crushed Ice, or Snow
- Four Plastic Containers
- Cooler To Keep Ice In
- Graph Paper
- Pencils/Pens
- 4 Stop Watches
- 4 Thermometers
- Student Hands!
Handouts
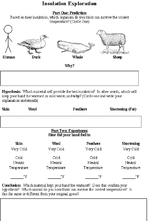
The students will complete this handout during the activity.
Description of Activity
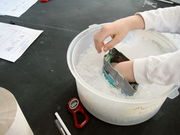
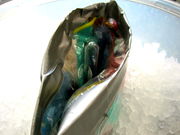
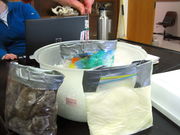
In this activity students will use plastic bags as gloves and will wear them while putting their hands into a tub of crushed ice. Each set of bags will include an outer one, where the insulation is held, and an inner one, where the students will put their hands. The two bags are held together by duct tape, or by being zipped together. (Try turning the inner bag inside out and zipping it to the outer one. We didn't have a lot of success with this, hence the duct tape). There will be four different bags students will try: one with nothing inside, one with wool, one with feathers, and one with shortening (to simulate lard/blubber). Students will wear each bag in turn and determine which one keeps their hand the warmest. After this they will also use a thermometer to make more accurate measurements inside the bag. An accompanying handout will help students record their hypotheses and results, and we will help them determine why different forms of insulation work well for different animals.
Lesson plan
Prior to the lesson, allow some time for setting up the bags and the activity station.
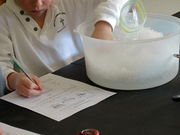
Introduction: The teacher(s) will briefly explain to the students that they are going to be doing an activity involving various types of insulation used by animals. Pass the handout out and have the students fill in the first part, which deals with predictions and hypotheses, for a few minutes. Next, split up the students into groups of 2's or 3's and put one group at each of the buckets that has been previously set up.
Instruction:
Once the students have been split up into small groups, the teacher(s) will explain that each group will get to feel how well each type of insulation works and then test the actual temperature of the inside of the insulation bag when placed in ice. The teacher(s) will remind the students to keep track of how their hands felt and the actual temperatures of each bag on their worksheets.
The students will be given 3-5 minutes at each bag. Start each group at a different station (one with the empty plastic bag, one with the wool, one with the feathers, and one with the shortening), and have groups rotate after the allotted time. Each student will take a turn holding their hand inside the plastic bags, which should then be inserted into the bucket of ice for thirty seconds, or until they get an accurate feeling of the temperature.
After both partners have had a chance to do this, they should work together to measure and record the temperature inside the bag using a thermometer. Be sure to remind students that the thermometer should be placed inside the bag in such a way that it is not touching the bottom. If the thermometer touches the bottom of the bag, the students are more likely to get a colder reading of the temperature. However, the walls of the bag should be kept snug around the thermometer and the bag should be well surrounded by ice so the temperature measurement is accurate. This should take about a minute in order to get an accurate temperature reading, and then allow some extra time at the end for students to fill in their handouts.
Closing: The students will place their data on a chart and discuss the results that they discovered. Once all the groups have recorded their temperatures, find the average for each type of insulation. Use this data to create a graph based on the average temperature for each insulation bag. The averages should be calculated by the teacher(s) when the activity is completed, and discussed with the class.
Potential pitfalls
One of the major pitfalls could be the temperature readings not being as accurate as hoped. Another issue that may arise may be keeping temperature of the buckets consistent throughout the whole activity. The change in temperature, if any, can alter the results of the experiment so it is important to keep the ice fresh if it starts to melt. Students may put the thermometer directly on the bottom of the bag, which will affect the temperature reading. Make sure to remind students that the thermometer should only go about halfway down the bag so that they get the best results. Students may also put the bags all the way into the buckets of ice, or lay them sideways, which causes problems for themselves and subsequent groups because ice gets inside the bag, gets everything wet, and alters the temperature readings. Make sure bags are securely closed and fastened; our shortening started leaking towards the end of activity, which made everything messier, needless to say.
Math connections
During the activity, the students will be recording the temperatures from each bag on their individual worksheets. Once the students have rotated through each station and have collected all of their data, they will put each of their temperatures onto a chart. Once the entire class has put their temperatures on the chart, the teacher will help the class calculate the average temperature for each bag. After the averages have been calculated, the students will help make a class bar graph of the average temperature for each bag. This will help the students see which insulation truly works the best!
Literature connections
Some books that could be tied in with this activity:
- Secrets of Animal Survival. Books for World Explorers, National Geographic Society. 1983.
Contains a section on polar regions and details the adaptations different arctic animals have to keep them warm.
- Davies, Nicola. Extreme Animals: The Toughest Creatures on Earth. Candlewick Press. Cambridge, MA. 2006.
Connections to educational standards
S3-4:30 Students demonstrate their understanding of Structure and Function Survival Requirements by explaining how the physical structure/characteristic of an organism allows it to survive and defend itself.
Next steps
After trying out the temperature inside the bag students could do a new experiment to test the insulation value in a different way. Fill four small vials or tubes with warm water, and have students place them inside the different insulation bags. Have them test the temperature of the vials at five or ten minute intervals and chart how long it takes for the temperatures to drop substantially. Another approach is to have students put a small container of ice inside the bag and place the bag in warm water. Watch and record how long it takes for the ice inside the bag to melt. Both extensions explore properties of insulation, and provide additional opportunities to discuss how insulation works.
Also, the students can brainstorm other types of insulation that animals use and formulate new hypotheses! Students could also explore other ways that animals adapt to their environment and do a small research project on an animal of their choice. The books listed under literature connections could be used to extend students' understanding of how insulation works in specific animals.
Reflections
At the beginning of the activity, our biggest difficulty was with time constraints, because we were only allotted 15-20 minutes per group of students. Realistically, this doesn't allow time for all of the students to test out and measure the temperature in each of the different bags. We had small groups of only four or five students, which worked well, because there were usually one or sometimes two students at each station. We modified the experiment to allow each student to test out and measure the temperature of one bag, and record his or her data on the chart. After, if there was time, students were able to try out the other bags and share their data with each other so everyone could have data to compare. The method we found that worked the best was to have students try out all the different bags by passing them around (this can get very wet) and then measure the temperature in only one bag. Then they would share their data with each other and record it on the chart. The chart was a useful tool that enabled us to see the distribution of data, but there wasn't time to use it to its full extent by finding averages and making a separate graph. With time to make this a complete lesson, the chart and graph will become even more important components.
We noticed that the temperatures were becoming less and less acurate as the activity went on. We had originally thought about changing the ice after each group, but since the students were coming to us so quickly, time did not allow us to do so. The last few groups found data that was not as good as the first groups that tested the various insulating materials. If this activity were done as a lesson for a whole class, changing the ice buckets part way through would be beneficial so that the results stay consistent.
The only other issue we seemed to run into towards the end was the bag filled with shortening started to burst at the seams. This bag was the most popular to try out because it is something that students did not normally have contact with and it was fun to touch. If we did this experiment again with groups of students, we think it would be beneficial to have extra shortening bags on hand in case this were to happen again.
An essential part of this activity was the handout. It helped the students think about the concepts and organize their predictions, observations, and data. With more time this handout would have been even more helpful because we could have discussed the data more in depth and determined whether or not the final outcomes lined up with students' hypotheses.
The nice thing about this activity was that there was plenty of time to discuss hypotheses, and many students had good guesses about the way animal insulation works. You could tell they were really thinking, and trying to understand how the data lined up with their predictions. The students had already done a similar project earlier so they were prepared to think about these concepts. They also knew enough about the different animals and about insulation in general to make accurate predictions.
Citations and links
Activity adapted from "Whale Blubber Experiment" on the Home Science Tools site: http://www.hometrainingtools.com/article.asp?ai=1355&bhcd2=1266812317
Additional ideas/information from: http://eeb.bio.utk.edu/biologyinbox/documents/Unit3-Ex2insulation.doc.
Information on the handout came from New World Encyclopedia:
"Feather," New World Encyclopedia 3 April 2008. http://www.newworldencyclopedia.org/entry/Feather
"Fat" New World Encyclopedia 29 August 2008. http://www.newworldencyclopedia.org/entry/Fat
"Wool" New World Encyclopedia 4 April 2008. http://www.newworldencyclopedia.org/entry/Wool
Books:
Secrets of Animal Survival. Books for World Explorers, National Geographic Society. 1983.
Davies, Nicola. Extreme Animals: The Toughest Creatures on Earth. Candlewick Press. Cambridge, MA. 2006.
The animal pictures on our handouts came from Wikimedia Commons. Here are the individual links:
http://commons.wikimedia.org/wiki/File:Sperm_Whale_(PSF).png
http://commons.wikimedia.org/wiki/File:LA2-Blitz-Ostfriesisches_Milchschaf.png
http://commons.wikimedia.org/wiki/File:Muscovy_Duck_(PSF).png

