The Basics
| IUT Workshop | ||
|---|---|---|
| Tutorial 6 | Introduction | The Basics | Show me how | |
In this subsection we will show you how to:
In the next subsection, we will show you how to manipulate the way images are displayed on the page. |
Basic syntax
The most basic syntax for adding an image is:
[[Image:Name_of_Picture_goes_here.jpg]]
You insert this where you would like the image to appear.
Explanatory notes
- The syntax is contained within two square brackets;
- For images, type the word "Image" followed by a colon (:);
- You must substitute the word "Name_of_Picture_goes_here.jpg", with the name of the file and its extension (the letters which appear after the full stop. The extensions for the image formats you can use are: .gif, .jpg, .png. and .svg). For example, if you wanted to insert a jpeg image on your computer called "Flowers_Sept06", you would type the following: [[Image:Flowers_Sept06.jpg]].
With images, you can:
- use an image that is already available on WikiEducator (in other words, an image that was previously uploaded onto the WikiEducator server), or
- upload an image from your personal computer onto the server.
Using an existing image available on WikiEducator
We'll start with an image that is already available for use on WikiEducator.
Uploading a new image on WikiEducator from your computer
When you want to upload a new image onto the server, you use the basic syntax e.g. [[Image:Picture.jpg]] After you have saved your page the wiki syntax will appear like this:
Image:Picture.jpg
Note: If the image already exists on the wiki the image will appear right away, otherwise you will get a red link like the one above. The red link tells you that the image still needs to be uploaded onto the server.
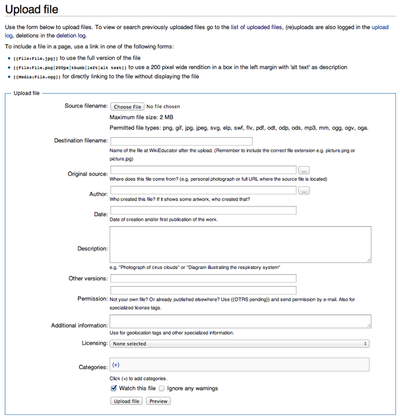
Now the second step: you need to upload your image into the wiki software for it to be displayed on the page in place of the red link. The way to do this is to click on the red link that has just been created for you by the wiki. This will take you to the Upload file page where you will upload your image into the wiki to be displayed.
The Upload File page contains a form that will allow you to select an image (or media file) from your own computer and upload it into the wiki. Clicking on the Browse button next to the Source filename field will open your computer's standard file open dialog. Use this dialog to navigate to and select the image you would like to add to the wiki. The Destination filename should already be filled in for you and will not need to be changed.
Each image actually has its own page that can be accessed by clicking on the image. The Summary field that appears on the File Upload form will appear below the image on this image page. Here you should include a brief description of what the image is, and perhaps its source; this box allows Wiki markup.
For more information on positioning images visit the WikiEducator Tutorial.
