From Liquid to Solid: An Ice Cream Creation
| Instant wiki maker | Making handouts | Editing tips |

Biology In Elementary Schools is a Saint Michael's College student project from a course that ran between 2007 and 2010 and fully described in this book chapter. The student-created resources have been preserved here for posterity. Link under 'toolbox' for printer-friendly versions of the exercises. Click on handouts to print full resolution versions. Please see Wikieducator's disclaimer, our safety statement, and the Creative Commons licensing in English and in legalese.
Student worthiness
This has been tested and was successful.
Primary biological content area covered
Through the process of making ice cream students will explore the different states of matter as the ingredients mix together and transform from a liquid state into a solid state. They will learn about the movement of the particles between the liquid and solid states of matter. Students will also learn about the importance of having a healthy, balanced diet, leaving some room for sugars and fats. This can be explained further by discussing the food pyramid with students.
Materials

Per Student:
- 1 sandwich size zipper-lock bag
- 1 large plastic jar (with a screw top)
- 6 tablespoons of rock salt
- 1/2 cup of half & half (Full cream will work diluted by half with milk)
- 1 tablespoon of sugar
- 1/2 teaspoon of vanilla extract
- Gloves or a towel
- 6 cups of Crushed ice
- Spoon
Other ingredients that may be used:
- Flavored Syrups (i.e. chocolate, mint, strawberry, etc)
- Food coloring
- Half & half can be replaced with whole milk or whole cream
Handouts
These two handouts discuss how to live a healthy and nutritional lifestyle and the important differences between the two states of matter that are observed in this lesson: liquid and solid.


Description of activity
We will begin the activity with presenting the bags of half and half, sugar and vanilla and asking the students what they see and have them describe the characteristics of the liquid. The comments will be put up on a piece of chart paper to refer back to. Then we will add the liquid filled bag into the jar of ice and rock salt mixture. The students will begin to shake the jars vigorously until the liquid turns into a solid, ice cream. Finally, the students will describe the solid and the responses will again be put on a chart to review. While the students are shaking the jars the other teachers will set up the activity for the next group by mixing the half and half, sugar and vanilla. Students can add food coloring to the mixture to have some color for their ice cream.
Lesson plan
This particular lesson plan [1] should take approximately 20 minutes to complete. It is important to make sure that all materials are cleaned completely to avoid issues related to food allergies.
- The first and most important part of this lesson is to have each of the students wash his or her hands thoroughly with soap and warm water.
- Next, take the empty salad dressing containers and fill them approximately half way with crushed ice. After this, put between 3 and 6 tablespoons of the rock salt into the container. Then, seal and shake it for about 30 seconds.
- Then, fill the sandwich size bag with 1/2 cup of half & half cream, 1 tablespoon of sugar, and 1/2 teaspoon of vanilla extract. (see figure 4) At this time, you may also add chocolate syrup or food coloring
- After, seal the bag tightly, allowing as little air as possible into the bag.
- Once this has been done, place the sealed bag into the jar of salt and ice. Close the jar tightly.
- For approximately 5 minutes (it may take more or less time), have the students roll and shake the containers.
- As soon as the liquid appears to be a solid (see figure 5), carefully open the lid for each student. (The salt and ice mixture has a sulfur smell and may be harmful to the students).
- Last, remove the bag from the ice and dump the ice cream into a bowl (see figures 6 & 7), and let the children eat their creation.
- After the children have eaten their ice cream and discussed the difference between the liquid mixture and the solid, it is time to clean up!
When this experiment was completed for the first time, the ingredients had already been measured and placed into the plastic bag for the children.
- Ice Cream Gallery
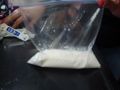
Figure 4. The bag with all of the ingredients mixed inside; click to view closer.
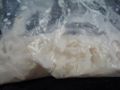
Figure 5. A picture of the ice cream in its transition from liquid to solid; click to view closer.
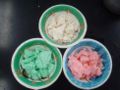
Figure 6. Three examples of the completed, solid ice cream; click to view closer.
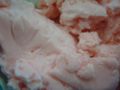
Figure 7. Up close picture of the solid ice cream; click to view closer.
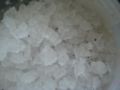
Figure 8. The rock salt and ice mixture, inside the container; click to view closer.
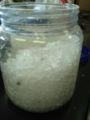
Figure 9. The container full of the ice and rock salt mixture; click to view closer.


Potential pitfalls
From running the activity we found that the rock salt and ice mixture has a sulfur smell. What we propose to do is have the teachers open and close the jars so that the students will not smell the sulfur. Also, with the lack of time we have decided to have two of the teachers run the activity and have the other two teachers create the liquid mixture and then switch each time we have a new group of students. This way each teacher will be able to run the activity and we will cut down on the amount of time needed to set up the project.
Math connections
While following the ice cream recipe, students can explore the different measurements. Beforehand, have students convert specific measurements to understand their relationship with one another (i.e. convert tablespoons to teaspoons). You may also ask students to double or half the recipe based on the measurements given in the recipe above.
Literature connections
A great leeway into this activity is to begin with stories introducing the art of ice cream making. Some great examples include, From Cow to Ice Cream, by Bertram T. Knight, Milk to Ice Cream (Welcome Book: How Things are Made) by Inez Snyder, and Product Testing: The Chemistry of Ice Cream by Dianne N. Epp. Additionally, to explore the history of ice cream, consider sharing We All Scream for Ice Cream! The Scoop on America's Favorite Dessert, by Lee Wardlaw and Ice Cream: Including Great Moments in Ice Cream History by Jules Older and Lyn Severance with your class
Connections to educational standards
Vermont Standards: 7.12 Students understand forces and motion, the properties and composition of matter, and energy source and transformations. This is evident when students observe and describe the changes of states of matter. Edmund's Elementary School Standards: S3-4: 12 Students demonstrate their understanding of the States of Matter by… •Identifying, describing and comparing the properties of selected solids, liquids and gases
Next steps
Once the activity is completed one could expand upon the experiment by adding new flavors and goodies to the mixture to see if there is a change in the experiment. Also,an experiment with the salt and ice can be done. Such as identifying the reaction between the salt and ice and why the ice melts from the salt. Based off of the students input a teacher can decide whether or not to add onto the unit of liquids and solids so ensure that students fully understand what a liquid and solid is and the characteristics of each.
Reflections
Overall, this experiment went over well. By having four of us students running the activity, it went over very smoothly. The children responded very well to listing off characteristics of liquids and solids. The students already knew many of the characteristics of all 4 states of matter. They were able to then apply this knowledge to the ice cream as a liquid and later as a solid. At the last minute, we decided to include the food pyramid. This was helpful to engage the students while they were sitting and eating their ice cream. This discussion helped to further their knowledge on living a healthy lifestyle by exercising and eating the right amount of all food groups. In closing, the students were handed a worksheet that helped them to reinforce the concepts of the states of matter as well as apply them to what they had experienced when making ice cream. There were few problems that encountered. A few of the children dropped their containers and broke the lids, causing the ice and salt to spill all over the floor. After this happened, we encouraged the children to roll the containers on the floor. The containers became too cold for some of the students, and assistance was needed to shake and roll the ice cream. Lastly, it is important to be aware of allergies of students. We encountered one student who was lactose intolerant. Therefore, soy milk was successfully used to replace the cream in the ingredients. However, these were only minor issues that were encountered and the experiment was very successful.
Citations and links
Making Rock & Roll Ice Cream. Retrieved February 25, 2009, from : http://www.stevespanglerscience.com/experiment/00000148 Ice cream in a Bag! An Ice Cream experiment done in a different way.