Density Rainbow
| Instant wiki maker | Making handouts | Editing tips |

Biology In Elementary Schools is a Saint Michael's College student project from a course that ran between 2007 and 2010 and fully described in this book chapter. The student-created resources have been preserved here for posterity. Link under 'toolbox' for printer-friendly versions of the exercises. Click on handouts to print full resolution versions. Please see Wikieducator's disclaimer, our safety statement, and the Creative Commons licensing in English and in legalese.
Student worthiness
- Tried and Trusted
Primary biological content area covered
Students will be comparing and contrasting properties of different liquids. Density of liquids will be the main focus of this exploration.
Materials
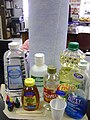
Figure 1-Materials We Used
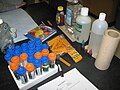
Figure 2- Materials


Student Materials:
- 5mL Karo® Syrup (clear corn syrup)
- 5mL Water
- 5mL Vegetable Oil
- 5mL Blue Dish Soap
- 5mL Rubbing Alcohol
- 5mL Lamp Oil
- 5mL Honey
- Food Coloring
- Funnel
- Pipettes
- Small 9 ounce cups
- Stirrers
- 15mL containers (enough for each student)
Teacher Materials:
- Gloves
- Hand washing Station
- Emergency Eye Washing Station
Handouts
HAND OUT EXAMPLE:

Description of activity
In this activity, students will learn about density by looking at how the different materials separate when put in the same container. The seven materials will be put together and will form layers. In this activity we will explore the concept of density with students. We will do this by observing various liquids from honey to lamp oil. Each liquid will be a different color after mixed with food coloring so that students can see where one liquid ends and another begins. Since some liquids are denser than others they will not mix together when poured in slowly. This gives students the opportunity to observe different densities in an understandable way.
Begin with an empty cylinder jar large enough to hold the liquids (size of cylinder container depends on how many mL of each liquid you choose to use during your experiment-for ours we used 5mL per liquid and decided to use a slim container holding 50mL.). You will also need smaller cups (Dixie® cups work well-small waxed paper cups) to measure out each liquid before pouring them into the large jar. Then students will pour the liquids into the container in order from the greatest density liquid to the least density liquid. After the experiment students will be given a chance to reflect on the bottom of their handout and order the densities of the liquids used in a chart from least to greatest. Further class discussion can revolve around hypotheses made by the students and their new understandings of density.
First the honey gets poured into the bottom of the jar using a funnel, then the Karo® syrup, followed by the dish soap, next the water, the rubbing alcohol, the vegetable oil, and finally the lamp oil.
- Make sure to pour the liquids slowly and directly into the middle of the cylinder jar. Do not allow the liquids to touch the sides of the jar while pouring. If the liquids mix a little while pouring, don't worry. They will even themselves out since they have different densities!
Lesson plan
- Introduce the concept of density- Ask students if they know what density is, introduce density through the use of some texts and pictures from books
- Pass out handouts showing what order is used to pour the liquids into the larger cylinder jar and a density chart
- Ask students to break up into groups of two and together create a hypothesis about what they think will happen during the experiment
- Perform the Density Rainbow Experiment
- Allow students a chance to talk about their observations and record what they have seen
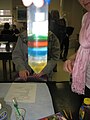
Figure 4- Exemplar
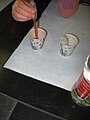
Figure 5- In Progress
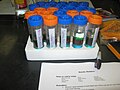
Figure 6- Test Tubes
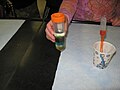
Figure 7- Student & Final Product
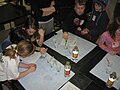
Figure 8-Students Participating


Potential pitfalls
This experiment should be done carefully and students must not touch their faces while working with these products. Some pitfalls occur when the liquids are poured in too quickly and the liquids mix and then do not always resettle themselves. If the liquids touch the sides while being poured in problems also arise. We tried this experiment with different sized cylinders and have concluded that height is not as large a factor as is the width of the cylinder. Cylinders with a larger diameter (2 cm approx) separated the liquids more efficiently. Larger jars waste materials and were unsuccessful in a previous attempt at this experiment. If only very thin cylinders are available a centrifuge will be needed to separate the liquids and results may not come out as well. Another pitfall to mention is the fact that not all density rainbows will last long, some will last a few hours some a few days and some maybe even a week or more. We have looked at websites stating some liquids have remained separated after a week but we have not had long results with our own experiments.
Math connections
This experiment involves the students through measuring liquids as they create their density rainbow. Each student will be responsible for measuring 5 mL. of each liquid into a Dixie® cup. Students may also weigh each liquid in the cup (subtracting the weight of one Dixie® cup alone) and determine the different weights particular liquids. Buoyancy should also be addressed with students, in particular that things that are lighter will rise and float on top of things that are heavier. With this information, students will be able to make well educated hypotheses based on the weights of each liquids, which liquids will be most or least dense. Students will then pour the liquids into the group container. The students will also be looking at the various densities of each liquid used and they will fill in charts with the name of each liquid used and order them from least to greatest density. Then students will be able to see the differences in density between the liquids and understand why these particular liquids do not merely mix together all at once. The students may then compare the density of each liquid to the weight that was originally determined. Students may then begin to make connections between weight and density of liquids.
Literature connections
To gain background knowledge that is crucial for young children to understand density, simple children's texts will be used. These books combine basic knowledge with bright pictures and captions to grasp the students' attention and make them eager to try the experiment. We will start the lesson by asking the students what they think density is, and then will read the book to them to establish a basic knowledge of density.
Some texts used are:
- Manolis, K. & Quam, D. (2009). Density. Minneapolis: Bellwether Media.
- Barkan, J. (2006). What is Density?. New York: Children's Press.
Connections to educational standards
- Vital Results 1.13-Students listen actively and respond to communications
- Vital Results 1.14-Students critique what they have learned
- Vital Results 1.20-Students use graphs, charts, and other visual presentations to communicate data accurately and appropriately
- Scientific Method 7.1.e.-Explain a variety of observations and phenomena using concepts that have been learned;
Next steps
After the experiment students can brainstorm about where they think other common liquids would fit in the container. Another option is to discuss how they think the density of different substances would change if exposed to different elements, such as heat or cold.
- Once the experiment is complete and the students have had a few days to observe their density rainbows, precautions must be taken to properly dispose of the tubes or whichever type of containers have been used. Rubbing alcohol and lamp oil are flammable substances and must not be thrown away in an everyday trash receptacle or poured down a sink drain.
Reflections
Grouping the students by twos and threes worked well because it gave each student an opportunity to participate in the experiment. In smaller groups students are able to observe the liquids in their tube more closely and freely vocalize their observations. It also worked well to have the students take turns within their groups handling the materials. This way every student had at least two chances to hold the tube and measure in liquids. Only one situation arose that we had not expected and this was the order in which we poured in the vegetable oil and rubbing alcohol. While testing this experiment we realized that the "Seven Layer Density" website puts vegetable oil in before rubbing alcohol, but we decided to change this because the rubbing alcohol proved multiple times to be denser than the vegetable oil and so they would switch places. We began this experiment with the first two groups of students dropping in the rubbing alcohol before the vegetable oil but noticed the green dyed rubbing alcohol would then mix with the orange dyed water and they were no longer separated. We discovered that the suggestions on the website had been correct and that if you put the vegetable oil in first and then let the two liquids mix as they settle, the rubbing alcohol and water stay separate. The students had a few ideas about what density was and as we read a few pages from a picture book they were able to clarify their own thoughts and understood what was happening between the liquids. The students demonstrated a good use of vocabulary such as density, least, greatest, heavier, weight, mass, and measurements. Overall the students enjoyed this activity and had a lot of fun!