Create and manage files/Word-processing essentials/Working with text
| Create and manage files | |
|---|---|
| Word-processing essentials | Introduction | Basic layout | Character formatting | Working with text | Key points | Assessment |
Contents
Show/Hide non-printing characters
Show/Hide is really useful to see why “something” isn’t working out, e.g. too many tabs or not enough spaces etc.
The Show/Hide (non-printing) characters look like this:

- Check that your Active Tab is Home
- Click on Show/Hide ¶ to turn these off/on.
- You will notice the ¶ icon becomes highlighted when the Show/Hide (non-printing) characters are showing.)
- Keyboard shortcut for Show/Hide: Ctrl + Shift + 8
Spell Check a whole document
The Spell checker is great for picking up errors but don’t rely on it entirely. A word may be spelt correctly but still not be correct e.g. here/hear, went/want, their/there. It is still very important to proofread (check) your document before printing.
|
Please note: the following tutorial will open in a new window/tab. When you have finished the tutorial, simply close the window/tab and you'll return to this page. Before you go on, please work through the following tutorial: Don't forget to watch the 3-minute video on page 2!
|
- Click on Customize Quick Access Toolbar and add Spelling & Grammar
- Click on
 .
.
The Spelling and Grammar dialog box will appear and the cursor will move to the first incorrect word and highlight the word.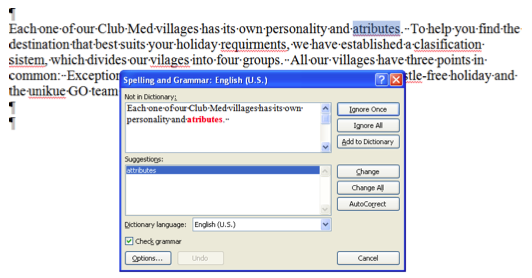
- The spell check feature automatically gives you some options down the right hand side of the dialog box.

This is what each option means:
- Change
- When the word is spelt incorrectly click on the correct spelling from the list of suggestions, then click on Change.
- Ignore Once
- Click on Ignore Once when you know the word is spelt correctly but is not in the dictionary and you are not likely to use it again e.g. an odd place name
- Add to Dictionary
- When you know the word is spelt correctly and you are likely to use it again e.g. your name, highlight the “incorrect” word and click on Add to Dictionary. The highlighted word will be added to your own Custom Dictionary rather than the main Word dictionary.
Moving and copying blocks of text
You can change the order of words, sentences and paragraphs to improve the structure of your document. When moving or copying text, the text (plus any space required) must be selected.
When you copy or move text, the text retains the character formatting e.g. bold, font style. If the copied or moved text includes the paragraph mark ¶, the text retains the paragraph formatting e.g. line spacing, alignment.
- To move text
- Cut the text from one place in the document and paste it into another.
- To copy text
- Copy it from one place in the document and paste a copy of it into another.
|
Please note: the following tutorial will open in a new window/tab. When you have finished the tutorial, simply close the window/tab and you'll return to this page. This online tutorial includes a useful guide to moving and copying text:
|
Find and Replace Text
The Find facility allows you to quickly find text and/or formats when editing a document. For example, say you find a mistake in a printed document, instead of scrolling through the document yourself; you can use Find and go straight to the mistake.
Find Text
- Go to Home Tab ⇒ Editing group
- Click on Find. (The keyboard shortcut key is Ctrl F)
- The Find dialog box will appear:
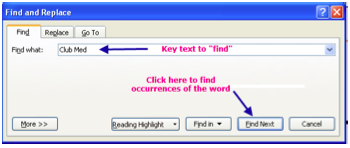
- Key the text to be found in the Find what field
- Click Find Next

Replace Text
The Replace facility allows you to replace existing text with other text and/or formats. For example, say you keyed in Club Med throughout a document and you wanted to replace it with Holiday Club, you tell Word to do this once and it happens throughout the document.
- Go to Home Tab ⇒ Editing group
- Click on Replace
- The Find and Replace dialog box will appear:
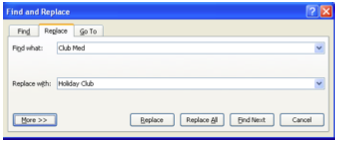
- Key the text to be found and the text you would like it to be replaced with
- Click on Find Next - the first occurrence will be highlighted
- Click on Replace
- Repeat until all occurrences have been replaced and this appears: Click on OK
- Click on Close in dialog box

Both Find and Replace save lots of time!
|
Please note: the following tutorial will open in a new window/tab. When you have finished the tutorial, simply close the window/tab and you'll return to this page. This tutorial is for an older version of Word (2003) so some items will look a little different - but the principles are the same:
|
How to Get Help from Word
The easiest way to get help from Microsoft Word is to press the F1 key. The cool part about the F1 key is that it is context-sensitive: that is, if you press it while you're performing some obscure task deep inside some strange dialog box or task pane, Word summons help for that specific issue, telling you how to do what you want to do. Press F1 any time you have a question, and help arrives.
- In the Search box in the upper-left corner of the Help window, type a topic, command name, or question. Then press Enter or click Search
- Information regarding your query will appear in the Help window
Source: How to Get Help from Word 2007