Compass explorations
Biology in Middle Schools home | |Elementary School sister project
Biology In Middle Schools is a Saint Michael's College student project. Link under 'toolbox' for a printer-friendly version. Click on handouts to print full resolution versions. Please see Wikieducator's disclaimer, our safety statement, and the Creative Commons licensing in English and in legalese.
Primary biological content area covered :
Students will learn how to utilize a compass for navigation to locate materials needed to create a homemade compass. This will provide a skill that would allow the student to make a compass in any situation with household items.
Materials :
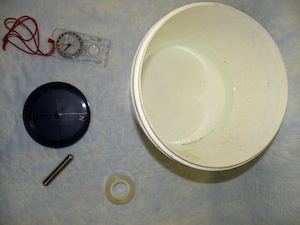
1. Small Plastic Dish 2. light weight bar magnet 3. bowl 4. water 5. compass
Handouts
http://wikieducator.org/File:Compass_Explorations.pdf
Materials:
Plastic Dish Light weight bar magnet
Tape Water
Bowl Compass
Methods:
http://maps.google.com/maps/user?uid=108965875583451400915&hl=en&gl=us (Follow link and open satellite image of map)
- Search for materials
- Begin at designated staring point.
- Go 30o East of North for 30 paces to obtain a large bowl.
- Return to starting point.
- Go 70o West of South for 78 paces to obtain water.
- Return to staring point.
- Go 50o East of South for 54 paces to obtain a plastic dish.
- Return to staring point.
- Go 70o West of South for 35 paces, then go 10o West of North for 16 paces. Finally go 60o East of North for 16 paces to obtain a magnet.
- Return to starting point to construct the compass.
- Compass construction - see handout for figures
- Obtain plastic dish.
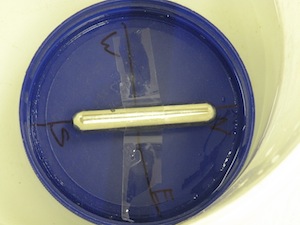
- Draw perpendicular lines to divide the space into four equal spaces.
- Label the four contact points where the line meets the circle as North (N), South (S), East (E) and West (W).
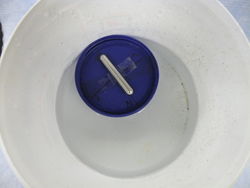
- Attach a light weight bar magnet to the plastic dish using tape. Place the magnet on the north-south line.
- Use a bowl that is larger than the plastic dish and fill it with water.
- Place the plastic dish with the bar magnet in the bowl, making sure that the plastic dish is floating.
- Once the plastic dish stops rotating, determine where north, south, east and west are.
Description of activity
For this activity students will be creating a compass using a bar magnet, small plastic dish and a bowl of water. During the lesson students will learn how a compass uses the magnetic field as well as how to use a compass. They will learn directionality and standard language when providing or receiving directions using angles. Once students learn how to use a compass they must locate the different materials based on a set of directions (students will be given coordinates to locate). The project will be performed across RT 15 from Saint Michael's College. A map providing the site can be found at http://maps.google.com/maps/user?uid=108965875583451400915&hl=en&gl=us (open with satellite image).
Lesson plan
1. Introduce what a compass is and how to use it. Having a diagram of the Compass face will be helpful when explaining how to read the compass based on degrees from North or South. Background info: The compass is a navigational device that based on the magnetic poles. Compasses have magnetic pointers that align themselves with the earths magnetic field. 2. Explain to the students that they will be locating materials to make a compass. The materials consist of a magnet, petri dish, water and bowl. Each on of the materials will be placed at a different location. Students will use a provided compass with a set of directions to locate these materials. 3.Before students read the instructions ask them how they might put the device together. What will the magnet tell us? 4. Once the group finds all of the materials they will assemble their compass, following the instruction sheet. 5. If time allows, show students how to make a compass on the ground. Draw a circle in the dirt, draw a line in the circle that aligns with the sun.
Potential pitfalls
The educator will want to check and make sure the magnet is not to heavy. The magnet must be able to float in the plastic dish in order for the activity to work. If the magnet is too heavy an educator may consider the hanging magnet method instead.
Math connections
M5: 9 Uses properties or attributes of angles (right, acute, or obtuse) or sides (number of congruent sides, parallelism, or perpendicularity) to identify, describe, classify, or distinguish among different types of triangles (right, acute, obtuse, equiangular, or equilateral) or quadrilaterals (rectangles, squares, rhombi, trapezoids, or parallelograms).
Students during the lesson can learn about degree of angles. Students will be using compass coordinates to locate objects, which will be marked by degrees. The teacher could use a variety of angles (right, acute and obtuse) and have the students identify which objects directions was associated with which type of angle.
Literature connections
We did not have any specific literature connections that were need to have on hand to complete the activity.
Connections to educational standards
S5-6: (DOK 3) Students demonstrate their understanding of Magnetism by… • Identifying real world objects that demonstrate and utilize a magnetic force field acting over a distance.
Next steps
The educator could expand this activity by talking about forces that interfere with the magnetic force. Other magnets will alter the way the compass functions as well as certain metals.
Another extension for this activity might be to talk about survival needs. What might a person bring with them on a hike or outdoor trip. The teacher can ask students what a hiker should bring with them and why. Some things they might consider are a compass, food, water and things for shelter. This could be a nice transition into talking about the basic needs of the human body.
Reflections
If I were to teach this lesson again I would make sure that each student had access to a compass. We were working with a group of eight students and they had to take turns using the compass. Students worked in pairs when using the compass and I think the students would have gotten more out of the lesson if they used the compass multiple times. We also found it helpful to have a large drawing of the compass face. Using this picture we showed the students how to read a compass according to degrees. The larger image was very helpful in showing the compass face to a larger group of students and it allowed everyone to see how the compass was set up. Helpful set up hint: make sure you know which end is north and south on the magnet, some come unlabeled. Before the lesson check and make sure the magnet will float in the dish, some magnets were too heavy and it caused the plate to sink.
Some students questioned why you would bother carrying these materials when hiking if you had a regular compass. We explained that not everyone carries a compass especially if it is only meant to be a short trip on a well known trail. These materials are relatively small, light weight and provide multiple purposes. The large container can be substituted for any non-moving body of water, such as a puddle or a pond. Still unconvinced we demonstrated an alternative way to determine direction using the sun and a watch that has an hour hand. By placing the hour hand in the direction of the sun, an individual must determine midway between the hour hand and "12 o'clock" and draw (with a finger is fine) a line across the face of the watch. This line is the north-south line. Students found this more fulfilling and logical if lost in the forest.
Citations and links
1. The following site provides an alternative way to create a compass with needle and cork. This approach was not taken due to chance of injury when working with a large group. http://mrstoffel.com/Fall2007/science/Unit14Magnets/HomemadeCompassLab.pdf
2. The following is a video of how to create a compass with a bar magnet. Our procedure was adapted from this video. http://www.wonderhowto.com/how-to-homemade-magnetic-compass-267325/


