Colorful Nutrients
| Instant wiki maker | Making handouts | Editing tips |
Contents

Biology In Elementary Schools is a Saint Michael's College student project from a course that ran between 2007 and 2010 and fully described in this book chapter. The student-created resources have been preserved here for posterity. Link under 'toolbox' for printer-friendly versions of the exercises. Click on handouts to print full resolution versions. Please see Wikieducator's disclaimer, our safety statement, and the Creative Commons licensing in English and in legalese.
Colorful Nutrients
Student worthiness
Tried and trusted.
Primary biological content area covered
Students will have the opportunity to see how a flower transports nutrients. In observing how the nutrients of a flower work their way up the stem and through the flower the students will be exposed to the various parts that create a flower and will have the opportunity to explore the parts and components of flowers.
Materials
Materials for Teacher's Use:
- Flower Handout
- Small sharp knife to cut flower stem (as part of the next steps activity)
Materials for Each Student Group:
- Flowers- white carnations work well. Thirsty flowers work best; leave the flowers out of water for at least an hour in advance of the experiment.
- Simple flower for disection
- Food Coloring- at least two colors ( red and blue )
- 6 large mason jars
- 6 little glass vials or pill jars
- Water
- Scissors
- Magnifying glasses
- Toothpicks
- Construction Paper
- Colored Pencils
- Tape
Materials for Each Individual Student:
- Flower Diagram Handout (Figure 1)
- Observation Chart (Figure 2)
- Magnifying glasses
- Toothpicks
Handouts
- Handout with diagram of flower and its parts. Each student will need a preprinted copy of the handout (Figure 1) prior to the lab.
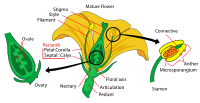 Click to see the full-size handout
- Observation Chart.Each student will need a preprinted copy of the handout (Figure 2) prior to the lab.
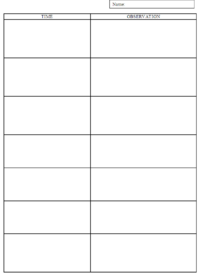 Click to see the full-size handout


Description of activity
Students will learn about the parts of a flower and have the opportunity to observe how a flower receives its nutrients.
- Set up experiment
- Go over the parts of the flower- Use flower handout Figure 1
- Disect Flower
- Explain process of transpiration
- Periodically fill in time progress chart- Figure 2
Lesson plan
- Ask students what they already know about flowers
- For the experiment:
- Taking the flower cut off a piece of the stem at the bottom. Cut at about a 45 degree angle (the shorter the stem the faster color change will occur).
- Fill the glass vials with water then add several drops (around 10-15 drops work well) of one color of food coloring
- Place the cut flower into the colored water vial then place vial in mason jar (provides support)
- Observe what gradually happens to the white flower and have students periodically fill in their observation charts--About 30 minute intervals to record observations would work best.
- Pass out the flower handout and explain to students the various parts that make up a flower--A simplistic diagram with more basic parts than the one used so students will be able to recognize the different parts easier.
- As students wait for the flower to change have them disect a basic flower that will clearly show them the parts, using thier hands and toothpicks they will gently pull the flower apart and observe the various parts. They can use their flower parts handout to classify the parts of the flower they are noticing. They can take the parts they identify and tape them onto a piece of construction paper and label them.--One flower for a group of two or three students works well and reduces waste and clutter.
Potential pitfalls
- White Carnations may be unavaliable and color changes will not be as pronounced with carnations of other colors.
- The amount of food coloring used, it is good to have a high concentration of food coloring in the water.
- The amount of time it takes for the flower to send the nutrients up the stem in contrast to the amount of time students have to complete the experiment. We observed that the shorter the stem is cut the faster the nutrients reaches the petals.
- It might be difficult to keep track of observations in short time segments. Observations are a good idea, but time might need to be taken out of all parts of the day to make those observations because the reaction does not occur right away.
Math connections
Create a time chart to monitor the speed at which the flower begins to absorb the nutrients (water) by observing how much of the flower begins to turn the color of the added food coloring. Students will fill in a "T" chart (Figure 2), writing the time of their observations and on the corresponding side illustrate what they observe changing in the flower. When all data is collected a class-wide line graph could be created to compare results.
Art connections
In creating their observation charts students will be observing the changes in the flower in close detail and will be drawing what they are observing in the second column of the chart. A variety of colored pencils will be avaliable for student use so they can make their observation as accurate as possible while expressing it artistically.
Literature connections
Bodach, Vijaya, 2007, "Flowers", Capstone Press. Bodach, Vijaya, 2008, "Stems", Capstone Press. Moore, Jo Ellen, 2000, "Learning About Plants", Evan-Moor Educational Publishers. Hutts Aston, Dianna, 2007, "A Seed Is Sleepy", Chronicle Books.
Connections to educational standards
Vermont Standards
S1-2:4
Students demonstrate their ability to CONDUCT EXPERIMENTS by… ∙Referring to and following a simple plan for an investigation. AND ∙Describing observations using senses rather than feelings (e.g., The snail has a hard shell with wavy, brown lines, rather than the snail is awesome). AND ∙Recording observations of similarities and differences. AND ∙Drawing scientifically: a.Recording relative proportion (e.g., Eyes are approximately the right size when compared to the head) including focus on finer details, and differentiating all parts observed. b.Labeling significant aspects of a scientific drawing or diagram with words provided. c.Creating a title for a scientific drawing or diagram. AND ∙Recording data (in a table provided by the teacher) generated from the use of simple science equipment, as well as nonstandard and standard measurement tools.
S1-2:5
Students demonstrate their ability to REPRESENT DATA by… ∙ Organizing a collection of data into a table or a graph template. AND ∙ Creating a title for a table or graph.
S 1-2:6
Students demonstrate their ability to ANALYZE DATA by… ∙ Sorting and classifying objects based upon observations, prior knowledge, or experience and justifying groupings. AND ∙ Identifying and describing the pattern in diagrams and charts (e.g., model, bar graph, pictograph, diagram or chart).
S1-2:7
Students demonstrate their ability to EXPLAIN DATA by… ∙ Developing a reasonable explanation based upon observations (e.g., I found out. . .)
Standard 7.9: Data, Statistics, and Probability Concepts
M2: 25 Organizes and displays data using diagrams, models, tally charts, or tables to answer questions related to the data, to analyze the data to formulate conclusions.
Next steps
- If there is time available, split the stem of one of the flowers in half, put each half into a different color vial, and observe using the same process. To do this, first cut the bottom of the flower stem off then carefully, using a small knife, vertically slice the stem in half starting about two inches below the flower. Fill one small vial with water and add one food color then fill a second small vial with water and a different food color. Place each half of the stem in one of the vials and place into a mason jar. Students can propose a hypothesis about what will happen.
- Another option for this lab is to after certain time intervals slice the stem and see the coloration within the stem and time how long it takes for the water to flow up the stem and to the flower. This would also introduce students to more parts that constitute a flower.
Tips/Reflections
- Before completing the lab with students remove the carnations (or flowers you are using) from water at least an hour ahead of time. This makes the flowers "thirstier" and allows for the color change to occur faster. Teachers might also want to have pre-dyed flowers on hand that have been changed the day before as another example to show students. After completing this activity with several groups the later groups enjoyed comparing their flowers to the color changes in the flowers of the previous groups.
- If there is time we highly recommend trying the split step carnation, the student with whom we conducted this activity really seemed to enjoy the fact that the flower changed two colors. They also came up with interesting hypothesis' about what they believed would happen to the flower.
- It also might be easier if possible to keep students in groups of two or three with one guide/teacher. Individual attention might be needed when disecting the flowers and helping them label them.
- Students seemed to really like having the magnifying glasses to look at the very small parts of the flower they were disecting.
Citations and links
Idea derived from the PBS Zoom website, http://pbskids.org/zoom/activities/sci/coloringflowers.html.
Flower Handout derived from, http://teachart.msu.edu/pila/teachersmaterials/kaleidoscope.php.