Biome in a Baggie
| Instant wiki maker | Making handouts | Editing tips |
Contents
- 1 Program title
- 1.1 Student worthiness
- 1.2 Primary biological content area covered
- 1.3 Materials
- 1.4 Handouts
- 1.5 Description of activity
- 1.6 Lesson plan
- 1.7 Potential pitfalls
- 1.8 Math connections
- 1.9 Literature connections
- 1.10 Connections to educational standards
- 1.11 Next steps
- 1.12 Reflections
- 1.13 Citations and links
Biology In Elementary Schools is a Saint Michael's College student project from a course that ran between 2007 and 2010 and fully described in this book chapter. The student-created resources have been preserved here for posterity. Link under 'toolbox' for printer-friendly versions of the exercises. Click on handouts to print full resolution versions. Please see Wikieducator's disclaimer, our safety statement, and the Creative Commons licensing in English and in legalese.
Program title
Student worthiness
Tried and Trusted
Primary biological content area covered
- The water cycle
- Biomes
- Plant growth
Materials
- Clear cups (enough for each group of students or each individual student.)
- Gallon-size resealable storage bags
- Potting soil
- Bush beans (or substitute whatever seeds you have available; bush beans grow rapidly)
- Measuring cup
- Eye dropper
- Masking Tape
- Marker
Handouts
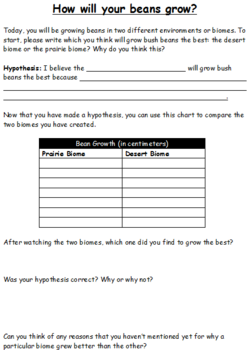
This handout (Figure 1) can be used for students to record a hypothesis and how their beans are growing in each biome. Teachers can decide how often they want them to measure and for how long before they answer the last three questions.
Description of activity
The purpose of this activity is to explore different biomes and the water cycle. Students will create both a desert biome and a prairie biome, and see how the plants survive in both. They will also see how the water cycle works because once the plants are shut in the plastic bags, they will not need water again.
Lesson plan
Before Teaching:
- You may want to prepare a demo ahead of time to show the students what may happen in their experiments. (Keep in mind: the handout (Figure 1.) has a section for making a hypothesis, so you may want to show students the example biomes after they make their hypotheses.
During Teaching:
1. Start by discussing biomes with the students, and explain that they are going to make their own prairie and desert biomes.
2. Each biome should be done one at a time because they will each need different amounts of water. Give each group a clear cup and have them fill it 3/4 of the way with soil. Students should then be instructed to plant a bush bean in the middle of the soil.
3. Students will add water next. For the prairie biome, they should use the measuring cup to be sure they are putting a certain amount of water in the cup. Students can decide as a group or class how much water should go into the cup.
4. The final step is for students to put the cup in the plastic bag and seal it. They will then use the masking tape to wrap the bag tight around the cup, so the condensation will fall into the cup instead of around it.
5. Repeat all these steps with the desert biome, with the exception of the water. In this biome, the dropper will be used instead of the measuring cup to make sure that it will have less water. Again, students can decide as a class or group how much water to put in. Be sure to use the marker to record which biome is the prairie and which is the desert.
6. After finishing all this, students should discuss why they will not need to water the plants again and how the water cycle works. They will each record their hypothesis about which biome they think will best suit the bush beans.
7. Depending on what the teacher decides, students can measure their beans over a period of time and record the bean growth on the chart provided on the handout (Figure 1.). When they decide to stop measuring, students will answer the last three questions.
- Figures 2-7
Potential pitfalls
- When discussing biomes, it may be helpful to have books on hand with pictures showing the two different biomes being discussed during the experiment. We found that many students did not know what biomes were and it would have benefited them to be able to see pictures or hear a story.
- This experiment does not take very long. This is because the only hands on part of it in the beginning is planting the seeds. The ongoing experiment is watching the plants grow and measuring them. Do this when you want a simple, short, initial experiment with the potential for a long-term follow-up.
Math connections
- Students will measure the bean growth in the desert and prarie environments over time. A class graph could even be made because this experiment is designed to do in groups. Each group can be assigned a number or letter and have their own spot on the horizontal axis of the graph and the vertical axis can measure the bean growth they each experience. Each biome can have a color. The group will not only be comparing biomes, but also the progress of each group.
- Students will decide how much water to put in each biome and measure it with either a dropper or measuring cup.
Literature connections
Bracken, Carolyn & Relf, Pat, 1996, The Magic School Bus Wet All Over: A Book About the Water Cycle, Scholastic Paperbacks.
- This book can used to begin the lesson because it will either remind students or get them thinking about the water cycle. It could also be used at the end to finish the lesson.
Jackson, Kay, 2008, Explore the Desert, Capstone Press.
- This is an excellent book to provide extra information about what plants grow in the desert. Students can look at this when making their hypothesis and decide whether bush beans would grow well here.
Robinson, Faye, 1995, Where Do Puddles Go?, Children’s Press Chicago.
- This is another book about the water cycle that could be used instead of The Magic School Bus. It has less text, so it may be quicker to read if when teaching this lesson there is limited time and the introduction needs to be shorter.
Sievert, Terri, 2005, Prairie Plants, Bridgestone Books.
Welch, Katherine, 2005, Desert Plants, Bridgestone Books.
- These two books can be used at the beginning of the lessons to introduce biomes and get students thinking about what the two different biomes they will be working with look like. This will also provide additional information for them to think about when making their hypotheses.
Connections to educational standards
Vermont Standards
7.3 Students understand the nature of mathematical, scientific, and technological theory. This is evident when students:
a. Show understanding that concepts form the foundation for theories;
b. Look for evidence that explains why things happen.
Vermont Grade Expectations
S3-4:48 Students demonstrate their understanding of processes and change over time within Earth systems by…
- Describing water as it changes into vapor in the air and reappears as a liquid when it is cooled.
Next steps
- This experiment can easily be part of a longer unit on either the water cycle or biomes.
- It can go along with other experiments about the water cycle, such as:
Magic Moisture This explores condensation.
Water Cycle in a Bottle This explores the water cycle as a whole and might be a good experiment to do before the Biome in a Baggie experiment.
- This experiment can also be modified to compare plant growth and something other than amount of water, such as light, temperature, fertilizer, etc. It would be a good idea to allow groups of students to come up with their own ideas for experiments and test them to see how the plants grow.
Reflections
- The biggest problem I found with this experiment is that we didn't have a book to supplement our lesson. I think if the one of the books about biomes had been used, the students would have had a better idea about what they were creating. There are several appropriate books in the literature connections section that would have been excellent for this lesson.
- I also think having each student create their own plant is best, but when there are limited materials sometimes it doesn't work out this way. Students seemed to get bored while we were actually putting the plants together, especially when we had a large group of students because only one student could participate at a time. I think even putting the students in pairs and having them create plants together would have helped them to be more engaged. However, when having to work with large groups like we did, it is important to be sure each student gets to participate in some way. I think this is one of the things that worked well with our experiment. Everyone was involved.
- The other problem with this experiment that I found was the time it took to make the biomes. In our classroom setting we only had each group for 20 minutes. The bulk of this experiment is the follow up on the worksheets and on watching their plants grow. Most of the excitement will come later on in the experiment when the students get to watch the plants. I found that planting the plants was only exciting because they got to use dirt.
Citations and links
http://pbskids.org/zoom/activities/sci/biomeinabaggie.html Zoom Science (This is where we got our idea.)
http://education.vermont.gov/new/html/pubs/framework.html The Vermont Standards and Grade Expectations
http://www.epa.gov/OGWDW/kids/flash/flash_watercycle.html The Water Cycle Animation
- This website contains a fun animation. Students can use it as a visual and audio aid in learning about the water cycle, either before or after this activity.


