Text and Images/Document formatting/Special text

Text and Images
An introduction to creating and enhancing word-processing documents, including working with special text, tabs and images.
An OP Online course from the National Certificate in Computing (Level 2) programme.
| Text and Images | |
|---|---|
| Document formatting | Introduction | Paragraphs | Special text | Working with tabs | Key points | Assessment |
Contents
Symbols
You can use the Symbol feature to insert symbols, such as ¼ and © or special characters.
The types of symbols and characters that you can insert depend on the font that you choose. For example, some fonts may include fractions (¼), international characters (Ç, ë), and international monetary symbols (£, ¥). The built-in Symbol font includes arrows, bullets, and scientific symbols. You might also have additional symbol fonts, such as Wingdings, that include decorative symbols.
*Adapted from: http://office.microsoft.com]
Insert a symbol
- Click where you want to insert the symbol
- On the Insert tab, in the Symbols group, click Symbol
- Do one of the following:
Click the symbol that you want in the drop-down list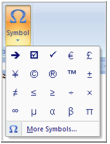
If the symbol that you want to insert is not in the list, click More Symbols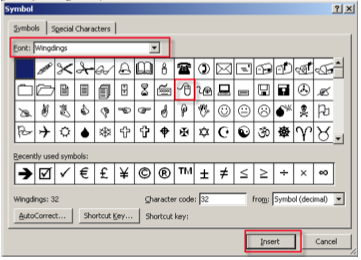
In the Font box, click the font that you want, click the symbol that you want to insert, and then click Insert - Click Close


|
Special characters
Insert a special character
- Click where you want to insert the special character.
- On the Insert tab, in the Symbols group, click Symbol, and then click More Symbols
- Click the Special Characters tab
- Click the character that you want to insert,and then click Insert
- Click Close
|
Bullets and Numbering
Using bullets or numbering lets you display information clearly. An example of bulleted and numbered lists is shown below.

Creating a Bulleted List
Recreate the bulleted list above by following the instructions below:
- Start typing the first line of your list e.g. Eggs
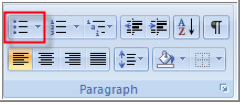
- Go to the Paragraph Group on your Home Tab
- Click the Bullets button
- After completing the first line of your list press Enter
- The second bullet will appear. Type Milk, press Enter and so on
- Once you have completed your list press Enter twice to turn off the bullet formatting

Creating a Numbered List
Recreate the numbered list above by following the instructions below:
- Start typing the first line of your list e.g. Eggs
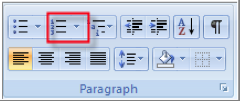
- Go to the Paragraph Group on your Home Tab
- Click the Numbering button
- After completing the first line of your list press Enter
- The second number will appear. Type Milk, press Enter and so on
- Once you have completed your list press Enter twice to turn off the number formatting

Drop caps
A drop cap, a large dropped initial capital letter, can be used to emphasise text and to add interest to a newsletter or invitation:

There are two options when inserting a dropped cap: Dropped and In Margin. Using the dropped option is recommended.
- Click in the paragraph you would like the drop cap to be inserted in.
- Go to Insert Tab ⇒ Text Group
- Select Drop Cap
- Select the style of Drop Cap you prefer
- The Drop Cap will now be applied to your paragraph
- On the Insert tab, in the Text group, click Drop Cap
- Click Dropped or In margin
|
Please note: the following tutorials will open in a new window/tab. When you have finished the tutorial, simply close the window/tab and you'll return to this page. Symbols
Bullets and numbering Drop Caps
|