OpenOffice.org Writer Level 1 Course Material/LESSON 1: Create a Basic Document
LESSON 1: CREATE A BASIC DOCUMENT
Contents
What is Writer?
Writer is the word processor component of OpenOffice.org (OOo).In addition to the usual features of a word processor (spell checking, thesaurus, hyphenation, autocorrect, find and replace, automatic generation of tables of contents and indexes, mail merge and others), Writer provides these important features:
- Templates and styles
- Powerful page layout methods, including frames, columns, and tables
- Embedding or linking of graphics, spreadsheets, and other objects
- Built-in drawing tools
- Master documents
- Change tracking during revisions
- Database integration, including a bibliography database
- Export to PDF, including bookmarks
- And many more
The Writer Environment
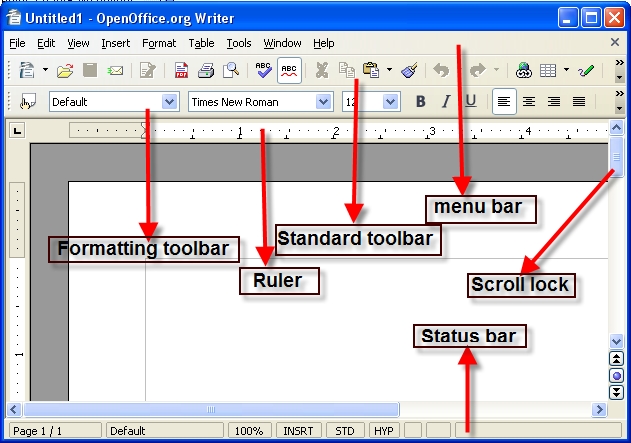
The main Writer workspace is shown. The Toolbars, Menu bars Rulers will be explained later.
Menu Bar
At the top of the OpenOffice.org window, immediately under the title bar, is the menu bar. Point with the mouse to a command on the menu bar and press the left mouse button. The menu opens, allowing one to choose a command from the submenu by clicking it. The menu bar can also be accessed from the keyboard, by pressing the Alt key.
Standard Tool Bar
Below the menu bar is the Standard toolbar. This toolbar contains icons for several important commands and functions that can be used in OpenOffice.org to open a document, export to PDF, undo and redo, access the navigator, or gallery or print the current document.
Formatting Tool Bar
Immediately above the horizontal ruler is the Formatting toolbar. This offers features that are always appropriate to the current context such as alignment, font styles, lists and indenting. For example, if a piece of normal text is selected, one will see different icons from those within a text table.
Get Help to Use Writer
Different kinds of help are available in OpenOffice.org.
- Step-by-step instructions with full references via the Contents and Index selections of OpenOffice.org help
- Help Tips that pop up next to the mouse pointer
- Extended tips with more detailed explanations that provided with Tips
- Help Agent To turn off the Help Agent (similar to Microsoft's Office Assistant), deselect his checkbox. To restore the default Help Agent behaviour, click Reset Help Agent . OpenOfffice.org Step-by-Step Help As mentioned above a step by step is the instructions with a full explanation on how to do.
To Access Step-by-Step Help
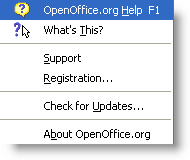
1. Click Help on the menu bar
2. Select OpenOffice.org Help
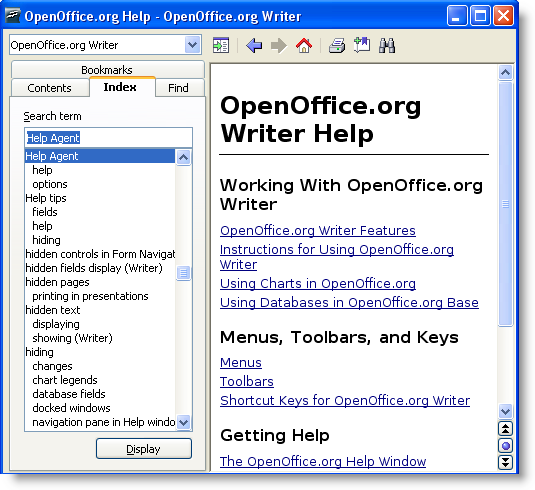
The Window below is displayed
Type a topic form a Search term textbox
- Click Display to show a topic searched Tips Tips are on at installation by default and it is recommended that this feature should always be switched on. With Tips activated one can, for example, let the mouse pointer rest on an icon so that its name is displayed
To Turn Tips On and Off
- Click Tools
- Select Options
- Select OpenOffice.org
- Select General
- Put a tick on Tips Extended Tips Switch on the Extended Tips during the first few weeks of Openoffice.org usage. Enabling this option gives a brief description of each item on the screen when the mouse pointer is hovered over the item for a moment.
To Turning Extended Tips On
- Click Tools
- Select Options
- Select OpenOffice.org
- Select General
- Put a tick on Extended Tips. Help Agent When certain actions are performed in OpenOffice.org, the Help Agent automatically appears. This is small window in a corner of the document. The Help Agent normally remains visible for 30 seconds. When clicked, it is replaced by a help window providing some helpful advice about the current topics.
To Turning the Help Agent on
- Click Tools
- Select Options
- Select OpenOffice.org
- Select General
- Put a tick on Help Agent
Creating a Document
For the most part, using Writer in either Windows or Ubuntu is the same. The major difference occurs in open and closing the application. The other variation is in opening and saving files as the file system is quite different in Windows and Ubuntu.
Start Writer
Using the system menu is the most common way to open Writer. The system menu is the standard menu from which most applications are started.
To Start Writer
- Click on the Start button
- Select All Programs
- Select Openoffice.org 2.3
- OpenOffice.org 2.2 drop down list is display
- Select OpenOffice.org 2.3 Writer The screen should now look as follows:
Enter Text
Writer normally function in Insert mode that means that text is added to a document without overwriting anything else. Alternatively, Writer can function in OverType mode that will OverWrite existing text with any new text that you type in. The Status Bar at the bottom of the Word window indicates that you are in Insert mode by displaying INSRT insert mode
Save a New Document
We save a document so that we can be able to use it later. The are different ways and formats on how to save a document. Those options are mentioned below
To Save a Document for First Time
- Click File on the toolbar
- Select Save AS
- Choose a directory to save your document from Save In
- Type a document name on the File name textbox.
- Click Save
To Save Existing Document
- Click File
- Select Save
- The changes made to the document will be saved
Saving As a Microsoft Word Document
You may need to share your documents with other people who do not use OOo, but use Microsoft Word instead. Most versions of Microsoft Word cannot read or write OOo files, although filters are becoming available. Fortunately, OOo can read and write Word files. First save your document in OOo's format (.odt). If you do not, any changes you made since the last time you saved will only appear in the Microsoft Word version of the document.
To Save a Document as a Microsoft Word Document
- In the Save as type drop-down menu, select the type of Word format you need. Click Save. From this point on, all changes you make to the document will occur only in the Microsoft Word document. You have actually changed the name of your document. If you want to go back to working with the OOo version of your document, you must open it again.
Preview a Document
OpenOffice.org has a Preview Document to check the output of the document before you print a document, So that you can check the layout of the page.
To Preview a Document
- Click File
- Select Page Preview
- The following window below is display
- Click Close Preview when finished
Print a Document
Set he print options to suit your default printer and your most common printing method. You can change these settings at any time, either through this dialog or during he printing process (by clicking the Options button on the Print dialog).
To Print a Document
- Click File on the menu bar
- Select Print
- The window below is display on your window
- Click OK


