Required parameters
- microcourse: Name of micro-course, eg "Digital literacies for online learning" or transcluded title, eg.: {{:Introduction_to_project_management/Links/IPM101/Title}}
- code: Course code for associated micro-course, eg LiDA101 or transcluded course tag, eg.: {{:Introduction_to_project_management/Links/IPM101/Tag}}
- coursefeedpage: Wiki url for the course feed page eg.: Introduction to entrepreneurship/IENT102/Feed
Syntax for transclusion
{{:OERu/Planning/Boilerplate/Declare yourself outputs|microcourse=|code=|coursefeedpage=}}
The purpose of this blog post is to introduce yourself to fellow {{{microcourse}}} ({{{code}}}) participants sharing why you are taking this course
Publish a post on your blog comprising a few paragraphs (about 150 to 200 words in total) introducing yourself and what you would like to achieve by maintaining a blog to support your learning on {{{code}}}. If you are a first-time blogger, you can also include a reflection on this e-Learning activity. Choose an original title for your post or use: "Declaring myself on {{{code}}}". Your blog post must include:
- A short introduction (consider linking to your "About" page on your blog)
- The reasons why you are taking this course.
- At least one hyperlink to an external website (for example, a resource you found useful or a link back to this e-Learning activity)
- Optional: Record a short video introduction and embed this in your blog post.
- Add a category or tag for your post using the course tag: {{{code}}}.
- See how to add a tag in Wordpress or in Blogger see Change settings on your posts to add a label.
- The tag is needed for the harvester we use to link to your posts from the course feed. If the tag is missing, we will not be able to incorporate your post into the [[{{{coursefeedpage}}}|course feed]]. This is done automatically once you have registered your blog url on the course site (see below).
- At least one comment (for example invite a friend or family member to comment on your blog post). This is so you can test that you have enabled comment settings properly and know how to moderate posts, if required.
- You will need to assign the url of your blog feed to your course account (if you haven't already done this). We need this url to harvest posts tagged or labelled with the tag "{{{code}}}" for the aggregated course feed. Please note it will take up to an hour before your posts appear in the feed.
- To assign your blog url:
- Log in to the course site by clicking on the "Log in/Register" at the top of the page (or (click head graphic () on a mobile device) and check that your status is "Enrolled" after you have logged in on the course site.
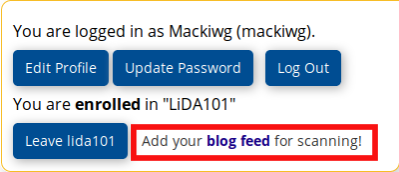
- After you have logged in, click on the "Add your blog feed for scanning" link on the registration window (see image below). The blog feed finder will open in a new window.
Alternatively, after logging in to the course website, you can go directly to: https://course.oeru.org/blog-feed-finder. Follow the instructions on screen or consult the support website for additional help.
- Enter the url of your blog in the text field area for "Find your blog's feed address". It will look something like: "https://blogname.blogspot.com" or "https://yourblogname.wordpress.com".
- The service will identify valid feed urls based, for example, on "Atom" or "RSS". Select any of the valid feeds - it doesn't matter if you choose Atom or RSS.
- The service will then list all the OERu courses you are registered for, and any previous blog urls you assigned if applicable. Click on the "Assign" or "Replace" button to associate your blog feed url with the respective course(s).
Need help?
