Adding a Creative Commons License
| OER Handbook for educators | |
|---|---|
| License | Copyright Clearance | License Compatibility | Creative Commons | Adding a Creative Commons License | GFDL | Which License Should I Choose? | Perspectives |
Some services, such as Flickr or an OpenCourseWare site, have their own custom method for selecting a license. Other services use the same license for all of the resources hosted on their website. However, if you need to license a resource on an individual website it is a fairly straightforward process. Linking to the legal code of the license is a necessary part of licensing your OER. It is also helpful because some search engines (Google, Yahoo) will identify it specifically as an OER.
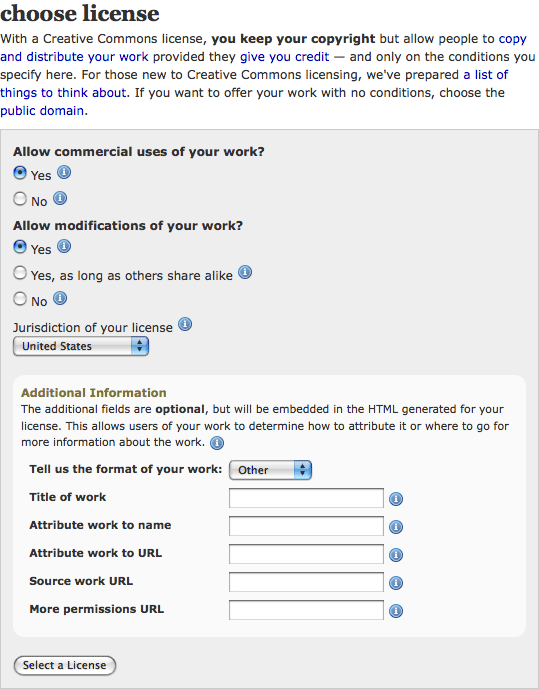
First, go to the license generator page on the Creative Commons website[1] (note that the CC0[2] license has a different URL and CC+ does not have a license selection page). You'll then see a list of questions for you to answer. The first question asks whether you want to allow commercial use. The second question asks whether you want to allow derivatives. Choose which license you think would be most appropriate. Next, you'll be asked to select the country of jurisdiction (which is the country you are located in).
The box marked "Additional Information" allows you to provide further metadata so OER search engines can better identify your work. They are optional and not necessary for actual licensing, but are helpful to others. The first field is for the type of work you are licensing (e.g. video, audio, text, etc.). The subsequent fields are to assist in attribution. Here is what each of the fields mean:
- Title of work: The name of the OER. This field is particularly helpful for images in which the title is not immediately clear.
- Attribute work to name: Name of the person(s) or organization who developed the OER.
- Attribute work to URL: Web address of the OER.
- Source work URL: web address(es) of content that was used as part of the OER.
- More permissions URL: Web address where a user can find out more about the freedoms and restrictions associated with the work. For example, some repositories have their own definition of what constitutes Noncommercial use.
Once you have finished filling out the fields, click "Select a License," and you'll be taken to a new page.
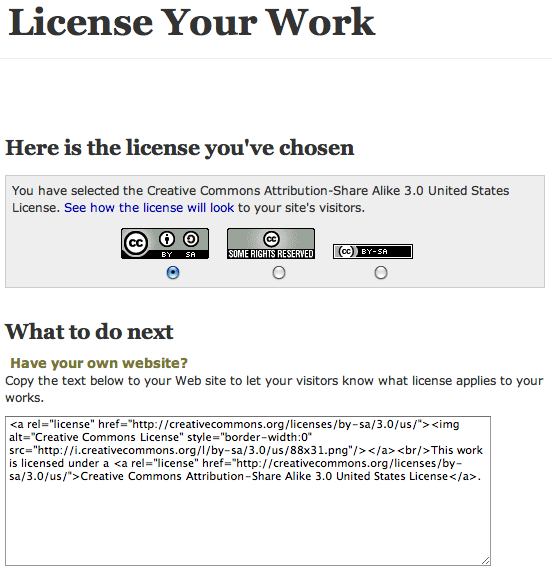
On this new page, you'll have three options for license images. Each of the images lead to same license, so it is purely a matter of aesthetic taste. The text below is the HTML code necessary to get the license image displayed on a page. If you do not know HTML, consult an education technologist or someone who is knowledgeable in web programming and design.
Once the image is on your website, visitors will be able to click on it and see the terms of the license under which you are sharing your OER.

