Making Simple Paper Circuit Cards
From WikiEducator
Contents
Overview

Materials
- Cardboard, felts, glue and other materials (glitter etc.)
- Coin cell batteries (CR 2032 or similar). These have a positive (+) and a negative (-) side.
- Axial LEDs,
- 5mm adhesive copper tape
- Sticky tape

5mm Copper tape
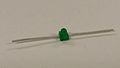
Axial LEDs
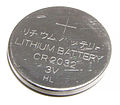
3v coin cell battery


|
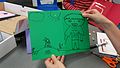
Step One: Make your card
Grab some card and design your card. Fold it in half and create a picture or write something on the front. Be creative!
Step Two: Plan your circuit

- Think about where you want your LEDs to go, and how many. Also think about whether you want your copper tape circuit to be visible or not. If you want it to be hidden, you can build the circuit inside the card and cut holes for the LEDs to poke through to the front cover.
- Think about where your battery is going to go. The easiest way to make a switch to turn your circuit on an off is to fold one corner of the card over and have one piece of copper tape touch the top of your coin cell battery and another
- Circuit sounds like 'circle'. Your circuit will start at one of your battery terminals, go through your LEDs, then go back to the other terminal of your battery. If there is a break in your circuit, it won't work.
- The circuit needs to be in parallel, not in series. This is because when you make a series circuit with LEDs, you need to add a battery for every LED. We're going to make life easier and just use a parallel circuit.
Step Three: Build your circuit

- Peel the backing off the copper tape and stick down one side of your parallel circuit. If you are using the simple 'folded corner' switch.
- Use your LEDs to see how far apart the parallel strip of copper tape needs to be.
- Stick the second strip down and make sure you've got enough copper tape to come back to the corner you are using as your switch.
- When you have the gap between your two strips of copper tape right, put your battery in place and test your LEDs. LEDs have a positive (+) and a negative (-) side and need to be the right way around for them to work. The Axial LEDs we use have a stripe on one end of them to show which way around they should go. When you are testing your circuit, make sure the LEDs are the right way around, and when you're happy with them, sticky tape them in place.

Ninja paper circuit card
Hidden circuit design

