Ict-innovation/LPI/110.3
Contents
110.3 Securing data with encryption
The candidate should be able to use public key techniques to secure data and communication
Key Knowledge Areas
- Perform basic OpenSSH-2 client configuration and usage
- Understand the role of OpenSSH-2 server host keys
- Perform basic GnuPG configuration and usage
- Understand SSH port tunnels (including X11 tunnels)
Introducing ssh
The secure shell (SSH) is a popular replacement for earlier remote login tools such as telnet and rlogin. The biggest advantages of SSH over these earlier tools is that all traffic between client and server is encrypted, and the server's identity is securely verified. The implementation of secure shell used on Linux is called OpenSSH.
The OpenSSH server (sshd) listens on port 22 by default. On some Linux distributions the server is installed and running by default; on others it will need to be installed using the package management tools. The client-side pieces of ssh (commands such as ssh, ssh-keygen, ssh-agent, and ssh-add) are usually installed by default.
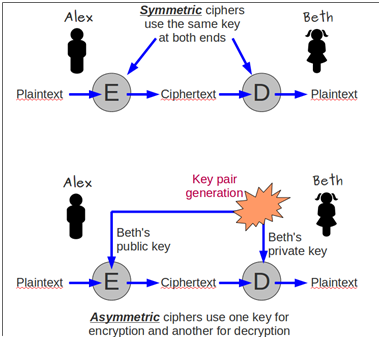
SSH uses public/private key encryption technology to securely authenticate the server when a connection is made. This authentication handshake also performs a secure exchange of a shared secret key that is used to encrypt all subsequent traffic between the client and the server. The figure below illustrates the difference between symmetric cryptography (using a shared secret key) and asymmetric cryptography (using a public and private key pair).
SSH Host Authentication
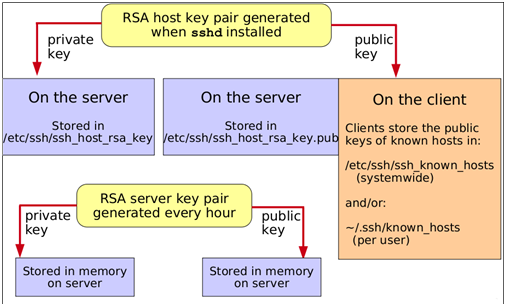
When the openssh server is installed, a public/private key pair is generated for that machine. Actually, two key pairs are generated: a DSA key pair and an RSA key pair. (DSA and RSA are just the names of two asymmetric cryptography technologies.) The private keys are stored in /etc/ssh/ssh_host_rsa_key and /etc/ssh/ssh_host_dsa_key; these files are readable only by root. The public keys are stored in /etc/ssh/ssh_host_rsa_key.pub and /etc/ssh/ssh_host_dsa_key.pub. These keys are summarised in the figure below.
These keys are used to securely verify the identity of the server machine, and to set up an encrypted channel via a key exchange protocol. The server's public key needs to be available on any client that needs to connect. It can be copied into place on the client by the system administrator (into the file /etc/ssh/ssh_known_hosts). Your distribution may have a utility called ssh-keyscan to help with this. Alternatively, when an ssh client connects to a server, the server will offer the host's public key. At this stage the user will be prompted with something like this:
|
# ssh chris@192.168.81.1 The authenticity of host '192.168.81.1 (192.168.81.1)' can't be established. RSA key fingerprint is a9:77:96:9f:13:24:59:90:92:f6:e2:da:f3:91:e5:06. Are you sure you want to continue connecting (yes/no)? yes Warning: Permanently added '192.168.81.1' (RSA) to the list of known hosts. chris@192.168.81.1's password:
$ |
A security-minded individual might choose to verify this key fingerprint against the same fingerprint generated on the server using the command ssh-keygen. For example:
|
# ssh-keygen -l Enter file in which the key is (/root/.ssh/id_rsa): /etc/ssh/ssh_host_rsa_key.pub 2048 a9:77:96:9f:13:24:59:90:92:f6:e2:da:f3:91:e5:06 /etc/ssh/ssh_host_rsa_key.pub |
However, most users simply trust that they are connecting to the correct server (and not an imposter) and simply answer yes to accept and continue the connection. At this point, the server’s public key will be added to the local ~/.ssh/known_hosts file. Obviously, this file is "per-user" – it only applies to the user who logged in.
Once the server's public key is known to the client, the "are you sure you want to continue" message will not appear again.
User Authentication
OpenSSH supports several mechanisms to authenticate the user. By default, on most Linux distributions ssh is configured to support simple password-based authentication – the user is prompted for the password for his account on the remote server and logs in. Note, however, that this password travels across an encrypted channel to the server and is not subject to being stolen by an eavesdropper.
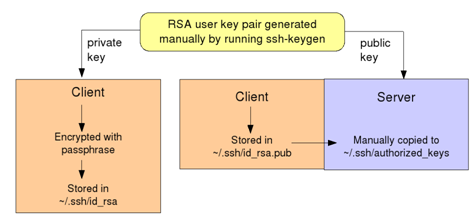
A user can also be authenticated using a public/private key pair, in much the same way that an SSH server authenticates to the client when the initial connection is made. For this to work, the user must first generate himself a key pair, then he must copy the public key of the pair onto any server on which he needs to authenticate.
Key generation is performed using ssh-keygen:
|
$ ssh-keygen -t dsa Generating public/private dsa key pair. Enter file in which to save the key (/home/chris/.ssh/id_dsa): Enter passphrase (empty for no passphrase): Enter same passphrase again: Your identification has been saved in /home/chris/.ssh/id_dsa. Your public key has been saved in /home/chris/.ssh/id_dsa.pub. The key fingerprint is: 14:af:92:52:d5:38:ba:82:88:11:44:ee:f8:b1:66:1a chris@m1530-rhel.example.com |
will generate a DSA key. By default these keys will be saved in ~/.ssh/id_dsa and ~/.ssh/id_dsa.pub If RSA keys are generated they would be stored in ~/.ssh/id_rsa and ~/.ssh/id_rsa.pub . Note that the user has the option to protect the private key with a pass-phrase. He may choose not to use a passphrase by simply pressing 'Enter' at this prompt.
The file containing the public key will need to be copied onto the server (using scp for example) and added to the file ~/.ssh/authorized_keys in the user's home directory on the server, as shown in the figure below. Your distribution may include a handy script called ssh-copy-id which automates this process:
|
$ ssh-copy-id -i .ssh/id_dsa.pub chris@192.168.81.1
Now try logging into the machine, with "ssh 'chris@192.168.81.1'", and check in:
to make sure we haven't added extra keys that you weren't expecting. |
This script will create the ~/.ssh directory and the authorized_keys file on the remote machine if necessary, and set their permissions correctly. If the authorized_keys file already exists, the key will be appended to it.
The management of user keys is summarised in the figure below.
With this key in place, if the user did not set a pass-phrase on his private key he can now perform a password-less ssh login to the server. However, if he did set a passphrase, he will be prompted for it at this point:
|
$ ssh 192.168.81.1 Enter passphrase for key '/home/chris/.ssh/id_dsa':
|
Note: The permissions on the files are important. All files holding private keys should be mode 600. The ~/.ssh directory should have mode 700. ssh will refuse to use these files if the permissions are too lax.
To avoid the inconvenience of having to supply a passphrase to unlock your private key during ssh login, the program ssh-agent can be used to hold the passphrase and supply it automatically when required. You supply your passphrase to the agent just once, and the agent will give the keys out to other processes owned by you on request.
The following dialog starts ssh-agent and adds your identities to it:
|
$ eval $(ssh-agent) Agent pid 22305
Enter passphrase for /home/chris/.ssh/id_dsa: Identity added: /home/chris/.ssh/id_dsa (/home/chris/.ssh/id_dsa) |
Now, you should be able to perform a secure but password-free login to any server that has a copy of your public user key.
The strange use of command substitution and the eval command to start ssh-agent arises because ssh-agent reports some environment variables on its standard output which the process needs to know in order to contact the agent. This 'trick' allows us to propagates these variable back into the shell. Note that the older command substitution syntax uses back-quotes like this: eval `ssh-agent`
Client-side ssh commands
Once configured, the end-user experience of SSH is straightforward. Some sample commands are shown in the table below.
| Command | What it does |
| $ ssh neptune | Log in on machine neptune using the local user account name |
| $ ssh brian@neptune | Log in on machine neptune as user brian |
| $ ssh neptune date | Run a single command on neptune |
| $ scp foo neptune: | Copy the local file foo into your home directory on neptune |
| $ scp foo neptune:/tmp/foo | Copy local file foo to the specified path name on neptune |
| $ scp neptune:/tmp/foo . | Copy /tmp/foo from neptune into your home directory on the local machine |
Port forwarding
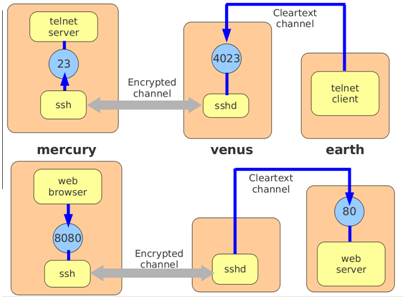
ssh has a useful feature called remote port forwarding, that allows the remote ssh server to listen for connections on any specified port and forward the traffic through an encrypted ssh tunnel to a specified port on the local machine. In the top half of the figure shown below, a user on machine mercury has run the command:
$ ssh -R 4023:mercury:23 venus
Then on machine earth, a user runs telnet, connecting to port 4023 on venus. Port forwarding means that the traffic is secure, and that the only port that needs to be open for connections on the server is port 22. In practice, 'venus' and 'earth' are often the same machine.
Local port forwarding is similar but it's the client that forwards the traffic, not the server. In the bottom half of the figure a user on mercury has run the command:
$ ssh -L 8080:earth:80 venus
(Again, 'venus' and 'earth' are often the same machine.) We can then browse securely through an encrypted channel by directing our browser to localhost:8080.
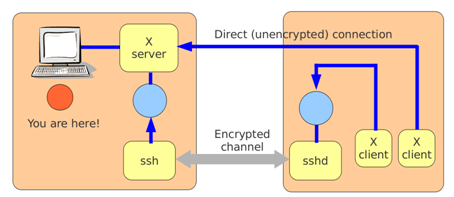
As a "special case" of port forwarding, ssh can arrange to carry X traffic from a remote graphical application back to the X server on the local machine. This is known as X11 forwarding. The following command:
|
$ ssh -X neptune xcalc |
runs xcalc on the machine neptune and arranges for it to display on the X server on the local machines. Behind the scenes, sshd acts as a proxy X server and forwards all X traffic down the encrypted channel back to the client. In addition, the DISPLAY environment variable is set to direct the xcalc program to the proxy server. The operation is illustrated below:
GnuPG
GPG (Gnu Privacy Guard) is a re-write of the original PGP software. It uses a combination of symmetric and asymmetric cryptography to provide secure communication between two parties. GPG also provides tools for key management.
At the heart of GPG is a command line tool called gpg, that handles the basic tasks of signing, encrypting and decrypting messages, and also handles key management. (Many email programs have plugins to encrypt, sign and decrypt email that use this command-line tool behind the scenes.) To illustrate its use, suppose Alex wants to communicate securely with Beth.
First, Alex generates his public/private key pair with the command gpg-gen-key:
|
$ gpg --gen-key gpg (GnuPG) 1.4.5; Copyright (C) 2006 Free Software Foundation, Inc. This program comes with ABSOLUTELY NO WARRANTY. This is free software, and you are welcome to redistribute it under certain conditions. See the file COPYING for details.
gpg: new configuration file `/home/alex/.gnupg/gpg.conf' created gpg: WARNING: options in `/home/alex/.gnupg/gpg.conf' are not yet active during this run gpg: keyring `/home/alex/.gnupg/secring.gpg' created gpg: keyring `/home/alex/.gnupg/pubring.gpg' created Please select what kind of key you want: (1) DSA and Elgamal (default) (2) DSA (sign only) (5) RSA (sign only) Your selection? 1 DSA keypair will have 1024 bits. ELG-E keys may be between 1024 and 4096 bits long. What keysize do you want? (2048) 2048 Requested keysize is 2048 bits Please specify how long the key should be valid. 0 = key does not expire <n> = key expires in n days <n>w = key expires in n weeks <n>m = key expires in n months <n>y = key expires in n years Key is valid for? (0) 1y Key expires at Wed 28 Sep 2011 01:29:24 PM BST Is this correct? (y/N) y
from the Real Name, Comment and Email Address in this form: "Heinrich Heine (Der Dichter) <heinrichh@duesseldorf.de>"
Email address: alex@example.com Comment: Demo User A You selected this USER-ID: "Alex Instructor <alex@example.com>"
You need a Passphrase to protect your secret key.
some other action (type on the keyboard, move the mouse, utilize the disks) during the prime generation; this gives the random number generator a better chance to gain enough entropy. .++++++++++++++++++++.++++++++++.+++++.+++++.+++++++++++++++.+++++.+++++++++++++++.+++++++++++++++.+++++++++++++++++++++++++..+++++++++++++++>..++++++++++>+++
the OS a chance to collect more entropy! (Need 282 more bytes) We need to generate a lot of random bytes. It is a good idea to perform some other action (type on the keyboard, move the mouse, utilize the disks) during the prime generation; this gives the random number generator a better chance to gain enough entropy. ...+++++...+++++.+++++++++++++++++++++++++.+++++++++++++++...++++++++++...+++++...++++++++++++++++++++..+++++++++++++++++++++++++++++++++++.++++++++++++++++++++.+++++>..++++++++++>+++++......>+++++.......<+++++............>+++++..........+++++^^^^ gpg: /home/alex/.gnupg/trustdb.gpg: trustdb created gpg: key 1B21BE5C marked as ultimately trusted public and secret key created and signed.
gpg: 3 marginal(s) needed, 1 complete(s) needed, PGP trust model gpg: depth: 0 valid: 1 signed: 0 trust: 0-, 0q, 0n, 0m, 0f, 1u gpg: next trustdb check due at 2011-09-28 pub 1024D/1B21BE5C 2010-09-28 [expires: 2011-09-28] Key fingerprint = 9FD4 775C 8867 2E53 9C0A 28C3 C633 2E64 1B21 BE5C uid Alex Instructor <alex@example.com> sub 2048g/F0938AF1 2010-09-28 [expires: 2011-09-28] |
Here, we have chosen DSA and Elgamal keys and a DSA key size of 2048 bits. We have supplied a passphrase to protect our secret key. We have provided a name, email address and comment which were used to construct a "User ID" which identifies whose key this is in a human-friendly way.
The public and private keys are placed in files in the .gnupg directory:
|
$ ls -l .gnupg total 32 -rw------- 1 alex alex 9207 Sep 28 13:28 gpg.conf -rw------- 1 alex alex 1178 Sep 28 13:35 pubring.gpg -rw------- 1 alex alex 1178 Sep 28 13:35 pubring.gpg~ -rw------- 1 alex alex 600 Sep 28 13:35 random_seed -rw------- 1 alex alex 1327 Sep 28 13:35 secring.gpg -rw------- 1 alex alex 1280 Sep 28 13:35 trustdb.gpg |
Alex then exports his public key to an ascii file like this:
|
$ gpg --export --armor -o alex.pub Alex |
"Armoring" a key simply means representing it in an ascii form that could (for example) be printed out or transmitted as the text of an email. The final argument of the command ('Alex') is a fragment of the key's User ID, sufficient to identify the key. The file he ended up with, alex.pub, is the one he plans to give to Beth.
Beth goes through the same process, generating her own key pair and her own passphrase, and exporting the public key into a file call beth.pub ready to give to Alex.
Alex and Beth now exchange their public GPG keys. Alex copies Beth's file to his computer and imports it into his GPG keyring like this:
|
$ gpg --import beth.pub |
Beth similarly imports Alex's public key into her keyring.
At this point, if Alex lists his keys he will see the public half of his own key, and the one he imported from Beth:
|
$ gpg --list-keys /home/alex/.gnupg/pubring.gpg ----------------------------- pub 2048D/B4DF979C 2010-08-02 [expires: 2010-08-30] uid Alex Example (Demo User A) <alex@example.com> sub 2048g/626C246D 2010-08-02 [expires: 2010-08-30]
uid Beth Example (Demo User B) <beth@example.com> sub 2048g/07DFB736 2010-08-02 [expires: 2010-08-30]
|
There's one more thing Alex needs to do before he can use Beth's public key to send her a confidential message. He needs to sign Beth's key to say that he believes it really is hers:
|
$ gpg --sign-key Beth |
Alex can now use Beth's public key to send her an encrypted message:
|
$ gpg --encrypt --armor --recipient Beth secret.txt |
In this command Beth is any part of the key ID, sufficient to identify this key uniquely. At this point Alex has an encrypted file called secret.txt.asc which he can email to Beth. He knows that only Beth can read it, because only she knows the private key corresponding to the public key Alex encrypted it with.
Beth can decrypt this file like this:
|
$ gpg --decrypt -o poetry.txt secret.txt.asc
user: "Beth Example (Demo User B) <beth@example.com>" 2048-bit ELG key, ID 07DFB736, created 2010-08-02 (main key ID F6CA4978)
"Beth Example (Demo User B) <beth@example.com>" gpg: Signature made Mon 02 Aug 2010 03:25:00 BST using DSA key ID B4DF979C gpg: Good signature from "Alex Example (Demo User A) <alex@example.com>" |
Alex's key pair is also important. He has already used his private key to sign (declare his trust in) Beth's public key. His public key, of course, would be used to encrypt a reply from Beth back to Alex.
Digital Signatures
Alex signs his message by creating a hash of the message and encrypting it with his private key. On receipt, Beth can decrypt the hash (using Alex's public key), compute her own hash of the message, and compare the two. If they match, Beth has high confidence that the message came from Alex and that it has not been modified since it was signed. Note that digital signatures do not provide confidentiality – that is, they do not encrypt the message. gpg hides the complexity behind a simple command option (--sign). It's possible for Alex to both encrypt and sign the message:
|
$ gpg --encrypt --sign --armor --recipient Beth secret.txt |
Then, when Beth decrypts it, the signature will automatically be checked. (At the end of the earlier example, note the report of whose public key the message was encrypted with, whose private key it was signed with, and that the signature matches the message.
GPG also supports its own public key infrastructure using a "web of trust" but that is beyond our present scope.
How PGP works
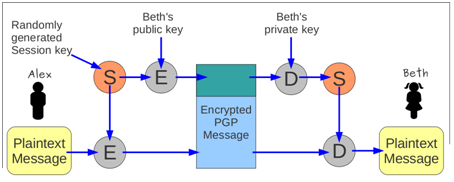
PGP uses a hybrid of symmetric and asymmetric cryptography. A random session key (used only for this one message) is chosen and is encrypted with the recipient's public key. The result is sent as part of the message. The session key is then used to encrypt the sender's plain text using a symmetric cipher (IDEA, by default) and the result is attached to the message. The recipient decrypts the session key using her private key, then uses it to decrypt the body of the message.
This approach has several advantages: first, symmetric ciphers are much faster to compute, and don't need such long keys. Also, if an eavesdropper does crack the session key, it won't help him read any subsequent messages. Finally, because the asymmetric cipher is used only to encrypt a short (and random) value, a cryptanalyst would have very little hope of cracking it.
The following is a partial list of the used files, terms and objectives:
- ssh
- ssh-keygen
- ssh-agent
- ssh-add
- ~/.ssh/id_rsa and id_rsa.pub
- ~/.ssh/id_dsa and id_dsa.pub
- /etc/ssh/ssh_host_rsa_key
- ssh_host_rsa_key.pub
- /etc/ssh/ssh_host_dsa_key
- ssh_host_dsa_key.pub
- ~/.ssh/authorized_keys
- /etc/ssh_known_hosts
- gpg
- ~/.gnupg/*
