Come fly with me/K-6/Activities 77 - 95
Come Fly With Me! - Exploring science through aviation / aerospace concepts
- David C. Housel and Doreen K.M. Housel, 1983.
- Reproduced with permission
Contents
- 1 77. MOON'S SONG: I GOT PLENTY OF NOTHIN'
- 2 78. LOST ON THE MOON 1
- 3 79. WHAT'S WHAT lN THE WAY OF SPACECRAFT
- 4 80. MODEL ROCKETS
- 5 81. ALTITUDE TRACKING OF MODEL ROCKETS
- 6 SIXTH GRADE
- 7 82. SPACE SHUTTLE SEARCH
- 8 83. SHIELDING AGAINST HEAT AND COLD
- 9 84. OXYGEN PRODUCTION
- 10 85. THINGS THAT GO ZING IN THE NIGHT
- 11 86. MUNCHING ON THE MOON
- 12 87. THE COOKIE THAT CAME TO EARTH FROM THE SEA IN ORDER TO BE EATEN IN SPACE!
- 13 88. CATCHING THE RAYS
- 14 89. SPACE INVASION
- 15 90. RECORDING HEART RATE
- 16 91. PHYSICAL FITNESS IN SPACE
- 17 92. IT'S ALL RELATIVE
- 18 93. PAPER STARSHIPS
- 19 94. DREAMS YOU DARE TO DREAM...
- 20 95. CAREERS IN AVIATION AND AEROSPACE
- 21 Youth in Aviation
77. MOON'S SONG: I GOT PLENTY OF NOTHIN'
SUBJECT:
Science
GRADE:
Fifth
GROUP SIZE:
Small
TIME:
2-50 minute periods + search Time
TYPE OF ACTIVITY:
Student investigation
TEACHING STRATEGY:
Guided Discovery
CONCEPTS:
Lunar environment Hostile environment
SKILLS:
Data Collecting Reporting Comparing
Objectives: to describe some of the characteristics of the moon's environment; to compare the moon's hostile environment to Earth's environment.
Materials: Reference material - books, pamphlets, magazines, encyclopedias. Lunar word puzzle worksheet.
Procedure:
Cut out the individual word puzzles and distribute one to each group. Explain that the students are to figure out what aspect of the moon's environment they are to research by unscrambling the letters on their paper. Give them a bit of time to do that and to organize their search. Allow a few days to find the information.
When they have finished, have each group present what they have learned to the class at large. Encourage pictures, drawings and illustrations as support for what they found. Encourage questions and have students write down questions that require further investigation. Work out ways of finding those answers.
After the moon's environment has been discussed and the remaining questions have been looked into, do a comparison of the Earth's environment to the Moon's. Ask students to note similarities and differences in their notebooks as you discuss them and write them on the board.
Extension: There's an activity coming up called, "Lost on the Moon." This is a very good activity to use as a lead in; in fact, it's really only fair that the students have some background on the moon's environment before they do "Lost on the Moon."
Key: 1.) Craters 2.) Moon Rocks 3.) Temperature 4.) Weather 5.) Lunar Life 6.) Communication 7.) Gravity 8.) Atmosphere 9.) Moonquakes 10.) Mountains
LUNAR SCRAMBLE
TRAESCR.....How did they form? What are they like?
OMNO CRKOS.....What do they tell us? Where can earthlings get some?
RRAPEMTEUET.....What's the highest? Lowest? How do the astronauts manage?
THWEERA.....Is there any? How does it affect what goes on there?
ULRAN IFLE.....Is the moon a dead duck? Do we know for sure?
UMCACOMTNINIO.....Why can't you hear when you're called? How is it done?
YVARGTI.....How does it compare to Earth's What are the problems? Advantages?
MSHRPEETAO.....What is it like? Why is it hard to land? Breathe?
OOQMNAKSEU.....How do they happen?
TINOUNSMA.....How were they formed? Are they like the ones on Earth?
78. LOST ON THE MOON 1
SUBJECT:
Science
GRADE:
Fifth
GROUP SIZE:
Small
TIME:
6O minutes TYPE OP ACTIVITY:
Game
TEACHING STRATEGY:
Guided Discovery
CONCEPTS:
Survival Group consensus
SKILLS:
Decision making Hypothesizing Inference
Objective: to use knowledge of moon's environment to make logical choices about equipment available for survival; to practice group consensus skills.
Materials: Copy of "Lost on the Moon Survival items" (1 for each student). Pencils.
Procedure:
- Distribute copies of the worksheet and have students individually rank the items, given the information at the top of the page. (about 10 minutes)
- Divide class into workable groups.
- Explain that this is an exercise in group decision making. Each group is to use the method of group consensus in reaching its decision. this means that the prediction for each of the 15 survival items must be agreed upon by each group member before it bee comes a part of the group decision. Con census is difficult to reach, therefore, not every ranking will meet with everyone's approval. Encourage the students to listen to each other and to find out why someone feels an item should have a particular ranking before the decision is made by the group. Avoid voting. It generally leads to trouble.
- Give the students 20 minutes to make their group decisions;
- In large group, read NASA's ranking to the students and have them compare their choices with NASA's. take the time to go over why the item was ranked the way it was by NASA. When the ranking is done, have students work out their scores.
KEY TO LOST ON THE MOON
| NASA's Ranking |
NASA's Reasons |
|---|---|
| 15 | No oxygen to sustain the flame |
| 4 | Good food energy source, efficient |
| 6 | Useful in scaling cliffs, tying together the injured |
| 8 | Will provide protection from sun's rays |
| 13 | Useless on dark side; not needed on lighted side |
| 11 | Possible means of propulsion |
| 12 | Bulky duplication of food concentrate |
| 3 | Primary means of navigation |
| 1 | Most pressing need |
| 9 | CO2 bottle in raft may be used for propulsion |
| 14 | Magnetic field on moon is not polarized, worthless |
| 2 | Replacement for high water loss on light side |
| 10 | Distress signal when mother ship sighted |
| 7 | For injecting vitamins - special aperture in suit |
| 5 | Talk to mother ship, FM needs short range and line of sight |
79. WHAT'S WHAT lN THE WAY OF SPACECRAFT
SUBJECT:
Science
GRADE:
Fifth
GROUP SIZE:
Small
TIME:
Several days
TYPE OF ACTIVITY:
Student investigation
TEACHING STRATEGY:
Guided Discovery
CONCEPTS:
Satellites Exploration
SKILLS:
Gathering and interpreting data Researching Using references Reporting
Objective: to use research to learn about spacecraft and associated hardware significant in the history of space exploration.
Materials: Various research materials from NASA on specific spacecraft. Pictures of spacecraft.
Procedure:
Put the name of each spacecraft on a separate piece of paper. Have the students split up into small groups and choose a slip of paper from a hat. The students should then research the history and purpose of the craft they picked. Ask them to consider the information gathered by the spacecraft as it went about exploring space. How has what was learned from each craft affected us on earth? What benefits have been gained from the exploration? How has the knowledge changed our concept space?
Have the students make presentations to their class about what they found. Encourage pictures, drawings, models and illustrations of the craft and related information. When they are all finished, display the information and visuals in a spacecraft display.
NASA Spacecraft
- Apollo
- Gemini
- Mercury
- Explorer
- Surveyor
- Pioneer
- Viking
- Voyager
- Eagle
- Columbia
- Discovery
- Atlantis
- Challenger
- [newer...]
80. MODEL ROCKETS
SUBJECT:
Science
GRADE:
Fifth
GROUP SIZE:
Small
TIME:
Several days
TYPE OF ACTIVITY:
Student Investigation TEACHING STRATEGY;
Guided Discovery
CONCEPTS:
Action-Reaction Thrust/Drag A Launch Altitude Gravity
SKILLS:
Modeling Experimenting Collecting data Comparing
Objective: To study, assemble and launch a model rocket; to learn model rocket safety procedures; to set up a launch and rocket recovery area.
Materials: Model Rocket Kits including rocket engines and igniters. Launch equipment. Model Rocket Activity Guides available from Estes Industries.
Procedure:
Obtain model rocket guides and technical manuals from a reputable supplier or manufacturer. Estes has a 4 week guide and is an excellent source. Bob Cannon is the Education Director at Estes. If you are familiar with concepts related to model rockets, you may wish to have:
- a demonstration launch
- students build model rockets
- students study safety procedures
- students set up a launch area
- students launch the class rockets
- students gather data about altitude, reliability of ignition, flight characteristics, accuracy of landing, etc.
- students compare thrusts of different engines
- students make graphs of data.
81. ALTITUDE TRACKING OF MODEL ROCKETS
SUBJECT:
Science
GRADE:
Fifth
GROUP SIZE:
Large or Small
TIME:
30 - 45 minutes
TYPE OF ACTIVITY:
Student Investigat1ion
TEACHING STRATEGY:
Expository
CONCEPTS:
Scaling Angle Altitude Tangent Tracking
SKILLS:
Graphing Measuring
Plotting Angles
Objective: to practice measuring and plotting similar triangles on a graph in order to determine the altitude of a model rocket or other object.
Materials: Protractor. Straw. Weight. or altiscope. tape. String. or hypsometer Graph paper. Pencil
Procedure:
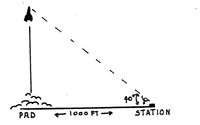
Have a student measure off 500 to 1000 feet from the rocket launch pad. this point is the "sighting station." Using a sighting device, measure the angle to the peak altitude the rocket reaches.
Method 1.
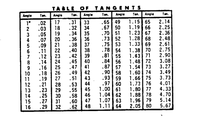
Locate the tangent of the angle read on the table of tangents. Multiply the tangent times the distance from the rocket launch pad to the "sighting station." The resulting figure is the altitude of the rocket flight.
TABLE OF TANGENTS [fix data, formatting or remove]
| Angle Tan. | Angle Tan. | Angle Tan. | Angle Tan. | Angle Tan. |
|---|---|---|---|---|
| 1' .02 | 17 .31 | as .55 | 49 1.15 | 55 2.14 |
| 2 .03 | t8 .32 | 34 .67 | 50 1.19 | 55 2.25 |
| 3 .w | w 34 | u .m m an w 2% | ||
| 4 .07 | 20 .35 | 36 .73 | 52 1.20 | 50 2.48 |
| 5 .m | m as | u .n | 53 lJ3 | 69 Zjl |
| 6 .il | 22 .40 | 38 .78 | 54 1_33 | 70 2,75 |
| 7 .12 | 23 .42 | 39 .81 | 55 1_43 | 71 2.90 |
| 8 .14 | 24 .45 | 40 .84 | 55 1_45 | 72 3,03 |
| 9 .15 | 25 .47 | 41 .87 | 57 1_54 | 73 3,27 |
| 10 .15 | Z6 .49 | 42 .90 | SB I_6D | 74 3,49 |
| I1 .19 | 27 .51 | 43 5 .93 | 59 1.55 | 75 3.73 |
| 12 .21 | za .53 | 44 .97 | 50 1.75 | 76 4.01 |
| 13 .za | 29 .55 | 45 1.00 | 61 1.80 | 77 4.33 |
| 14 .25 | ao .55 | 46 1.04 | 62 1.04 | 78 4.70 |
| 15 .27 | 31 .50 | 47 1.07 | 55 1.95 | 79 5.14 |
| 16 .29 | 32 .62 | 48 1.11 | 64 2.05 | B0 5.67 |
Estes Rockets, Penrose, California
Method 2.
Mark off the distance from the station to the pad. Let us assume that it is l,0OO feet. Assume that the rocket was tracked to its highest point and that the angle of elevation was 40 degrees.
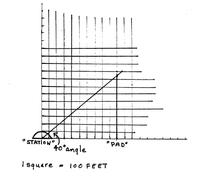
Let one square = 100 feet on the graph paper.
Draw a line on the graph paper 10 squares long paralleling the bottom of the paper.
Construct a line of any length perpendicular to the base line at the point called "pad."
Construct the angle of elevation to the perpendicular line from the point marked "station."
To obtain the elevation simply measure the length of the perpendicular side. For example: in our problem this line would be 8 4/10 squares or 840 feet.
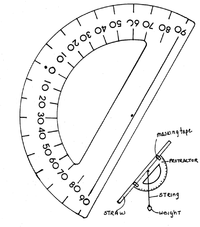
If you have no altiscope or hypsometer, have students make a sighting device using the illustration as a guide.
To use the sighting device (clinometer) hold the straw and sight the top of the building or the tree or the highest point a rocket rises through the straw. A partner should then observe the degree mark where the string crosses the protractor. To find the angle of the straw to the ground, subtract this reading from 90 degrees or use the diagram as a guide for remarking the angles on the protractor. (If you wish, you may reproduce it and glue it to the protractor.)
SIXTH GRADE
DREAMS THAT YOU DARE TO DREAM
- "...BUT NOW YOU RE OUT THERE AND WHAT YOU'VE GOT AROUND YOUR HEAD IS A GOLDFISH BOWL AND THERE ARE NO LIMITS HERE" --RUSSELL SCHWEICKERT, ASTRONAUT DURING EVA, MARCH 1969
82. SPACE SHUTTLE SEARCH
SUBJECT:
Science
GRADE:
Sixth
GROUP SIZE:
Small
TIME:
2 - 50 minute period Several day research
TYPE OF ACTIVITY:
Student Research
TEACHING STRATEGY:
Guided Discovery
CONCEPTS:
Space Shuttle Technology
SKILLS:
Researching data Presentation
Objective: to have students find information on the Space Shuttle; to motivate students to gather and organize information to share with class.
Materials: Copy of assignment for an area to investigate. (See following pages) Books, magazines, pamphlets, etc. on the Space Shuttle. Model of Shuttle, Following.) "Space Shuttle Statistics" sheet. (Following) Light cardboard. Scissors. Glue.
Teacher Background information:
Since the space program began, designers of space craft have built on the lessons learned with each flight. Lessons from Mercury, Gemini, Apollo and Skylab have helped to make life for the Shuttle's passengers as safe and comfortable as possible in weightlessness.
This is important because, as we move into the future, there will be giant leaps in "manned" space travel. The livability aboard the Shuttle made it possible to add other people besides the superbly trained and healthy astronauts to the list of passengers. Men and women scientists, technicians and others in reasonably good health have joined the shuttle crews in order to meet the goals of the program.
The Shuttle functioned as a "freight" carrier, a traveling repair shop, a science lab and as a factory for manufacturing products in zero gravity. In addition, and perhaps the most exciting prospect of all, the Shuttle delivered supplies and made possible the construction of the International Space Station.
Procedure:
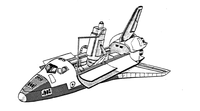
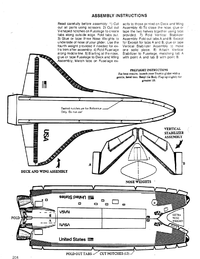
Make copies of the "Space Shuttle Statistics" sheet and the Shuttle model for the students. (l each) Make one copy of the assignments to be cut and given to each group. Talk a bit about the Shuttle and explain that they will be doing some research on specific areas of the Shuttle. Distribute the statistics sheet and discuss. Distribute the model and have them cut out the pieces, glue to light cardboard and construct the Shuttle model. Talk with them about the parts of the Shuttle. When they have finished, practice flying the models and then hand out the assignments to I5 groups to investigate.
Provide books, magazines and pamphlets for the students and arrange for library time. Have the students write letters to NASA for information on their specific area if your due date for finished presentations allows. Work with the students over a period of time on their presentations, suggesting ways to present and to organize as they require or ask for your help. Encourage as much visual material during the presentation as they can handle. Encourage them to search out information from real people, if at all possible, rather than just through written material. Set dates for the presentations that give enough time to do some real gathering of information but not so far in the future that there is no sense of immediacy.
Have students give their presentations to the class. Leave time for questions of the groups and once finished, display the gathered models, pictures, drawings, etc. in a Space Shuttle Center and invite other classes in to see.
Space Shuttle Search Worksheet
- 1. Find out how the astronauts sleep on the Shuttle. Investigate the difference between some earlier sleeping arrangements (for example, what was the sleeping arrangement on Apollo II?) and the Shuttle's Facilities. Explain to the class how things have changed. Use Illustrations or models to show how the astronauts sleep. Explain what time they go to sleep and what time their work day starts.
- 2. Find out about the Shuttle Orbiter's food system. Find out what sort of food is eaten by the astronauts, how much, how it's prepared, stored, etc. Tell the class how the astronaut diet is figured out and where they can get similar food. Bring samples of the sort of food eaten on the Shuttle and share with the class.
- 3. Find out about the space suits and head gear worn on board the Shuttle. How do they differ from earlier models for other missions? What are they made of? Are they made of male and female crew members? (Find out only about the gear worn inside the craft as another group is working on the EVA gear. After you have your information gathered, make drawings or find pictures to show the class what the gear looks like and how it works.
- 4. Find out how the Shuttle is launched. Using an illustration of the Shuttle show the class the basic parts of the craft and explain how it gets off the ground and how it enters orbit. What kind of fuel is used? How many g's are experienced on take off? (What is a "g“?) How is the g force better now with the Shuttle than most other manned flights? How fast does the Shuttle orbit? Describe to the class what can be seen as the Shuttle orbits the Earth. Bring pictures of take off. They're beautiful. Bring pictures of what the astronauts see while in orbit.
- 5. Find out about weightlessness on the Shuttle. (Did you know you‘d be taller in space than on Earth? Find out why.) Explain to the class what happens in weightless conditions when you eat, go to the bathroom, take a shower or do work on board. How are the problems solved on the Shuttle? Bring pictures or drawings of astronauts in weightless conditions. Tell the class how NASA prepares astronauts to live in weightlessness.
- 6. Find out why it's so important for the astronauts to exercise in space. Find out what kind of exercises do the job and what some of the problems are. Show the class a drawing of the treadmill and explain its use. Why is it important that astronauts be in good condition before they come on board? Why do they need to exercise after they get there? Why are the needs greater the longer the flight?
- 7. Find out how the air manufacturing and control system inside the Shuttle works and why it's so vital up there where the Shuttle orbits. Why would your blood boil in space? Find out and tell the class how the Shuttle engineers keep that from happening to the astronauts. Explain how the air is purified. Bring something that illustrates to the class how the whole process works.
- 8. You won't be able to shower on the Shuttle, but you will be able to stay clean AND go to the bathroom when necessary. How come showering is such a problem and just how does one go about staying on the toilet seat in a weightless condition? Find out how NASA has provided for the personal hygiene of its astronauts. Find out why the fuel cells on board are so important to this provision. Explain why it's so vital that this aspect of space travel be carefully provided for and, while you're at it, find out why you don't have to trim your fingernails as often in space. Bring pictures or drawings of the personal hygiene facilities to show the class.
- 9. Find out how the astronauts, while in orbit, leave the Shuttle and why. Find out what kind of gear is used for EVA (Extra-Vehicular Activity). Find out and explain to the class the procedure used to leave the vehicle and some of the things the astronauts do outside the craft. Explain how gear protects the astronauts from the hostile environment. What would happen without it? Bring pictures or drawings of EVA to show the class.
- 10. Find out about the Manipulator Arm. How does it work? Why is it so helpful to the astronauts? What does it do in space? How is it like a human arm? Make a mode] for the class of the "space crane" showing the movable "shoulder," "elbow," and "wrist" on the "arm." Explain how it works. Bring pictures of the arm.
- 11. Find out about SpaceLab. Who financed and built it? Who goes into space as "Payload Specialists?" What sort of work will be done by SpaceLab? Give examples of experiments better done in space and tell the class why. Brainstorm some ideas for experiments your group thinks would be good to do in weightless conditions on board the Shuttle. Tell why you think they would be good experiments. Bring pictures or drawings of what the SpaceLab looks like to show the class.
- 12. Find out about the Space Center (Space Station). How many people would work in it? What wou1d it be used for? How would it be constructed? How would it be powered? How long would people stay there? Make a model of it to show to the class.
- 13. Find out how the Space Shuttle comes back to Earth. Find out when the astronauts begin reentry procedures and explain to the class the steps they go through to bring the craft back to the landing site. Explain how a vehicle that took off as a rocket, comes back as an airplane. How fast is it flying as it touches down? What is its angle to reentry? How does it differ from most other airplanes? What happens to the Shuttle after it returns? How is that different from other spacecraft in the past?
- 14. Find out about the people on board the Shuttle. Explain who the Astronaut Crew is and what the responsibilities are. Who are the Payload Specialists? What do they do? Who "mans" these trips? Why is "mans" an inappropriate verb here? Find out and tell the class how Shuttle astronauts get to be Shuttle astronauts. What are some of the requirements? Choose a couple of specific astronauts as examples, and give some details about their background. Bring pictures or drawings of people working on the Shuttle.
- 15. Find out about some of the benefits that come from using the Shuttle. What repairs can it make? What information can it provide in the areas of Agriculture, Communications, Scientific Study, Petroleum Resources, Mineral Resources, Pollution, the Fishing Industry and the Timber Industry? How can that information be used? What will the Shuttle be doing for us in the future, according to your reading? What things can YOU think of for it to do? Futurize a bit. Bring illustration of how it benefits us.
Space Shuttle Statistics
The Space Shuttle is NASA’s first true aerospace vehicle. It will take off as a rocket, operate in orbit as a spacecraft, and land on the' Earth as an airplane. The Shuttle is a four part vehicle consisting of the Orbiter, an expendable External Tank (ET), and two Solid Rocket Boosters (SFTB’s).
Launched in a conventional manner, the Space Shuttle’s Main Engines (SSME’s) and the SFTB’s produce approximately 30,800,000 newtons of thrust. At 45 kilometers above the Earth the boosters separate and return to the Earth by parachute for sea recovery. Eight minutes into the flight, at an approximate altitude of 110 kilometers, the ET propellants are exhausted. The tank will separate from the Orbiter and disintegrate upon reentry into the Earth’s atmosphere. Any surviving pieces fall into remote ocean areas. To complete orbital insertion to altitudes between 160 and 1100 kilometers, and later to make orbital adjustments, two Orbital Maneuvering System (OMS) engines fire.
Once in space, the Space Shuttle Orbiter serves as a base to deploy payloads such as satellites or space probes. Satellites needing repair or servicing can be brought on board and later released or returned to Earth. The Orbiter can also be used as a platform for scientific research.
At the completion of the orbital phase of the mission, the Orbiter is rotated in space by firing combinations of small rockets called the Reaction Control System (RCS). When the OMS engines are aimed in the direction of motion, they fire and the resulting thrust slows the Orbiter, initiating reentry. Before making atmospheric contact, the Orbiter is again rotated so that the underside will experience the major share of atmospheric friction. To protect the Orbiter, three types of reusable surface insulation are used. In areas of greatest heating, the nose area, and the leading edges of the wings, reinforced carbon is used (carbon cloth impregnated with additional carbon, heat treated, and then coated with silicon carbide). Other areas are covered with thermal tiles made of silica fibers or a Nomex felt blanket material (nylon felt coated with silicon). To aid in heat rejection, the tiles are given a glassy ceramic coating.
As the altitude and speed of the orbiter decreases, the Orbiter begins to function as a glider. The glide angle to the runway is about six times steeper than a commercial jet liner on landing approach. Landing speeds are approximately 340 kilometers per hour.
Following landing, the Orbiter undergoes refurbishment, new payloads are inserted, a new External Tank installed, the boosters refueled and the entire vehicle assembly is made ready for a new launch a few weeks later. To reduce cost, the Orbiter is designed to be used again for up to 100 missions and the SFTB's are designed for 20 flights each.
ASSEMBLY INSTRUCTIONS
Read carefully before assembly:
- Cut out all parts using scissors
- Cut out V-shaped notches on Fuselage to create tabs along outside edge. Fold tabs out.
- Glue or tape three Nose Weights to underside of nose of your glider. Use the fourth weight provided if needed for extra trim after assembly.
- Fold Fuselage along middle line.
- Starting at the nose, glue or tape fuselage to Deck and Wing Assembly. Match tabs on Fuselage exactly to those printed on Deck and Wing Assembly.
- To close the nose, glue or tape the two halves together using tabs provided.
- Fold Vertical Stabilizer Assembly. Fold out tabs A and B. Except for tabs A and B, glue or tape Vertical Stabilizer Assembly to make one solid piece.
- Attach Vertical Stabilizer to Fuselage, matching tab A with point A and tab B with point B.
PRE-FLIGHT INSTRUCTIONS
For best results, launch your Shuttle glider with a gentle, level toss. Bend the Body Flap up slightly for greater lift.
83. SHIELDING AGAINST HEAT AND COLD
SUBJECT:
Science
GRADE:
Sixth
GROUP SIZE:
Small
TIME:
EO minutes per activity
TYPE OF ACTIVITY:
Student investigation
TEACHING STRATEGY:
Guided Discovery
CONCEPTS:
Absorption Radiation Expansion/Contraction
SKILLS:
Collecting/Recording data Observation inference Prediction
Objectives: to show students that various materials have varying heat absorption and radiation capabilities as well as expansion and contraction capabilities; to relate those capabilities to flight; to help students appreciate the complexity of designing space and aircraft.
Materials:
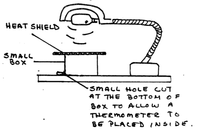
- (Activity I) Gooseneck lamp. Small box (cut off milk carton works). thermometer. Various materials like cloth, aluminum foil, paper, styrofoam, metals.
- (Activity II) Materials from Activity l. Flat black paint.
- (Activity III) 4 short candles. Drinking straw. Metal tray. Hat pin. 2 blocks of wood. Metal rods like small round curtain rod or heavy copper wire (8 or 10 gauge).
Teacher Background Information: Shielding aircraft and passengers from heat and cold is a complicated engineering problem and spacecraft destined to make long space journeys and to return to earth will face difficulties more formidable than any ever encountered before.
Among the most hazardous of the difficulties are temperatures ranging from 4,000 F in space to 15,000 F during reentry. Spacecraft designers, therefore, are constantly searching for materials and construction techniques which can withstand these temperature conditions Examples of effective structural designs and materials already in use include the overlapping of metal shingles on the neck of the Mercury capsule, corrugations in the skins of some of the more advanced craft and the heat protection tiles of the Shuttle. these permit scale-like and accordion-like movements when temperature changes result in expansion and contraction of the materials and/or insulation against very high temperatures.
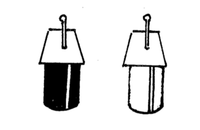
The internal temperature of many spacecraft is partially controlled by using different types of construction materials and painting them in patterns of black and white or of colors. thus, the absorption and radiation of heat by the craft can be balanced to some extent and the on-board equipment can operate in temperatures that approximate those within the earth's range.
Procedure:
Simple experiments, which yield quantitative results, can be done in the class to test the heat resistant qualities of certain materials.
Activity I:
Make a hole large enough tor a thermometer in the side, at the bottom of a small box. Cover the top of the box with a material you want to test. Record the temperature of the box (room temperature) and record the rise in temperature inside the box over a given period of time after turning on the light bulb which provides your heat source. After the recordings have been made, have students graph the results of materials tested and temperatures reached, Discuss which of the materials absorbed the greater amount of heat and which reflected back heat, keeping the box cooler; Relate this to the shielding of aircraft against the heat of rocket blasts and atmospheric friction in reentry. Have students find the kinds of materials NASA'S engineers have used or are testing now.
Activity II:
To experience the way some colors absorb more heat than others,paint some of the materials used in Activity l with flat black paint. Repeat the experiment and record the differences in temperature of the test materials when they are exposed to the heat source. Discuss the differences after they write up their observations and relate to the internal temperature of an aircraft. Problem to solve: If the Sun is shining on one side of the craft and the other side is in the cooler Shaded side, how might the craft maintain a constant comfortable temperature inside? Brainstorm ideas., (insulation--Cooling/heating systems--rotation of craft) Have students research what NASA engineers and aircraft engineers do.
Activlty III:
Use a straight metal rod about 60 cm long. Place ends on two blocks of wood. tape blocks in place to table and tape one end of the rod to the block. It's important that the blocks and one end of the rod be stationary. Cut drinking straw in half and stick a pin through the middle of one half to serve as a "pointer." Set the pin on the block and rest the rod on it with the straw straight up~and down.
Put the metal tray with 4 short candles placed in a row, under the rod. Light the candles and observe what happens. Ask the students to write their observations. What physical changes took place? What inference can be made here? (Why does the "pointer" move as it does?)
Ask students to predict what will happen when the candles are blown out? Check it out. (EXTRA: Put ice in a plastic bag and wrap around rod. What happens?) Discuss the implications of metal expansion and contraction in designing aircraft and spacecraft. Brainstorm some ways the students think aircraft and spacecraft engineers might take care of this problem. (Overlapping--use of corrugated material--flexible joints.) Have them research what the designers do.
84. OXYGEN PRODUCTION
SUBJECT:
Science
GRADE:
Sixth
GROUP SIZE:
Small
TIME:
45 minutes for A & B 40 minutes for C
TYPE OF ACTIVITY:
Experiment
TEACHING STRATEGY:
Guided Discovery and Expository
CONCEPTS:
Oxygen production Compounds Elements
SKILLS:
Experimentation Inference Data Collection/Recording
Objective: to learn that oxygen can be produced in various ways for space flight.
Materials: Dry yeast. Heat resistant bottle. Hydrogen peroxide (6 percent). Activated charcoal. Cardboard. Splint. Elodea plant (from fish store). test tube. Glass funnel.
Teacher Background Information: Oxygen is an odorless, colorless gas. It makes up about 20 percent of the air. It is slightly heavier than air and is a necessary component in supporting life. Whenever anything burns, it unites with oxygen.
Since it's so vital to survival, oxygen must be carried along and delivered to the astronaut in regular and uniform concentration. There are several methods of supplying oxygen. One is to carry the total supply in containers either in gaseous or liquid state. Another method is to obtain oxygen from certain oxygen compounds. A third is to have green plants along, such as algae, to produce oxygen. A fourth method would be to split the oxygen away from the carbon dioxide breathed out by the astronaut. These three simple experiments can be done to show the students how it is possible to produce oxygen with plants and by breaking down oxygen compounds.
Procedure:
Talk with the students about the critical need for oxygen that humans have. Talk about oxygen as part of our environment and how we must replace the hostile environment of space with a more friendly one if we are to survive. Discuss the difficulty of providing for oxygen only by carrying tanks of it on board. (Weight, space, safety and mobility, for example.) Explain that they will be producing oxygen in these experiments in ways similar to those used by NASA.
A.) Have students place yeast in the bottom of a heat-resistant bottle or flask. When 1 tablespoon of hydrogen peroxide is added, a bubbling of oxygen gas will result. The gas can be collected in the flask by holding your thumb over the top or covering it in some way until a glowing splint can be put into it. What happens to the splint?
B.) Put a heaping spoonful of pieces of activated charcoal into a container such as a heat-resistant baby bottle. Cover the charcoal with 6 percent hydrogen peroxide and cover the bottle with a sheet of cardboard to trap the oxygen that is produced. Test for oxygen with the glowing splint. What happens? (Glows more brightly or bursts into flame)
Have students write up their observations by describing their experiments and the results observed. Then, discuss why the splint burst into flame and have them write what can be inferred as a result of that.
Discuss why the splint bursting into flame indicates the presence of oxygen? Where does the oxygen come from? What compound is involved here? (H2 O) What is a compound? What is an element? What two elements are involved in this experiment? How can the students tell? If hydrogen and oxygen are both odorless and colorless, what sort of evidence does one have to have in order to know they are present? (NOTE: Why would it be dangerous to have open containers of hydrogen gas on board? Why would a "NO Smoking" sign be in order, besides the fact that it's already dangerous to an astronaut's health? Because of the high flammability of pure oxygen, NASA now uses a combination of oxygen and nitrogen for breathing. That's closer to the actual earth's combination anyway.)
C.) Place an elodea plant under an inverted clear plastic or glass funnel in an aquarium. Place a test tube filled with water over the funnel stem. Allow several days to pass being sure the plant has plenty of sunlight. Note the change in the water level of the test tube. After most of the water has been displaced (by oxygen), remove the test tube. Test for the presence of oxygen by placing a glowing wood splint in the test tube. Write up the experiment and have students infer what they believe has happened.
Discuss growing green plants in space for producing oxygen. What might be some of the difficulties? What advantages? Have students do some research on how NASA uses algae to produce oxygen on space flights. Have students design an imaginary "Space terrarium and oxygen collector" for a group of imaginary space travelers. Make a model or drawing of it. Make it wild but based on what they know, at this point, to be scientifically true.
85. THINGS THAT GO ZING IN THE NIGHT
SUBJECT:
Science
GRADE:
Sixth
GROUP SIZE:
Small
TIME:
2 - 45 minute periods
TYPE OF ACTIVITY;
Student Investigation
TEACHING STRATEGY:
Guided Discovery
CONCEPTS:
Meteoroids Micro-meteoroids Velocity Friction
SKILLS:
Observation Collection and Recording data Inference
Objectives: to show that small particles at tremendous speeds can penetrate objects; to show students that earth is bombarded by micrometeoroids constantly.
Materials:
- (Activity I) Raw Potato. Plastic straws.
- (Activity ll) Strong horseshoe magnet. 6 feet of cord or rope. Tweezers. Powerful magnifying glass or rock and mineral microscope (dissecting Scope). Samples of gathered magnetic particles.
Teacher Background Material: Most of us have at one time or another seen "falling stars" or "shooting stars." These are bits of material which have been heated to incandescence by the friction of the air. Those pieces which are sufficiently large to not vaporize completely and reach the surface of the Earth are termed meteorites.
The incandescent trail which forms as these "falling stars" hurtle through space is termed "meteor." The chunks of material, in space, are called meteoroids. Meteoritic samples vary from tiny dust grains to giant boulders having masses of several thousand kilograms.
It is difficult to distinguish meteorites from terrestrial rocks but there are some distinguishing characteristics that can be used to determine the difference. A round, melted looking piece or a triangular shape with what appear to be tiny "thumb prints" on the side are characteristic of meteorites, for example.
Estimates indicate that perhaps as little as 1.000 to more than 10,000 tons of meteoritic material falls on the Earth every day. However, most of this material is very tiny - in the form of micrometeoroids or dust-like grains a few micrometers in size. Analysis of ocean sediments show the presence of large quantities of micrometeorites and considering the proportion of ocean to land, the majority of meteorites should fall into the water.
In spite of the vast infall of meteorites, there are only two documented cases of anyone being hurt or killed by meteorites. A shower of stones which fell near Alexandria, Egypt in l9ll killed a dog and in l954, in Alabama, Mrs. Hewlett Hodges was severely bruised by an 8 pound meteorite that crashed through her roof.
A An interesting note here is that there are micrometeorolds so small and traveling so fast, they can actually pass right through a house or a space craft without notice. While a large meteor "strike" would be disastrous, these collisions with micrometeoroids could go on without any of us being aware that we are colliding with objects from space.
Procedure:
(Activity 1)
To show the penetrating power of a projectile which has a small mass but a high velocity, hold a raw potato in one hand (between the thumb and index finger). Do not hold it in the palm of your hand. With the straw in the other hand, try to drive the straw through the potato. Do it slowly at first and observe what happens. (Not much except crinkled straws.)
Increase the velocity. What happens? What happens when the straw's velocity is increased and you move the potato quickly toward the oncoming straw? Relate this to moving vehicles or objects in space. (You might want to relate it to driving an automobile too fast for a quick reminder of that danger as well.) Repeat the experiment using different sizes of straws. What happens? Have students write up their observations. After a discussion about why the straw is able to penetrate the potato, have them write up the inferences that can be made. Have them write up their conclusions about how size and speed affect the ability of the straw to penetrate the potato.
Spacecraft engineers have developed "bumpers" on space craft as one method of protecting crafts in case of a collision with a meteoroid in space. Have the students consider protective measures against meteoroids and draw or construct a model of a space craft with the devices they have come up with. (Bumpers, laser beams, warning systems, etc.)
(Activity 2)
Very small meteorites can sometimes be found by dragging a magnet through the dirt outside and inspecting the pieces which "stick" to the magnet with a magnifying glass or under a microscope. Tie a length of strong cord to a horseshoe magnet and drag it through the dirt for ten or fifteen minutes.
Try to find an area that is not heavily walked on. Bring the material that clings to the magnet inside and carefully remove the material. Place the material under a scope or inspect with a strong magnifying glass. Look for the characteristics mentioned (round, melted side or the "thumb prints")
86. MUNCHING ON THE MOON
SUBJECT:
Science
GRADE:
Sixth
GROUP SIZE:
Large
TIME:
60 minutes
TYPE OF ACTIVITY:
Student investigation
TEACHING STRATEGY:
Guided Discovery
CONCEPTS:
Calories Nutrition Food System
SKILLS: interpreting data Collecting data Futurizing
Objectives: to provide students with information on the food system of the space shuttle; to have students plan a balanced menu tor space flight; to futurize on food needs when colonizing space.
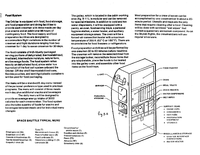
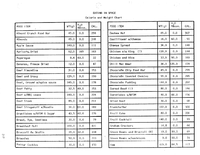
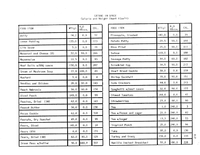
Materials: information sheets - "Food System," and "Eating in Space: Calorie and Weight Chart." Samples of "space food." Pencils.
Teacher Background information:
In long term space flight, the food carried aboard must remain free from spoilage or decomposition and must contain all the essential nutrients in order to maintain a proper state of health. On the NASA missions, the diet of each astronaut is carefully controlled and monitored. Food items are carefully analyzed for the major as well as trace biochemical constituents. The activity which follows takes into consideration only the weight of the food and water used in a typical day's diet and the Calories recommended. The students should be told that NASA works out a diet consistent with the recommended daily dietary allowance of several items: Protein, Fat, Carbohydrate, Water, Minerals, Vitamins and trace Minerals. A complete listing of these can be obtained from NASA.
NOTE: The list of foods on the Calorie and Weight Chart is a partial listing of the foods available to the astronauts. A complete list can also be obtained from NASA.
Procedure:
Have the students assume that they are space travelers. They are allowed to bring on board 950 grams of food stuffs for each day, are allowed a maximum of 1350 grams of water to reconstitute their food each day and are allowed 3,000 Calories for each day, divided into 1100 C (Breakfast), 1100 (Lunch), and 800 (Dinner).
Have them work out the best (most nutritious and close to the numbers allowed) day's worth of menus they can. Before they go to work, talk with them about nutrition, balanced meals and the need for exercise to work off some of the Calories. Why do they think the recommended Caloric allowance for Gemini was l,800 Calories while the Apollo Mission was given 2,000. Skylab between 2,200-2,400 Calories and the Shuttle folks 3,000 Calories. Have them find out some of the reasons were.
Have students keep a one-day record of what they eat, how much it weighs and how many Calories it contains. Compare kinds of food, weight and Calories with the Astronauts' diets. Is there a difference in nutritive value? In fiber content? Why is it so important to have low residue diets in space?
Talk about the problem of food in space over long periods of time. A year perhaps. Or 96 years. What would be necessary to grow food in space? What kinds of food could be grown most feasibly? Have students do some research after brainstorming the problem. They'll run into some fascinating sometimes pretty yuchy sounding) possibilities. Talk about nutrition in a capsule. Problems? (If we could get them to set our taste buds off properly and time release them so that the soup course went off before the entree and the chocolate mousse came last, we'd be in business.)
Extension:
Bring in samples of dehydrated, thermostabilized, irradiated or intermediate moisture foods and compare to natural food - Dried fruit, granola and foods like macaroni and cheese in a package are very easy to find in regular stores. Other stores will have even more "far out" foods on hand. There are a number of companies that manufacture food for NASA as well as for campers and hikers and they can be found at sporting goods stores, health food stores and camping supply stores. Do some taste testing. You'll love the freeze dried ice cream....
87. THE COOKIE THAT CAME TO EARTH FROM THE SEA IN ORDER TO BE EATEN IN SPACE!
SUBJECT:
Science
GRADE:
Sixth
TIME:
30 minutes
GROUP SIZE:
Large
TYPE OF ACTIVITY:
Discussion
TEACHING STRATEGY:
Expository
CONCEPTS:
Food Source Algae
SKILLS:
Munching!
Inference Researching
Objective: To illustrate The use of algae as food
Materials: 4 Tablespoons concentrated chlorella (algae).* 2 cups flour T Teaspoon salt , 4 Tablespoons shortening. 3/4 cup milk. 3 Teaspoons baking powder
Procedure:
Cream shortening. Add dry ingredients and milk. Roll out in 1/2-inch sheets. Spread with mixture of sugar, cinnamon, and butter. Roll up and slice into pinwheels. Bake at 350 for 10 minutes.
Share cookies with class and discuss growing algae in space as food for people living there. Why is it such a probable source for nutrition? How is it being used now? How does it taste? Have students research the way NASA is using this food source. Futurize a bit on using it in the future in space colonies.
- Chlorella or algae can be obtained from various biological supply houses and some health food stores.
88. CATCHING THE RAYS
SUBJECT:
Science
GRADE:
Sixth
GROUP SIZE:
Large
TIME:
60 minutes
TYPE OF ACTIVITY:
Demonstration
TEACHING STRATEGY:
Expository
CONCEPTS:
Solar Energy
SKILLS:
Observation Recording data Inference Futurizing
Objective: to help students understand that the sun's energy can be used directly; to become aware of various ways the sun's energy might be used in space.
Materials: Guide sheet (See following). Light cardboard. Aluminum foil. Glue. Scissors. Paper punch. Paper fasteners. 2 tin cans. Flat black paint. 2 thermometers. 2 pieces of cardboard for covers.
Teacher Background information:
Almost all our energy comes from the sun - directly or indirectly. As the students get into the futurizing unit, do some experiments with solar energy that help them to see the wide variety of possibilities for solar. Collect articles and pictures showing its use and display them. Talk with them about when solar can be used - furnaces, solar cells, water heaters, cookers, food dehydrators, etc. There is a great deal of information on solar projects available, since it is becoming apparent that we cannot go on using up nonrenewable resources the way we are. This exploration of solar energy has immediate impact for students now on Earth as well as possible uses for the future both on Earth and in space.
There are myriad activities on solar from which to choose. The two following are simple, but should help your students to appreciate the energy that can he put to work here.
Procedure:
Activity I
To show students why solar heaters are often made of black metal, cut the lids off two cans. Paint one flat black and leave the other as is. Cut two pieces of cardboard and punch a hole in each, just large enough for thermometer to go through. Fill both cans with water and record the temperature making sure both cans have water the same temperature. Put the lids on the cans and set both in the sun. Every 5 minutes, check the temperature of each and record which can warms faster? Ask why the students think this happens? Which is absorbing better? How could this be related to using the sun's energy here on Earth? In space?
Activity II
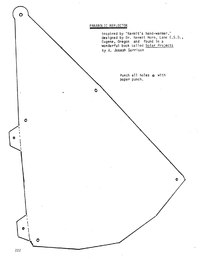
Cut out 8 light cardboard pieces using the guide on the following page. Score optional holding tabs on the ridge fold line. Punch all holes with a paper punch being careful to be exact so they will line up. Cover all eight pieces with aluminum foil and glue in place. (Spray glue works really well.) Smooth out the wrinkles very carefully with a soft cloth.
Starting with two pieces and working in a counter-clockwise direction, hold the two edges together, then insert paper fasteners through the punched holes on the edge. (The round head should be placed on the inside next to the reflective surface.) Continue until the next-to-last piece and cut the tabs off it. This will allow the last piece to be placed on the outside.
After attaching the second to the last piece, place the last piece on the outside of the very first piece and the second to the last one, then insert paper fasteners into the remaining holes. This should lock the entire reflector into an approximate parabolic curve and complete the assembly.
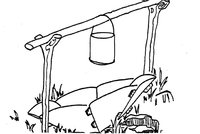
This is a portable parabolic reflector and no base is provided. You might scoop out earth, or balance it against stones or rocks, etc. when you want to use it. You could, of course, build a base for it, if you have the time and are so inclined. The simplest method is to use it as shown in the illustration with the object to be heated attached to a device above the parabolic reflector at the height of the focal point. (The focus is 7 l/l6" from the base. Try heating various items with the "cooker" and record the results.
PARABOLIC REFLECTOR inspired by "Kermit's hand=warmer,"
designed by Dr. Kermit Horn, Lane E.S.D Eugene, Oregon and found in a wonderful book called Solar Projects by A. Joseph Garrison
Punch all holes with paper punch.
89. SPACE INVASION
SUBJECT:
Science
GRADE:
Sixth
GROUP SIZE:
Large
TIME:
2 - 45 minute periods
TYPE OF ACTIVITY:
Student project
TEACHING STRATEGY:
Guided Discovery
CONCEPTS:
Waste Disposal individual's responsibility To community
SKILLS:
Collecting/Recording data Inference Designing project
Objectives: to increase student's awareness of the individual's responsibility to others; to help students see Earth as a unique environment in space.
Materials: Books, pamphlets, magazines on Waste Control and Disposal. Paint. Paper. Garbage cans (school or community). Plastic garbage bag per student. Scale.
Procedure:
Activity I
To help students understand how much garbage individuals dump into the environment and the importance of not polluting space, give students 1 plastic garbage bag and explain that they are to collect all the stuff they would ordinarily throw away over a 2 or 3 day period. Talk with them about it and do some predicting about how much they think they will have in volume and weight. Have them decorate the bags and relate this activity to space. The Earth is a unique space capsule with an environment that needs looking after just as a capsule away from the Earth in space has very specific needs. One of those needs is to keep it from contamination or danger from debris. After the students have collected their garbage, have them each weigh it and record the weight. Have fun!
Who collected the most? How much did the whole class collect? Do some projecting--how much would that mean given the population of the school? Community? State?
U.S.? What sort of stuff was in those bags? What might have been unnecessary--excess wrapping, for example?
How much volume was there? How could volume and weight be reduced? What problems arise with some of the solutions? Noxious gases? Is recycling an alternative?
Why is it so important to deal with this problem both on Earth and in Space? What can be done?
Activity II
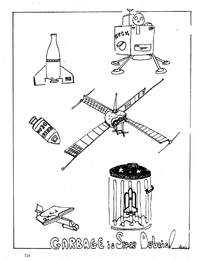
In order to extend the classroom notion of garbage as space debris, have students brain-storm ideas for posters and sayings and turn garbage cans into Space Debris Containers. Have them work out details for a project in school or in the community. Find out how waste is taken care of and what it costs. What kind of restrictions are there in the school or community? What kind of restrictions are there in space?
Extension:
Have students bring in a special piece of garbage (a can, box, bottle, etc.) and turn it into a space object.
90. RECORDING HEART RATE
SUBJECT:
Science
GRADE:
Sixth
GROUP SIZE:
Small
TIME:
60 minutes
TYPE OF ACTIVITY:
investigation TEACHING STRATEGY Guided Discovery
CONCEPTS:
Heart rate Space activity
SKILLS:
Recording data Comparing Graphing Measuring
Objective: to depict the differences in heart rates during various activities; to show
importance of accurate recording before and during space activity.
Materials: Watch with second hand. Worksheet (See following page). Pen or pencil. Ruler
Teacher Background information: This activity is to be used to show the differences in heart rate in students during various Earth activities. No immediate Biomedical conclusions should be made, but extended observations and graphing may be useful in helping to illustrate heart rate averaging and limits in relation to exercise and rest in individuals.
Procedure:
Talk with students about the importance of stamina and good health for astronauts and pilots. Talk about the need to have accurate records before astronauts leave Earth and the need to keep records while they are in space. How is that done? Why is it important?
Show students how to locate pulse or heart beat. Pulse is taken with forefinger held against the inside of the wrist. Have them count the heart beat for 15 seconds and multiply by four. Have them do it with other students and do their own until they have a bit of expertise.
Brainstorm several activities they could do in the classroom or in the hall, on the stairs or on the playground. (Walk vigorously for 3 minutes up and down the hallway; run in place for 3 minutes; step slowly up and down one step for 3 minutes; step vigorously up and down one step for 3 minutes; run for 3 minutes on the playground; use the jungle gym in a specific manner for 3 minutes, etc.)
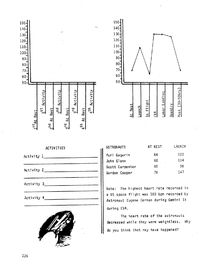
After brainstorming, have students choose 4 activities and write them on the worksheet. Explain that they are to:
- Take an at rest reading and record heart rate on chart with dot;
- Perform lst activity and record heart rate
- Rest 5 minutes and record heart rate;
- Perform 2nd activity and record heart rate, etc. and then connect dots with lines shown on astronaut as chart.
| Astronauts | At rest | At launch |
|---|---|---|
| Yuri Gagarin | 64 | 120 |
| John Glenn | 68 | 114 |
| Scott Carpenter | 65 | 96 |
| Gordon Cooper | 76 | 147 |
Note: the highest heart rate recorded in a US space f1ight was 180 bpm recorded by Astronaut Eugene Cernan during Gemini IX during EVA.
The heart rate of the astronauts decreases while they were weightless. Why do you think that may have happened?
91. PHYSICAL FITNESS IN SPACE
SUBJECT:
Science
GRADE:
Sixth
GROUP SIZE:
Large
TIME:
45 minutes
TYPE OF ACTIVITY:
Simulation
TEACHING STRATEGY:
Guided Discovery
CONCEPTS:
Physical fitness isometrics
SKILLS:
Recording data
Inference
Objective: to become aware of the type of exercise performed by astronauts during space flights.
Materials: Watch with second hand or stop watch. Bicycle inner tube, ZO". Piece of broom handle, 8" long.
Teacher Background Information: Due to limited area in the space cabin, the activities to maintain physical fitness must be designed for cramped accommodations.
Have students do some research on the importance of exercise in space and some of the ways astronauts do maintain an exercise regimen. Discuss how weightlessness affects exercising in space and why the lack of resistance in the weightless condition can lead to muscle and bone deterioration. As the students get ready to futurize on their own colony in space, this aspect of living in space must be attended to along with food, water, oxygen, etc.
Procedure:
Talk with students about isometric exercise. Ask why it is a likely candidate for the kind of exercise astronauts could do on a space ship. Give the students the examples of the isometric exercises listed here.
- Grasp right hand in left hand and pull in opposite directions while hands are held together for 5 seconds, 10 seconds and 20 seconds.
- Grasp left leg at the knee with clasped hands. Pull leg toward chest 12 times. Repeat procedure with right leg.
- Clasp hands behind head. Pull in opposite directions.
- In a seated position, clasp hands under legs. Pull in opposite directions.
Resistance Exercise:
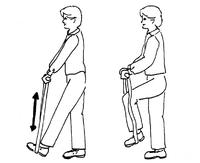
- Loop-hitch the bicycle inner tube around the middle of the wooden handle and tighten securely.
- Count the pulse for a period of EO seconds and record.
- Place one foot in the open end of the loop while holding the handle with both hands,
- Pull the loop against the foot, release, continuing this operation at the rate of one pull per 30 seconds. Change immediately to the other foot and repeat the operation.
- At the end of the second operation, check the pulse again and record. Note the change in pulse rate and muscular feeling.
- Discuss other ways of providing exercise in a small space that will still provide the kind of resistance to work the muscles. Brainstorm some ideas and have the students work out ways of doing them in the classroom. Have them keep records of their heart rate changes before and after doing the exercises.
92. IT'S ALL RELATIVE
SUBJECT: Science
GRADE:
Sixth
GROUP SIZE:
Large
TIME:
45 minutes
TYPE OF ACTIVITY:
Discussion
TEACHING STRATEGY: Expository
CONCEPTS:
Relativity Hyper-speed
SKILLS:
inference Hypothesizing
Objective: to provide students with some basic information on Einstein's General Theory of Relativity as it relates to time and travel; to provide students with basic idea of hyper speed.
Materials: Worksheet (See following pages). Pencils.
Teacher Background information:
Should your students have heard of some of the concepts of Einstein's General Theory of Relativity related to time and travel at the speed of light, they may use "hyperspeed" as a way of dealing with vast distance in space when doing their futurizing. In fact, we do know that travel at the speed of light would cause time to stand still. Practically, however, nothing other than light has ever been measured at the speed of light (l86,000 miles per second and for various reasons it's not very likely that anything like a spaceship will be clocked at any speed close to it).
In reality, a future astronaut will have to be content with traveling at some fraction of the speed of light and no real effect on time will be noticed anyway until the astronaut begins to travel at more than 75% of the speed of light. Astronauts traveling at speeds less than this will just have to get used to aging at about the same rate as those of us left here on Earth. For example, a journey that would take five light years at l0% the speed of light would seem to take 50 years to the observer on Earth and only about three months less to the astronaut who made the trip--hardly anything for actuaries to get worked up about.
Present technology would allow us to travel at perhaps 25 to 30 percent of the speed of light. Even given new technologies, there are still problems to work out. For one thing, as energy is added to an object to accelerate it, its mass increases also in the form of energy to go faster as it goes faster. The end result is, it would take forever to reach the speed of light. Some interesting possibilities exist, however, should we be able to achieve even 95% of the speed of light. Take a look at this:
An astronaut who is 30 years old has a child who is 10. The astronaut leaves for a trip to the "Tronolog" Galaxy about 12 light years away. Allowing for time to accelerate to 95% of the speed of light and to slow down coming back, the trip will seem to take about 30 years to the child left back on earth, so the child will be an adult of 40 at that time. The astronaut parent will have traveled for what seems to be about 10 years making him or her 40 when the ship returns to Earth. Now parent and child are the same age.
- One light year=the distance light would travel in one earth year or 5 849 600,000 miles
Let the students have some fun with this. Though we may never flit around space like Captain Kirk and Spock or make time stand still or time warp into galaxies on the other side of black holes, some fascinating situations could occur even at the fractions of the speed of light we may eventually achieve.
Procedure:
Give each student a copy of the "thanks to Mr. Einstein" sheet and do the first problem with them. Assume for the purposes of the worksheet, that we have solved the problems of space dust sand papering the nose off the spacecraft and any other troublesome aspects of hyperspeed travel. When they have finished with the worksheet, ask them to make up problems for other students to solve.
KEY:
- a.) twelve and a half b.) in the 7th or 8th grade, assuming he/she's typical c.) six and in first grade, probably (5 years x 2.294 = the age of the stay at home + l year because that's what s/he was already when the neighbors left.) The traveling child has aged the 5 space years he/she was gone + the l year before s/he left making the child 6 years old.
- a.) 4 years, 4 months
- the statute of limitations would have run out.
- a.) 72 years and 6 months b.) approximately 7 years c.) the commander was 36 years old.
- If he got on a spaceship for two years at 99% the speed of light, he would be 36 when he returned. His fiance would have aged 14 years during those two years in space and would also be 36 years old. (But probably not real thrilled with his solution.)
- King Tut (l37l BC)
THANKS TO MR. EINSTEIN
we know that
| while one year passes in Space traveling at this percentage of the speed of light |
this many years pass on Earth |
|---|---|
| 90% | 2.294 |
| 95% | 3.202 |
| 99% | 7.089 |
| 99.9% | 22.361 |
| 99.999% | 223.607 |
| 100% | infinite |
Given that information, try the following
l. Two neighboring families each had a child ago. One family leaves on a space trip at 90% t for 5 space years. The second family stays home the child who stayed at home be, when the travel would he be in? How old and in what grade would [
born on the same day one year
he speed of light and is gone Questions: How o1d would
ing family returns? What grade the trave1ing ch11d be? ]
2. If you wanted to beat the record for oldest living person on Earth, you wou1d have to beat Methuse1ah's record of 969 years. How long would it take you at 99.999% the speed of light to break that record?
3. Dapper Dan, an infamous and clever jewel thief, was apprehended by Detective Bullhorn Biodgett in Cleveland. "I've got all the evidence I need to convict you, Biodgett told the thief and he was right. Dapper Dan pretended to give up without a fight, but just as Biodgett was about to put the handcuffs on the culprit, Dan broke loose and escaped to a waiting spaceship he had arranged for in case something like this ever happened. The spaceship was programmed to travel at 99% the speed of light and to be gone for one space year. Why wasn't Dapper Dan worried about being taken into custody when he returned?
4. A pair of identical twins became astronauts. The first twin was made commander of a spaceship that traveled at 99% the speed of light. The other twin was given a position on Earth as a communications expert. When the twins were 30 years old, the first twin left Earth in the spaceship and traveled at 99% the speed of light for 6 space years. How old was the twin on Earth when her sister returned? If she had retired at 65, how long had she been retired? How old was her sister, the spaceship commander?
5. Bill was 34 and Carolyn was 22 when they met, fell in love and decided to get married. When the happy couple told Caro1yn's parents, her father shouted, “Absolutely not! You're much too old for our little Carolyn [
have my permission to marry."
Carolyn cried a lot but Bill was amazingly calm about the whole thing. "Don‘t worry,dear," he said. "I'11 be able to get your father's permission to marry you and you shall never
in two years because we'll both be the same age by then
make such a promise?
6. If E.T. had been traveling at 99.999% the speed of light
t5 space years ago and had visited Egypt, who would he have 'found ru1ing as King of Egypt?
How <;ou`l d he ]
93. PAPER STARSHIPS
SUBJECT:
Science
GRADE:
Sixth
GROUP SIZE:
Individual
TIME:
45 minutes
TYPE OF ACTIVITY:
Modeling
TEACHING STRATEGY:
Guided Discovery
CONCEPTS:
Starship Model Configuration
SKILLS:
Construction Design Futurizing
Objective: to give students opportunity to construct a model of starships as motivation for futurizing activity;
to learn about parts of spacecraft and configuration.
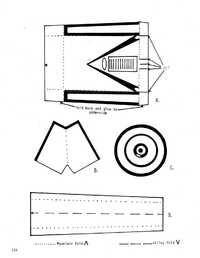
Materials: Glue. Scissors. Paper clips. Coloring pens or crayons. Rulers. Paper. Copy of model to cut out (See following page.)
Procedure:
Talk with students about living in space and what sort of environment people would have to have. Dream a bit. Imagine enormous starships with people living on board, perhaps never having known any other environment. This model is a relatively simple one and the students should be encouraged to imagine it as an enclosed environment with all the physical and emotional needs of those on board looked after. After talking about starships and such, give each student a copy of the model to cut out and glue together. The directions are given but here are a few helpful hints:
- Have students look over the whole set of cut-outs and directions before they start in, so they can get an idea of what the craft will look like. Many children will have NO problem; a few may have some spatial difficulty and will find themselves confused if they cut out the pieces before they've had a chance to visualize it in their minds.
- Practice launching the crafts after they have finished. Don‘t throw the model. Use a forward glide stroke and aim in a horizontal flight path.
- The craft will require one or two paper clips to be attached to the front of the nacelles for ballast.
Test for need.
Extension: Have students design and make their own starship model. Color it, fly it and write a short poem about it. Display starships and poems in room. (they'll look super on a black background)
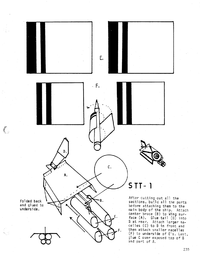
STT-1
After cutting out all the sections, build all the parts before attaching them to the main body of the ship. Attach center brace (B) to wing surface (A). Glue tail (D) into B at rear. Attach larger nacelles (E) to B in front and then attach smaller nacelles (F) to underside of E's. Last, glue C over exposed top of B and part of A.
94. DREAMS YOU DARE TO DREAM...
SUBJECT:
Science
GRADE:
Sixth
GROUP SIZE:
Small
TIME:
2 - 3 weeks
TYPE OF ACTIVITY:
Student investigation
TEACHING STRATEGY:
Open, Discovery
CONCEPTS:
Space Communities
Space Travel Space Fantasies Space stations
SKILLS:
Predicting Collecting and interpreting data Research skills Fantasizing Modeling
Objectives: to help students make predictions about establishing communities in space; to construct a model of a space community.
Teacher Background information: Introduce this unit on futurizing after the students have had the opportunity to do several other aerospace activities and have identified, discussed and researched any problem areas of traveling and living in space. This background should enable them to make some predictions about the future founded on sound principles rather than simply repeating "far out" ideas gleaned from TV or the movies. (It should help them evaluate better the things they see in those movies, as well.)
Encourage the students to dream, however. Talk about the usefulness of taking time to daydream - time absolutely necessary to the creative process. Talk with them about creativity as a process that breaks down mind set and allows us to come up with things here-to-fore unknown. Explain, emphatically, that creativity is a part of all of us - not only the painter and the piano player.
You might like to do some activities on mind set or on habits and discuss how difficult they can be to change. (One of the easiest ways to show that is to bring in homemade bread or biscuits tinted as green as you can get them topped with red or blue butter. What fun to eat after the initial "yuchs" are over.) Talk about how we will have to change as our technology changes, as our resources deplete, as our knowledge of society's physical and emotional needs increases, etc. Talk about the responsibility of making wise decisions based on the best information we have at any given time using our sharpest critical thinking skills; discuss our equal duty to modify our decisions when new "best" information is presented.
It has always been true that we teach best when we teach how to learn - it is getting truer every day as changes come furiously one upon another. This activity is designed to aid in this endeavor
Procedure:
Explain to the students what the theme of the activity is and discuss the rationale for doing it.
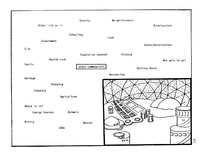
Ask why they think it is important to do this kind of activity. Let them know why you think it is valuable. Decide on the length of the activity and explain that others (decide who they will be) will be coming in to share what the groups have done. Brainstorm with the students as many possible topics related to living in a space community as you can. Give the students time to generate lots of ideas without any judgment or criticism. Don't worry about order or sequence or how bizarre some ideas may be and do not let students do it either. The goal here is to get as many ideas on the blackboard as possible and to evaluate and organize later.
(Included on the following page, is just the beginning of a brainstorming session on the topic. Look it over but do not use it as the beginning and end of the brainstorming session. There is so much more that will come up and your students must have the opportunity to do their own thinking and dreaming.)
Once you and your students have brainstormed all the areas related to living in a space community, have the students form their groups and organize the data in a way that makes sense for them. For example, if one group is going to work on a model of a mining station on the Moon, they may not be concerned with schooling or population control or agriculture but they may be very concerned with transportation or government restrictions. A group that is working on a community of people who have left Earth to find a whole new complex society will have to organize several categories to look into.
After the groups have had sufficient time to order their search, provide library time, books, pamphlets and magazines, construction time, talk time, etc. Set aside time specifically for working on the project over 2 or 3 weeks and encourage interacting with other groups as the activity progresses.
When the projects are finished, have each group present its space community. Give students the opportunity to ask questions and to share what they have learned. Have the students write about the experience or their community in a poem, short story or expression of their choice after the presentations are over.
95. CAREERS IN AVIATION AND AEROSPACE
SUBJECT:
Science
GRADE:
Sixth
GROUP SIZE:
Small.
TIME:
4-45 minute periods
TYPE OF ACTIVITY:
Student Search
TEACHING STRATEGY:
Guided Discovery
CONCEPTS:
Aerospace careers Information Search Personality Type
SKILLS:
Searching Organizing data Categorizing
Objective: to have students gather and share aerospace career information; to encourage learning about oneself in relation to career choices.
Materials: Books, magazines, pamphlets, etc. on aerospace careers. Online sources such as the Occupational Outlook Handbook. "The Party" worksheet (Following) for each student. Names of resource people: counselors librarians, local pilots, airport personnel, aircraft personnel, etc. whom you are aware of.
Procedure:
Begin with general discussion of careers in aerospace. Talk about the need to know:
- what kind of jobs are available
- what education is required
- what kind of work is actually performed on the job
- what type of personality best fits various jobs
- what type of personality individual student has.
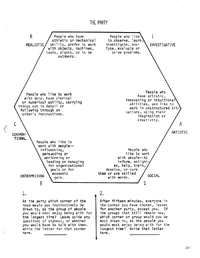
Ask how they think they might go about doing this kind of search. Talk about possibilities like reading, interviewing, writing for information, visiting facilities, for example. Talk about personality inventories as indicators of personality types. Start with the one here. Hand out "The Party" exercise and read through the 6 categories, making sure students understand the vocabulary. Read through the directions to be sure students know what to do and then do the exercise.
After students have finished, have them get together in small groups to brainstorm some possible aerospace jobs that they think fit the various categories. For example: "R" might include engineer or jet engine mechanic; "I" might be physicist or astronaut; "C" could be an airport comptroller or a computer programmer; "A" might be airport architect or interior designer for airport terminals; "E" might be an airport manager or a tax lawyer for an airlines and "S" could be a flight attendant or public relations person. (If you have any difficulty categorizing them, you can look them up in John Holland's book, Making Vocational choices: a theory of careers. You can find copies at the library or order it directly-from Prentice-Hall, Englewood Cliffs, NJ 07632. This party-exercise comes from his work, as well.)
After small groups are done, meet in a large group to get a more expanded list of jobs. Then have the students do some research on aerospace careers and add to their individual list. Meet again in large group and go over the additions. Now, using the results of the exercise as a guide, have students choose a specific occupation to investigate, try for as many different choices as possible and set a time for finished reports. Proceed with search. Written report format:
A. Introduction 1. What I knew before I started or thought I did) 2. Why I chose this occupation to investigate
B. Body 1. The things I read and what I learned .... 2. The people I talked to and what I learned on.. 3. The places I visited and what I learned ...
The body can be organized as above or in chronological order starting with the first thing the student did. Chronological order does allow for getting started on writing the paper before all the investigation is done. It is VERY important that the students know that their feelings about the search and what they found, are also important to the paper. This is not an objective search and they ought not to pretend it is.
The paper should be written in their voice to their fellow students and should avoid what Ken Macrorie calls "Engfish." That's pretentious language or dishonest writing and Macrorie has devised this "I-Search" concept to replace some of the dishonest "research" writing done by school students across the country. The point is, this is their search or, at least, it ought to be and they should have the opportunity to present it honestly.
C. Conclusion 1. A summary of what I learned about aerospace careers and about myself 2. What I still need to find out (if applicable)
Have students share their findings with a brief oral presentation of some important or interesting thing they discovered in their search and make each written report available to other students to read.
R - REALISTIC - People who have athletic or mechanical ability, prefer to work with objects, machines, tools, plants, or to be outdoors.
C - CONVENTIONAL - People who like to work with data, have clerical or numerical ability, carrying things out in detail or following through on other's instructions.
I - INVESTIGATIVE - People who like to observe, learn, investigate, analyse, evaluate or solve problems.
A - ARTISTIC - People who have artistic, innovating or intuitional abilities, and like to work in unstructured situations, using their imagination or creativity.
E - ENTERPRISING - People who like to work with people-- influencing, persuading or performing or leading or managing for organizational goals or for economic gain
S - SOCIAL - People who like to work with people--to inform, enlighten, help, train, develop, or cure them or are skilled with words.
1. At the party which corner of the room would you instinctively be drawn to, as the group of people you would most enjoy being with for the longest time? Leave aside any questions of shyness, or whether you would have to talk with them. Write the letter for that corner here.
2. After fifteen minutes, everyone in the corner you have chosen, leaves for another party, except you. Of the groups that still remain now, which corner or group would you be most drawn to, as the people you would most enjoy being with for the longest time? Write that letter here.
Youth in Aviation
Exploring
Exploring is the young-adult division of the Boy Scouts of America. Explorers are young men and women aged 14 through 20 who join Explorer posts organized by schools, churches, businesses, and community organizations, in cooperation with their local BSA council. These posts specialize in a variety of career and recreational programs designed to provide career service, outdoor, social, citizenship, and fitness activities.
A Special Program - Aviation Exploring is one of the specialty programs within Exploring. It is designed for young men and women interested in pursuing vocations or avocations in aviation, aerospace or related areas. It is designed as a hands-on experience for youth, bringing them into association with adults, facilities and activities related to aviation. Through Aviation Exploring, young people “try on" different careers and lifestyles under informal but expert guidance. Each post designs its own program by matching the interest of its members with the program and resources available. Posts specialize in such fields as flight training, mechanics, flight attendants, airport management, customer relations, ground support, ballooning, soaring, avionics, and more. The purposes of the organization and the BSA are best served when a well-rounded program is planned through service, citizenship, and outdoor activities. This planning provides post members an exciting and worthwhile program leading to personal fitness, citizenship training and character development.
For more information go to their web site at www.aviationexploring.org or contact your local Boy Scout of America Council.
CIVIL AIR PATROL (CAP)
CIVIL AIR PATROL (CAP) develops youth interest in aviation and it helps mold our aerospace leaders of the future. It provides cadet members an opportunity to learn the basics of aerodynamics, navigation, aircraft and rocket propulsion systems, aviation history, and the impact of aviation on society. Equally important are the experiences cadets receive in leadership training, moral leadership sessions, and physical conditioning.
Activities, which range from the local to the international level, are the heart of the program. These activities include first aid and survival training, radio communication, and actual flight in modern aircraft.
Being a CAP cadet is truly exciting. Travel, adventure,study... all are part of the life of a cadet. in the United States each summer CAP cadets may spend a week at an Air Force base, live the life of a regular airman, use the same quarters, food service and recreational facilities as Air Force personnel.. fly orientation flights in Air Force aircraft, study maintenance of engines, radar, radio, and related areas.
International Exchange
CAP’s International Air Cadet Exchange is one of the most sought-after of all the cadet special activities. The exchange involves a three-week trip to one of more than 20 foreign countries. The cadets visit in the homes of host families and thrill to visits to historical shrines of the world.
Scholarships - Civil Air Patrol offers scholarships in engineering, languages, airport management, physics, aeronautics and aerospace medicine. Outright educational grants are also offered. Every cadet may compete for these scholarships. Study grants are available for youth not planning to attend a four-year college or university course.
Cadet Program The CAP aviation education program for youth is now available nationwide and offers a wide variety of flight, academic, career exploratory and other related experiences. Special summer courses, flight encampments, and visits to aviation facilities are made available on a competitive selection basis.
For more information visit www.capmembers.com
