'Microscopes and Their Uses in Biology'
|
Of all the techniques used in biology microscopy is probably the most important. The vast majority of living organisms are too small to be seen in any detail with the human eye, and cells and their organelles can only be seen with the aid of a microscope. Cells were first seen in 1665 by Robert Hooke (who named them after monks' cells in a monastery), and were studied in more detail by Leeuwehoek using a primitive microscope.
Contents
Units of measurement
| metre | m | = 1 m |
| millimetre | mm | = 10-3 m |
| micrometre | μm | = 10-6 m |
| nanometre | nm | = 10-9 m |
| picometre | pm | = 10-12 m |
| angstrom | A0 | = 10-10 m |
Magnification and Resolution
By using more lenses microscopes can magnify by a larger amount, but this doesn't always mean that more detail can be seen. The amount of detail depends on the resolving power of a microscope, which is the smallest separation at which two separate objects can be distinguished (or resolved).
The resolving power of a microscope is ultimately limited by the wavelength of light (400-600nm for visible light). To improve the resolving power a shorter wavelength of light is needed, and sometimes microscopes have blue filters for this purpose (because blue has the shortest wavelength of visible light).
Overall Magnification: is how much bigger a sample appears to be under the microscope than it is in real life.
| |
Resolution is the ability to distinguish between two points on an image i.e. the amount of detail
- The resolution of an image is limited by the wavelength of radiation used to view the sample.
- This is because when objects in the specimen are much smaller than the wavelength of the radiation being used, they do not interrupt the waves, and so are not detected.
- The wavelength of light is much larger than the wavelength of electrons, so the resolution of the light microscope is a lot lower.
- Using a microscope with a more powerful magnification will not increase this resolution any further. It will increase the size of the image, but objects closer than 200nm will still only be seen as one point.
Different kinds of Microscopes:
Light Microscopy:
This is the oldest, simplest and most widely-used form of microscopy. Specimens are illuminated with light, which is focussed using glass lenses and viewed using the eye or photographic film. Specimens can be living or dead, but often need to be stained with a coloured dye to make them visible. Many different stains are available that stain specific parts of the cell such as DNA, lipids, cytoskeleton, etc. All light microscopes today are compound microscopes, which means they use several lenses to obtain high magnification. Light microscopy has a resolution of about 200 nm, which is good enough to see cells, but not the details of cell organelles. There has been a recent resurgence in the use of light microscopy, partly due to technical improvements, which have dramatically improved the resolution far beyond the theoretical limit. For example fluorescence microscopy has a resolution of about 10 nm, while interference microscopy has a resolution of about 1 nm.
Components of a light microscope
All modern optical microscopes designed for viewing samples by transmitted light share the same basic components of the light path, listed here in the order the light travels through them:
- Light source, a light or a mirror (7)
- Diaphragm and Condenser lens (8)
- Objective (3)
- Ocular lens (eyepiece) (1)
In addition the vast majority of microscopes have the same 'structural' components:
- Objective turret (to hold multiple objective lenses) (2)
- Stage (to hold the sample) (9)
- Focus wheel to move the stage (4 - coarse adjustment, 5 - fine adjustment)
These entries are numbered according to the image on the right.
Preparation of Slide Samples
- Fixation: Chemicals preserve material in a life like condition. Does not distort the specimen.
- Dehydration: Water removed from the specimen using ethanol. Particularly important for electron microscopy because water molecules deflect the electron beam which blurs the image.
- Embedding: Supports the tissue in wax or resin so that it can be cut into thin sections.Sectioning Produces very thin slices for mounting. Sections are cut with a microtome or an ulramicrotome to make them either a few micrometres (light microscopy) or nanometres(electron microscopy) thick.
- Staining: Most biological material is transparent and needs staining to increase the contrast between different structures. Different stains are used for different types of tissues. Methylene blue is often used for animal cells, while iodine in KI solution is used for plant tissues.
- Mounting: Mounting on a slide protects the material so that it is suitable for viewing over a long period.
Practical investigation into size and scale of microscopic tissues
This practical focuses on microscope technique and using graticules and stage micrometers to determine size and scale in biological cells and tissues.
learners should be able to:
|
Safety Information There are no particular hazards in this practical, however you must follow your laboratory rules.
Background information • The measurement of specimen size with a microscope, is made by using an eyepiece graticule. This is a glass or plastic disc with 8 divisions etched onto its surface, which is inserted into the eyepiece lens. • The size of the eyepiece graticule remains constant, despite the fact that the image viewed will change its size depending upon whether high- or low-power objective lenses are used. For example a cell viewed with the x40 objective will appear much larger than when viewed with the x10 objective. However because the graticule is in the eyepiece it will not change its size. Therefore the value of each of the divisions in the eyepiece graticule varies with the magnification of the objective lens.
• A stage micrometer is a very accurately etched glass or plastic ruler that is placed on the microscope stage so that the eyepiece graticule scale is superimposed on the stage micrometer scale. The scale is usually 1mm divided into 100 separate divisions so that each division equals 10 micrometres (10μm).
• It is necessary to calibrate the eyepiece graticule with the stage micrometer placed on the microscope stage for each objective lens used.
You will observe a TS of plant tissues through a microscope and use an eyepiece graticule and a stage micrometer to determine the size of some of the structures.Plant tissues
• Read the information above.
• Ensure that you understand the principles of using an eyepiece graticule and a stage micrometer before you continue with the investigation.
Method
Preparation
1. You have been provided with a compound light microscope with both low and high-power objective lenses and an eyepiece lens that has been fitted with a graticule. You have also been provided with a stage micrometer.
2. You must now calibrate the eyepiece graticule. Place the stage micrometer onto the microscope stage and focus using the low-power objective lens so that the graticule scale becomes superimposed over the stage micrometer scale.
3. Move the stage micrometer until the start or zero line of each scale is coincident (lined up)
4. Look along the scale until another coincident point is found.
5. The relationship between the two scales can now be calculated On the scale shown there are 17 divisions on the stage micrometer scale that line up with 7 divisions on the graticule scale. Thus 17 / 7 = 2.42857 units. Each unit on the stage micrometer scale is 10 micrometres (10μm). Therefore each division on the graticule scale is 24.2857 micrometres rounded to 24.3 μm.
6. Use the procedure described above to determine the size of each division on the eyepiece graticule using the low-power objective lens of your microscope.
7. Repeat the procedure to determine the size of each division when using the high-power objective lens.
Making observations
1. You are provided with a stained transverse section through part of a dicotyledonous plant root.
2. Examine the specimen using the low-power of your microscope.
3. Make a large, plan drawing to show the distribution of tissues, labelling the stele (vascular bundle).
4. Use the eyepiece graticule to measure the width of the vascular bundle at its widest point in graticule units and then calculate the actual width of the vascular bundle in millimetres and in micrometres.
5. Draw a straight line on your drawing across the vascular bundle to show where you took your measurement. Write the dimension on your drawing next to the line.
6. Make a high-power drawing to show a group of four xylem vessels from inside the vascular bundle.
7. Use the eyepiece graticule to measure the width of the xylem vessel at its widest point in graticule units and then calculate the actual width of the vessel in micrometres, remembering to use the appropriate calibration of the eyepiece graticule for the high-power objective lens.
8. Draw a straight line on your drawing across the xylem vessel to show where you took your measurement. Write the dimension on your drawing next to the line.
9. Look at your two measurements and check on their accuracy. The actual size of the xylem vessel should be smaller than the size of the vascular bundle even though it looked larger using the high power objective lens.
10. You are now going to determine the magnification of your drawing of the xylem vessels. Use a ruler to measure the length of the line that you drew across the xylem vessel. Use your knowledge of the actual size of the vessel to calculate the magnification of your drawing. Write your answer x at the bottom right hand corner of your drawing.
|
• Compare your results with other members of the class and check for consistency of readings.
|
Electron Microscopy
This uses a beam of electrons, rather than electromagnetic radiation, to "illuminate" the specimen. This may seem strange, but electrons behave like waves and can easily be produced (using a hot wire), focused (using electromagnets) and detected (using a phosphor screen or photographic film). A beam of electrons has an effective wavelength of less than 1 nm, so can be used to resolve small sub-cellular ultrastructure. The development of the electron microscope in the 1930s revolutionised biology, allowing organelles such as mitochondria, ER and membranes to be seen in detail for the first time.
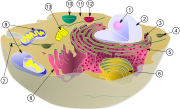
[1]Nucleolus [2]Nucleus (3) Ribosomes (little dots) (4) vesicle (5) rough endoplasmic reticulum (ER) (6) Golgi apparatus (7) Cytoskeleton (8) smooth endoplasmic reticulum (ER) (9) mitochondria (10) vacuole (11) cytosol (not cytoplasm as that includes all the organelles) (12) lysosome (13) centrioles within centrosome
The main problem with the electron microscope is that specimens must be fixed in plastic and viewed in a vacuum, and must therefore be dead. Other problems are that the specimens can be damaged by the electron beam and they must be stained with an electron-dense chemical (usually heavy metals like osmium, lead or gold). Initially there was a problem of artefacts (i.e. observed structures that were due to the preparation process and were not real), but improvements in technique have eliminated most of these.
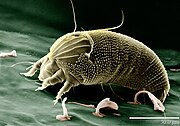
There are two kinds of electron microscope. The transmission electron microscope (TEM) works much like a light microscope, transmitting a beam of electrons through a thin specimen and then focusing the electrons to form an image on a screen or on film. This is the most common form of electron microscope and has the best resolution. The scanning electron microscope (SEM) scans a fine beam of electron onto a specimen and collects the electrons scattered by the surface. This has poorer resolution, but gives excellent 3-dimentional images of surfaces.
| |
|
|---|---|
* Pass a beam of electrons through the specimen. The electrons that pass through the specimen are detected on a fluorescent screen on which the image is displayed.
|
* Pass a beam of electrons over the surface of the specimen in the form of a ‘scanning’ beam.
|
Comparison of the light and electron microscope
| |
|
| |
|
| |
|
| |
|
| |
|
| |
|
| |
|
| |
|
| |
|
| |
|
| |
they must be stained with an electron-dense chemical (usually heavy metals like osmium, lead or gold). |
practice questions
3.Name the main steps involved in the preparation of a specimen to be viewed with an electron microscope 4.state the advantages and disadvantages of an electron microscope |


