Templates for project and community nodes
| Obsolete WikiEducator Rich Text Editor Tutorials (this editor is no longer in use) | ||
|---|---|---|
| Navigation templates | ||
| Tutorial 11 | Introduction | Creating a template | Templates for project and community nodes | Templates for structured content | Main page headings and usability | Optimising for print | Summary & FAQs | |
Contents
Introduction
Using templates that help with the layout of your navigation can be confusing at first, but this tutorial will help in demystifying navigation templates.
WikiEducator uses a smart approach for implementing our navigation templates by separating the content dimensions from the presentation (layout) dimensions. WE have a template which does all the work in automating the layout of the navigation which means that you don't need to bother with any HTML. However, this template needs the text, names of pages and their respective links (i.e. content) in order to display the navigation properly. So the template you will be creating in this section will provide the content information required by the second template to render the layout on the page. It may sound complicated but it works -- you'll see! By way of example, for those interested in the technical side:
- The Template:L4CNav contains the content inputs required for the layout of the navigation template, and
- The layout configuration is managed by a presentation template called Template:ProjectNav. (This is the layout template you will reference when creating navigation templates for your content pages.)
Take the time to work through each of the steps in this tutorial and pretty soon you will understand how this works. You will be rewarded by acquiring the the skills to use one of Mediawiki's most powerful features!
The first step is to visualise what your template will look like when it is published. The image below illustrates the sub-elements of a navigation template for a project or community node in WikiEducator.
Take a look at the layout and sub-elements of the project navigation template shown above and jot down the following information:
|
You can create your own project navigation template for a project node using the special features of Template:ProjectNav:
- Step 1: Create a new template page for your project. Choose a descriptive name for your template, for instance "Mauritian_teachers_nav" for a navigation template that will be used on the node page for the Mauritian Teachers Community.
- Step 2: Manually enter the name of the template into the URL bar of your browser after the http://www.wikieducator.org/ part, then hit enter. In our example you would enter http://www.wikieducator.org/template:Mauritian_teachers_nav (Refer to the previous section on creating a template);
- Step 3: Copy the following text into the template page you created in Step 2 above;
{{ProjectNav

|image   =

|title   =

|tagline =

|pages   =

}}
- Step 4: Click on the save button to create the template page;
- Step 5: Fill in the variables for image, title, tagline, and pages using the instructions provided on the ProjectNav template page. The template supports standard wiki text including page links.
- Step 6: Click on the save button.
- Step 7: Insert the template on every page where you want the navigation template to appear. In this example you would insert {{Mauritian_teachers_nav}} to call the template on any page where you intend to use the navigation.
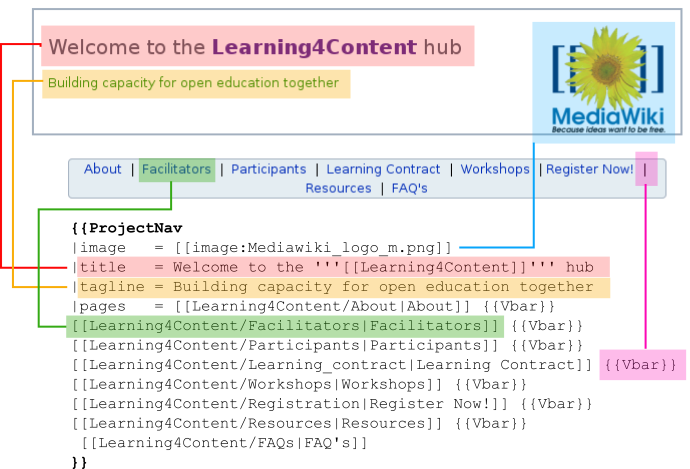
Take a look at the variables used to create this L4CNav template by going to the page and clicking on the view source tab. The image below illustrates the relationship between the variables in the template and the actual display.
The following syntax was used to create the L4CNav template illustrated above:
{{ProjectNav

|image   = [[image:Mediawiki_logo_m.png]]

|title   = Welcome to the '''[[Learning4Content]]''' hub

|tagline = Building capacity for open education together

|pages   = [[Learning4Content/About|About]] {{Vbar}}

[[Learning4Content/Facilitators|Facilitators]] {{Vbar}}

[[Learning4Content/Participants|Participants]] {{Vbar}}

[[Learning4Content/Learning_contract|Learning Contract]] {{Vbar}}

[[Learning4Content/Workshops|Workshops]] {{Vbar}}

[[Learning4Content/Registration|Register Now!]] {{Vbar}}

[[Learning4Content/Resources|Resources]] {{Vbar}}

[[Learning4Content/FAQs|FAQ's]]

}}
- You must use the {{Vbar}} syntax to insert the vertical bars ("|") between page links in the navigation template, otherwise the template will not work.
- You can use the standard wiki syntax for page links and images.
- The variables (i.e. image, title, tagline etc.) are optional. You can leave these blank if you like.
- Make sure that there are no line or page breaks between the individual pages -- this will break the navigation template.
- If you make a mistake -- don't worry this is a wiki and mistakes are easily fixed.


