Water Around and Around Again
| Instant wiki maker | Making handouts | Editing tips |
Contents
- 1 Water Around and Around Again
- 1.1 Student worthiness
- 1.2 Primary biological content area covered
- 1.3 Materials
- 1.4 Handouts
- 1.5 Description of activity
- 1.6 Lesson plan
- 1.7 Potential pitfalls
- 1.8 Literature connections
- 1.9 Survival connections
- 1.10 Connections to educational standards
- 1.11 Demo Photos
- 1.12 Reflections
- 1.13 Next steps
- 1.14 Citations and links

Biology In Elementary Schools is a Saint Michael's College student project from a course that ran between 2007 and 2010 and fully described in this book chapter. The student-created resources have been preserved here for posterity. Link under 'toolbox' for printer-friendly versions of the exercises. Click on handouts to print full resolution versions. Please see Wikieducator's disclaimer, our safety statement, and the Creative Commons licensing in English and in legalese.
Water Around and Around Again
Student worthiness
Tried and trusted.
Primary biological content area covered
Students will:
- understand the water cycle.
- be able to pose a hypothesis.
Materials
Materials the teacher will need:
- large plastic table cloth
Materials each student group will need:
- soil
- water
- 8 x 4 inch plastic container
- small paper cups
- plastic wrap
- popsicle sticks
- rubber bands
- permanent markers
- adhesive tape
Handouts
Students will be given Figure 1 to record their hypotheses and observations.

Description of activity
Students will explore the water cycle by creating a miniature environment in a large plastic container. Students will make two different set-ups that will yield similar yet different results. Half of the student groups will place the small paper cup, half-filled with water, into the large container and then put soil in the rest of the container, making mountains, hills, and valleys to simulate the earth. The other half of the student groups will place two cups, both filled halfway with water, into the container and then put soil on the bottom of the container. All groups will then place plastic wrap over their containers, sealing the plastic on with rubber bands. Groups with one paper cup in their container will place four pennies on top of the plastic in the center of the container. All containers will be placed in the window or near a heater. Students will observe this several times daily to see the water condense onto the plastic wrap and then see it drop back down into the environment. Students will see that the water is conserved and is used over and over again by the environment. They will also see the difference that the pennies cause in the accumulation of water into the cup.
Lesson plan
The focus of this lesson plan is to help students understand how the water cycle works by creating their own environment. Begin by briefly explaining how the water cycle works and what components make up the water cycle. Drawing a simple diagram of the water cycle on the board or having a handout for the students will aid their comprehension of this topic greatly (5 minutes).
Next, each large student group will be broken up into two smaller sub-groups. The students in the first group will take a Dixie cup half-filled with water and place it in a container to simulate a pond or lake. Students should mark the level of the water with a permanent marker on the cups. They will then put soil into the container and build small mountains and hills to look like land. They will then place plastic wrap over the container and seal it tightly using a rubber band. Students will then place four pennies on top of the plastic wrap in the center of the container. The students in the second group will place two half-filled paper cups into the large container, marking the water level, and do the same process with the soil and plastic wrap. However, they will not place pennies on top of the plastic wrap (15 minutes).
Students will then use the handout (Figure 1) to record their hypotheses and predictions. You should encourage students to use the terminology that they learned about the water cycle in making their predictions and hypotheses (5 minutes).
Students will then place their containers next to a window or heater and observe it several times a day so they can see the condensation on the plastic wrap and then can see it drop back down into the soil and cup, thus demonstrating how the water cycle works.
Students will spend any remaining time cleaning up materials and work area.
Potential pitfalls
Preparing the project with third graders may get messy with the soil and water possibly spilling. We recommend spreading a large plastic table cloth over the workspace so the remaining soil and water can be disposed of outside, or in a compost bucket. Also, if there are any tears in the plastic wrap that is placed over the containers, then the experiment will not work.
Literature connections
- Waldman, Neil. 2003. The Snowflake: A Water Cycle Story. Division of Lerners Publishing Group.
- This is a great book to read to students after doing the experiment to explain to them the concept of precipitation and emphasize that snow goes through the same cycle because it is essentially water. Students will naturally only think of rain when they think of the water cycle, but they need to associate snow, sleet, and dew with the water cycle as well.
- Godwin, Sam. 2004. The Drop Goes Plop. Picture Window Books.
- This book could be read to students in the beginning of the lesson when introducing the water cycle to them.
- Gore, Al. 2006. An Inconvenient Truth. Viking.
Survival connections
A great connection to make with this science activity is a survival one. After students have observed that there is more water in the cup with the pennies on it than it started with, explain to students that this is a great way to collect clean water in nature. Explain to students that you cannot simply drink the water you find in a river, but if you dig a hole in the soil, place a container in it, and then cover it with some sort of plastic, then the clean, condensed water from the soil will end up dripping into the cup. Be sure to explain to students that this is one of the only ways to get clean drinking water in nature without using chemicals or a purifier. Ask students what simple supplies they should always bring with them on an outdoor trip to be able to obtain drinking water in this way.
Connections to educational standards
Vermont Science Standards
- 7.1: Students use scientific methods to describe, investigate, explain phenomena, and raise questions in order to generate alternative explanations--hypotheses--based on observations and prior knowledge. This is evident when students:
- use reliable information obtained from scientific knowledge, observation, and exploration.
- 7.15: Students demonstrate understanding of the earth and its environment, the solar system, and the universe in terms of the systems that characterize them, the forces that affect and shape them over time, and the theories that currently explain their evolution. This is evident when students:
- identify and record patterns and forces that shape the earth (atmospheric, etc.).
- analyze and explain natural resource management (water, soil, etc.).
Demo Photos
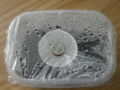
Figure 2. One Cup
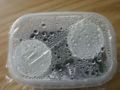
Figure 3. Two Cups
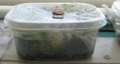
Figure 4. Because we used compost from our greenhouse rather than new potting soil, several plants grew in our containers.


Reflections
I thought that this activity went incredibly well with the third graders. The students said that they had never learned about the water cycle, but they grasped the concept very quickly. I think it helped that we used words like lake, water, and rain along with the more technical terms like evaporation and transpiration. The students liked the activity because it was hands-on and by the end of the time we were there, they could start to see water drops accumulating on the plastic wrap. Some students struggled with the introduction of the lesson when we were explaining the water cycle, but eventually they understood what was going to happen. Pointing and modeling were very helpful strategies to use with the students. I think that this activity is a good one because it is something that students can observe over a few days, with different results each time, especially if the teacher taps the container to imitate raining. I thought that this experiment was a great way for the children to actually see the water cycle because so often they see water evaporate from a cup, but they hardly ever see the water fall back down to where it began.
I was very impressed with how well this activity went. The students were able to understand the concept and really seemed to enjoy themselves. I liked that it was hands-on and that the students were able to form a hypothesis and make predictions about what they thought was going to happen. I think it was also a good idea that we had the students create two different environments, so that way they could compare theirs with their classmates and track the change over time. I was surprised and pleased that clean up went as well as it did. I would suggest putting down a plastic cover to future teachers because it makes clean up so much easier!
Our experiment went really successfully. The third graders at Barnes seemed to enjoy all the activities and listened well. Each and every student was very well behaved and you could tell everyone was learning. The students will also continue to observe and learn because they got to keep their containers. It was their first introduction to hypothesis testing and they will be able to support or reject them. There isn't anything I would change about Water Around and Around Again because it went so well and the children had fun with it and most importantly learned something new.
The actual teaching of our activity was extremely successful. Not only was the activity hands on, but they were able to incorporate the scientific method, as requested by the teacher. The simple materials used in the activity seemed to attract the attention of the students because they were excited to get their hands in the dirt. In addition, working with the scientific method provided a successful experience working with the students to form and answer their own questions. We were able to guide their learning, while at the same time, step back and allowing them to fill in their own ideas. Ultimately I think the students would have benefited from working in larger groups because they would have been able to share their hypotheses with each other. However, the students seemed to enjoy the activity and were excited to see immediate results with their mini-environments. The activity was simple and the students can leave their environments assembled for as long as their teacher wants to observe them, which can lead to water measurements and graph making. Therefore, there was nothing that I would change about the activity except for the student-teacher ratio.
Next steps
Once a lot of condensation has built up on the plastic wrap, the teacher can tap on the plastic wrap of each container to imitate raining. Make the connection between the water on the plastic wrap and the clouds in the sky. The observation of the water falling back down will help students complete the water cycle in their mind, having observed one full cycle at this point.
This activity can be a great introduction to the Cloud Creations activity as well.
Citations and links
This idea was adapted from: http://www.eduref.org/cgi-bin/printlessons.cgi/Virtual/Lessons/Science/Meteorology/MET0024.html.
This is a great diagram of the water cycle to help students understand what happens to the water: http://www.dnr.state.wi.us/org/caer/ce/eek/earth/groundwater/watercycle.htm.
Here is a great link to a very student-friendly version of the scientific method: http://www.wikieducator.org/Image:Scientific_method.png